

Your print queue is stuck, or you simply upgraded to a newer model, and now you need to know how to remove a printer from your computer effectively. Leaving old devices installed often causes driver conflicts, printing errors, and system confusion when selecting your active hardware.
This guide details the exact steps to clear print jobs, uninstall the device, delete lingering drivers, and remove network ports. Follow this process to ensure your Windows 10 system runs smoothly without leftover software causing issues.
Locate Your Printer in Devices and Printers
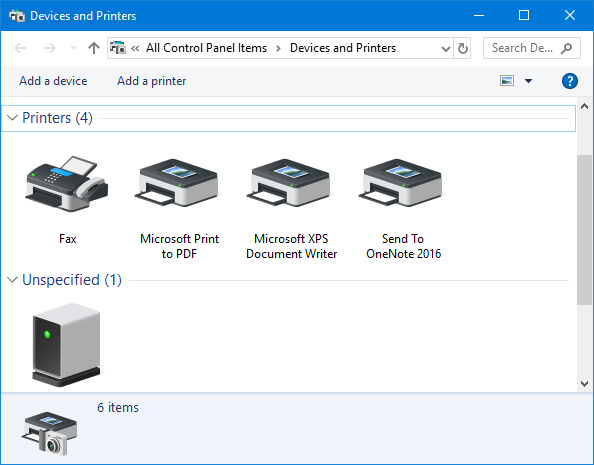
You must access the correct management interface to begin the removal process. Windows groups all imaging hardware in a specific control panel section that requires administrative access.
Open the Devices Interface via Search
Press the Windows key on your keyboard or click the Start button. Type “printers” into the search bar and select Devices and Printers from the results. This action opens the legacy control panel view where you can manage all connected peripherals.
Wait for the window to load all icons completely. If your printer is networked, ensure your internet connection is active so the device status displays correctly.
Clear All Active Print Jobs First
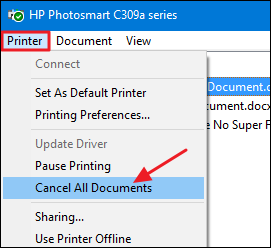
Attempting to remove a printer while documents are waiting in the queue often causes the system to freeze. You must clear these jobs to stop the print spooler service from locking the device.
Cancel Pending Documents in the Queue
Double-click the icon of the printer you wish to remove. If the window shows files waiting, click the Printer menu in the top-left corner. Select Cancel All Documents from the dropdown list and confirm by clicking Yes.
Warning: If jobs remain stuck after cancellation, the printer may be offline. Restart the Print Spooler service in Windows Services to force the queue to clear.
Close the queue window once the list is empty. Your system is now ready for safe device removal.
Uninstall the Printer Device Instance
With no active jobs blocking the process, you can delete the printer entry from your system registry. This step removes the visible icon but leaves the driver software intact.
Execute the Remove Device Command
Right-click the printer icon within the Devices and Printers window. Choose Remove device from the context menu that appears. Click Yes when the confirmation dialog asks if you want to proceed.
Windows will delete the device entry immediately. You will no longer see this printer listed when you try to print a document.
Note: This action only removes the device instance. The underlying driver files remain on your hard drive and can cause automatic reinstallation.
Delete Associated Printer Drivers Manually

Leftover drivers are the primary cause of printer reappearing issues. You must manually purge these files to prevent Windows from automatically reinstalling the hardware.
Access Print Server Properties
Click any remaining printer icon in the window to activate the top menu ribbon. Select Print server properties from the toolbar. Alternatively, press Windows + R, type printui /s, and hit Enter to open the properties directly.
Remove Driver Packages Completely
Navigate to the Drivers tab in the new window. Locate the driver for your removed printer in the list and select it. Click the Remove button to open the removal options.
Choose Remove driver and driver packages from the dialog box. Click OK, then confirm by clicking Yes, Delete, and OK again.
Why this matters: Selecting only “Remove driver” leaves supporting files behind. Choosing “Remove driver and driver packages” ensures a clean slate for future installations.
Clean Up TCP/IP Network Ports
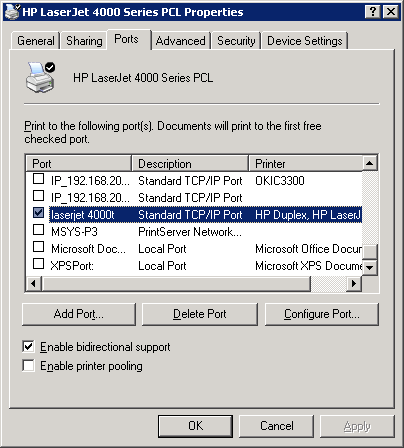
Networked printers create specific communication ports that often remain after uninstallation. These orphaned ports can confuse new printer setups or cause connection errors.
Identify Unused Network Ports
Stay in the Print Server Properties window and switch to the Ports tab. Review the list for entries matching your old printer model or its IP address, such as IP_192.168.1.100.
These entries represent the specific network pathways your computer used to communicate with the device.
Delete Obsolete Port Entries
Highlight the specific TCP/IP port associated with your old printer. Click the Delete Port button and confirm the deletion when prompted. Click OK to save changes and close the window.
Pro Tip: Never delete standard system ports like
USB001orFILEPORT. Only remove ports explicitly named after your removed device or its IP address.
Removing these entries prevents accidental selection during future printing tasks and reduces system clutter.
Verify Complete Printer Removal
Double-check your work to ensure no residual components remain that could cause conflicts later. A thorough verification saves time troubleshooting future printing issues.
Confirm Absence in Device Lists
Return to the main Devices and Printers window. Scan the list to ensure your printer icon is gone. If it reappears instantly, Windows may be re-adding it via network discovery features.
Disable automatic management by going to Settings > Devices > Printers & scanners and turning off “Let Windows manage my default printer.”
Check for Leftover Companion Software
Many manufacturers install extra utilities like HP Smart or Epson Connect. To remove these:
- Press
Windows + Ito open Settings. - Navigate to Apps > Installed apps.
- Search for software related to your printer brand.
- Click the three dots next to the app and select Uninstall.
Follow the on-screen prompts to finish removing all related software.
Troubleshoot Stubborn Printer Entries
Some printers resist removal or reappear automatically due to network settings. Understanding why this happens helps you stop the cycle.
Why Does My Printer Keep Coming Back?
Network discovery services often detect printers on your local subnet and reinstall them automatically. To stop this:
- Disable network discovery in Control Panel under Advanced sharing settings.
- Block the printer’s IP address at your router level if the device is decommissioned.
Fix “Device in Use” Errors
If Windows states the printer is being used, ensure no applications have it selected. Close Word, PDF readers, or image editors that might hold a lock on the device.
Restart the Print Spooler service to release any hidden locks:
- Press
Windows + R, typeservices.msc, and press Enter. - Find Print Spooler, right-click it, and choose Restart.
- Attempt the removal process again.
Prevent Future Printer Clutter
Maintain a clean system by adopting habits that prevent unnecessary device accumulation. Regular maintenance keeps your printing environment efficient.
Audit Installed Devices Regularly
Check your Devices and Printers list every few months. Remove any test printers or old hardware you no longer use to keep the list manageable.
Disable Automatic Driver Installation
Stop Windows from silently downloading and installing drivers for detected hardware:
- Go to Settings > Devices > Printers & scanners.
- Click Advanced printer settings.
- Toggle off Let Windows manage my default printer.
- In Print Server Properties, check driver isolation settings to limit automatic downloads.
This gives you full control over which devices enter your system.
Frequently Asked Questions About Removing Printers
Can I remove a printer without restarting my computer?
Yes, you can remove a printer and its drivers without restarting. However, if the print spooler service is stuck, a restart may be necessary to clear locked files completely.
What happens if I do not remove the printer drivers?
Leaving drivers installed can cause Windows to automatically reinstall the printer when it detects it on the network. It may also lead to conflicts when installing a new printer from the same manufacturer.
How do I remove a printer that keeps reappearing?
Disable network discovery in your Control Panel settings. You may also need to block the printer’s IP address on your router to stop your computer from detecting it on the local network.
Does removing the device delete the driver software?
No, removing the device icon only deletes the instance. You must manually go to Print Server Properties and select “Remove driver and driver packages” to delete the actual software files.
Can I remove a printer if it shows as offline?
Yes, you can remove an offline printer. However, you must ensure no print jobs are stuck in the queue. If jobs are stuck, restart the Print Spooler service before attempting removal.
Key Takeaways for Removing Your Printer Successfully
Knowing how to remove a printer from your computer involves more than just deleting the icon. You must clear the print queue, uninstall the device, delete the driver packages, and remove any unused TCP/IP ports to prevent future conflicts.
Skipping the driver or port cleanup often leads to automatic reinstallation or system errors. Follow these comprehensive steps to keep your Windows 10 environment clean and ensure your new printers install without issues.


