

You’ve seen the stunningly detailed miniatures, intricate jewelry prototypes, and lifelike dental models, and many of them come from resin 3D printing. But how do resin 3D printers work, exactly? Unlike their filament-based cousins, resin printers use light to transform liquid into solid, layer by layer, with precision measured in microns. This process, known as vat photopolymerization, is both fascinating and surprisingly accessible.
At its core, a resin 3D printer uses a light source to cure (harden) photosensitive liquid resin. The build platform descends (or ascends, depending on the model) as each new layer forms, creating smooth, high-resolution prints ideal for engineering, dentistry, and hobbyist projects alike. If you’re curious about the science behind the magic, or considering buying your first resin printer, this guide breaks down every key component and step involved.
By the end, you’ll understand not just how these machines operate, but also why they deliver such exceptional detail, what types exist, and what makes them different from FDM (Fused Deposition Modeling) printers.
Core Technology: Vat Photopolymerization
Resin 3D printing relies on a process called vat photopolymerization, where liquid resin hardens when exposed to specific wavelengths of light. This chemical reaction is the foundation of all resin-based printing.
Light Triggers Molecular Change
When photons from the printer’s light source hit the resin, they initiate a process called polymerization. Monomers and oligomers in the liquid link together into long polymer chains, turning the material from a pourable liquid into a rigid solid. The reaction only occurs where light touches the resin, allowing precise control over shape and structure.
This curing happens one thin layer at a time, typically between 25 to 100 microns thick (0.025–0.1 mm), enabling smooth surfaces and fine features impossible with most filament printers.
Resin Types Affect Performance
Not all resins behave the same. Common formulations include:
- Standard Resin: General-purpose, good for visual models
- Tough/Durable Resin: Mimics ABS-like strength and flexibility
- Flexible Resin: Produces rubber-like parts
- Castable Resin: Burns out cleanly for jewelry making
- Dental and Biocompatible Resins: Used in medical applications
Each type responds differently to light exposure and requires specific print settings.
Main Components of a Resin Printer

Every resin 3D printer contains several critical parts that work in sync to produce accurate prints.
Build Platform (Print Bed)
The build platform is where your model takes shape. It starts just above or below the resin surface and moves incrementally during printing. In most setups, it lowers into the resin vat (bottom-up) with each new layer.
Proper leveling, called Z-offset calibration, ensures the first layer adheres correctly without sticking too hard to the vat.
Resin Vat (Tank)
The resin vat holds the liquid photopolymer. It has a transparent bottom (usually FEP film or glass) that allows light to pass through while containing the sticky liquid.
Over time, the FEP film can degrade due to heat and UV exposure, leading to failed prints. Regular inspection and replacement are essential for consistent results.
Light Source: LCD vs. Laser
Two main technologies power resin curing.
LCD (Masked Stereolithography)
- Uses an LCD screen to project entire layers at once
- Fast printing for full builds
- Cost-effective for consumers
- Screen lifespan limited by UV exposure
Commonly called MSLA printers (Masked Stereolithography Apparatus).
Laser (Stereolithography – SLA)
- A focused laser beam traces each layer point by point
- Higher precision in some cases
- Slower than LCD for large prints
- Typically found in professional systems
While both cure resin effectively, LCD printers dominate the consumer market due to speed and affordability.
Step-by-Step Printing Process
Now that you know the parts, let’s walk through how a resin 3D printer actually builds a part.
1. Preparing the 3D Model
Before printing, you must prepare your digital file using slicing software like Chitubox, Lychee, or Formlabs PreForm.
Key steps include:
- Importing the STL or OBJ file
- Rotating and positioning the model for minimal supports
- Adding supports (tiny structures that hold overhangs)
- Generating slicing layers based on layer height
Supports are crucial. They prevent warping and detachment during printing.
2. Filling the Vat with Resin
Pour the chosen resin into the vat until it covers the build area. Avoid overfilling, which can cause spills during printing.
Always wear nitrile gloves and work in a well-ventilated space. Uncured resin is toxic and skin-irritating.
3. Starting the First Layer
The build platform lowers so the first layer sits just above the vat window. The LCD screen or laser then shines through the resin, curing only the cross-section of the model.
Adhesion to the build plate is critical here. If the first layer fails, the whole print fails.
4. Layer-by-Layer Build Cycle
After each layer cures, the build platform peels away from the vat (in bottom-up printers), creating a vacuum effect. Then, the platform rises slightly, allowing fresh resin to flow under the part before the next layer is exposed.
This cycle repeats hundreds or thousands of times, depending on the model height.
Typical print speeds:
- LCD: 1–3 seconds per layer
- Laser: 5–15 seconds per layer
- Total print time: 30 minutes to several hours
Post-Processing: Essential After Printing
A freshly printed part isn’t ready to use. It requires post-processing to become stable and safe.
Removing the Print
Once complete, remove the build plate and carefully peel the model off using a spatula. Then, cut away support structures with flush cutters.
Washing Away Uncured Resin
Uncured resin remains sticky and hazardous. You must wash the print in isopropyl alcohol (IPA) or a dedicated cleaning solution.
Options include:
- Manual washing: Soak and gently agitate in IPA
- Automated wash stations: Rotate or ultrasonically clean prints
Washing typically takes 5–10 minutes per side.
Final Cure Under UV Light
Even after washing, the resin remains slightly soft. A final UV cure solidifies the entire part.
Use a UV curing station or sunlight (less reliable). Cure times vary:
- Small parts: 5–10 minutes
- Large or dense parts: Up to 30 minutes
Over-curing can cause brittleness or warping, so follow resin manufacturer guidelines.
Advantages Over FDM Printers
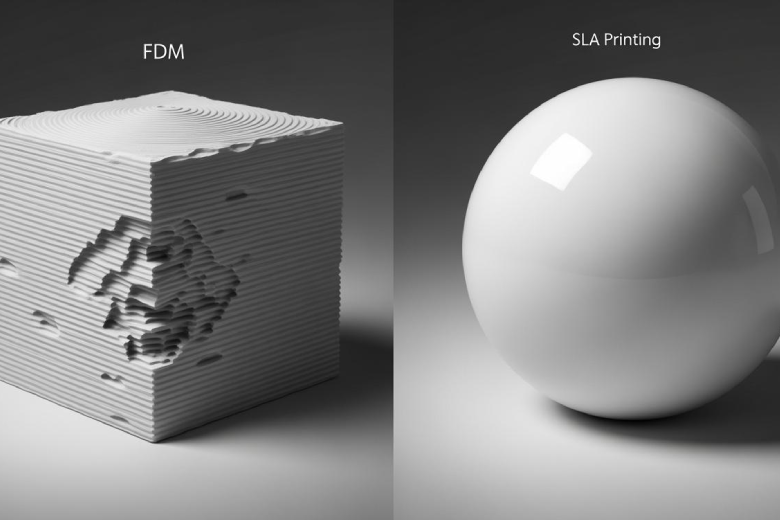
Resin 3D printers offer unique benefits compared to traditional filament-based (FDM) models.
Superior Surface Finish
Resin prints have smooth surfaces and sharp edges, with minimal layer lines. They are ideal for detailed figurines, molds, and prototypes requiring fine textures.
High Dimensional Accuracy
With layer heights as low as 25 microns, resin printers achieve tighter tolerances than most FDM machines (typically 100–300 microns). This makes them perfect for engineering fits, dental aligners, and miniature components.
Better for Complex Geometries
Intricate internal structures, thin walls, and organic shapes print reliably with resin, especially when supported properly.
Common Issues and Fixes
Even experienced users face challenges with resin printing. Here are frequent problems and how to solve them.
Print Won’t Stick to Build Plate
Causes: Poor leveling, dirty plate, incorrect exposure
Fixes:
- Re-level the build platform
- Clean the plate with IPA
- Adjust exposure time in slicer
- Ensure Z-offset is correct
Layer Separation or Delamination
Causes: Insufficient exposure, overheating, poor support
Fixes:
- Increase light exposure time
- Check for overheated resin (let it cool)
- Optimize support placement and density
Resin Sticking to the Vat
Causes: Worn FEP film, incorrect peel settings, over-curing
Fixes:
- Replace the FEP sheet
- Adjust peel speed (slower helps)
- Reduce exposure time to prevent over-curing
Warping or Curling
Causes: Excessive adhesion, stress during peeling
Fixes:
- Use anti-warping supports or rafts
- Ensure proper orientation
- Maintain room temperature
Safety and Maintenance Tips
Resin printing is powerful, but demands caution and care.
Always Wear Protective Gear
- Nitrile gloves (latex doesn’t block resin)
- Safety goggles
- Respirator or mask in poorly ventilated areas
Never handle uncured resin bare-handed.
Keep Your Workspace Clean
Spilled resin hardens under light and becomes difficult to remove. Use paper towels and IPA immediately for cleanup.
Cover resin bottles and vats when not in use. UV light degrades unused material.
Maintain Printer Components
- Wipe the LCD screen gently with a microfiber cloth
- Clean the vat window after each print
- Replace FEP film every 1–3 months depending on use
- Store resin bottles upright and away from sunlight
Choosing the Right Resin Printer
With so many options, consider these factors before buying.
Budget and Use Case
- Entry-level (under $300): Elegoo Mars, Anycubic Photon
- Mid-range ($300–$700): Longer lifespan, better resolution
- Professional (over $1,000): Larger build volume, advanced features
Hobbyists often start with budget LCD models.
Build Volume Matters
Larger build areas let you print bigger parts or batch multiple small ones. But larger vats mean more resin usage and higher costs.
Resolution and Layer Height
Look for XY resolution (pixel size) and adjustable layer height. Smaller pixels mean finer details.
Example:
- 2K screen: ~50 micron XY resolution
- 4K screen: ~35 micron XY resolution
Higher resolution improves detail but may slow printing.
Future of Resin 3D Printing
Innovation continues to improve speed, safety, and usability.
Faster Printing Technologies
New methods like Continuous Liquid Interface Production (CLIP) eliminate layer-by-layer pauses, dramatically reducing print times.
Water-Washable Resins
Eco-friendly resins that clean with water, not IPA, are gaining popularity, reducing chemical exposure and cost.
Improved Materials
Developers are creating tougher, heat-resistant, and biodegradable resins, expanding industrial applications.
Frequently Asked Questions About Resin 3D Printers
What is the main difference between resin and FDM 3D printers?
Resin printers use light to cure liquid photopolymer, producing higher detail and smoother surfaces. FDM printers extrude melted filament, which is faster but less precise.
How long does a typical resin print take?
Most resin prints take between 30 minutes and several hours, depending on model size, layer height, and printer type.
Is resin 3D printing safe for home use?
Yes, but it requires proper ventilation, nitrile gloves, and careful handling of uncured resin, which is toxic and irritates skin.
Can you reuse uncured resin from the vat?
Yes, you can filter and store unused resin in a sealed bottle away from sunlight. It can be reused for future prints.
What causes resin prints to fail most often?
The most common causes include poor first-layer adhesion, incorrect exposure settings, worn FEP film, and inadequate support structures.
Final Thoughts on Resin 3D Printing
Resin 3D printers work by using light to cure liquid photopolymer one ultra-thin layer at a time, producing highly detailed, accurate parts unmatched by most other desktop technologies. From the initial slice to final UV cure, each step plays a role in transforming digital designs into physical reality.
Whether you’re a hobbyist, designer, or engineer, understanding how resin 3D printers work empowers you to get the most out of this powerful tool, safely and effectively. With proper setup, maintenance, and post-processing, you can consistently produce professional-grade results right from your desk.
Your next step: choose a beginner-friendly LCD model, download a free slicer like Chitubox, and run a test print using standard resin. You’ll quickly see why this technology has become a favorite among makers worldwide.


