

You have likely seen videos where a machine magically creates a complex toy or tool from nothing. This process is not magic but a precise engineering method called additive manufacturing that builds physical items one thin slice at a time.
This guide explains exactly how does a 3d printer work by breaking down the digital design, material melting, and layering steps you need to know. You will learn about the specific technologies, common materials, and practical limitations of turning a digital file into a real object.
The Additive Manufacturing Principle Explained

Traditional manufacturing often cuts away material from a solid block to create a shape. Additive manufacturing works in reverse by adding material only where needed to form an object.
This method allows for complex internal structures and geometries that drilling or milling cannot achieve. It reduces waste significantly since you only use the material required for the final part.
Why Layering Creates Complex Shapes
The printer stacks hundreds of ultra-thin layers on top of each other to build height. Each layer acts as a cross-section of the final design, typically ranging from 0.1 mm to 0.3 mm thick.
Think of it like building a loaf of bread where every slice has a specific shape. As the printer adds each slice, it fuses it to the one below to create a solid unit.
Comparing Additive and Subtractive Methods
Subtractive methods like CNC machining remove material from a stock piece, creating significant waste. Additive methods deposit material precisely, making them ideal for custom parts and prototypes.
| Method | Process | Best Use Case |
|---|---|---|
| Additive | Adds material layer by layer | Prototypes and complex designs |
| Subtractive | Removes material from stock | High-precision metal parts |
| Formative | Presses material into molds | Mass production of identical items |
Converting Digital Models Into G-Code Instructions
Before any plastic melts, you must create a digital 3D model using CAD software like Fusion 360 or Blender. The file must be watertight with no gaps so the printer understands the inside from the outside.
Common file formats include .STL or .3MF, which represent the surface geometry of your object.
Slicing Software Generates Printer Commands
You cannot send a 3D model directly to the printer without processing it first. Slicing software like Cura or PrusaSlicer cuts the digital model into horizontal layers.
This software generates G-code, a language telling the printer exactly where to move, how hot to get, and when to extrude material. You can adjust settings like layer height and infill density during this stage.
Setting Critical Print Parameters
Your slicing settings determine the strength and appearance of the final part. Thinner layers create smoother surfaces but take longer to print.
- Layer Height: Controls resolution and print time.
- Infill Density: Sets internal structure percentage, often 15% for functional parts.
- Support Structures: Adds temporary scaffolding for overhangs steeper than 45 degrees.
FDM Technology: Melting and Extruding Thermoplastics
Fused Deposition Modeling (FDM) is the most common technology found in homes and schools. It works by feeding a solid plastic filament into a heated nozzle to melt it.
The machine then deposits the molten plastic in precise patterns to build the object layer by layer.
Feeding Filament Through the Hot End
A stepper motor pushes 1.75 mm diameter filament from a spool into the printer head. The material travels through a tube to the hot end, where heaters raise the temperature between 200°C and 250°C.
Once melted, the plastic is forced through a tiny nozzle, usually 0.4 mm wide, ready for deposition.
Moving the Nozzle Across Three Axes
The printer moves the nozzle or build plate along three specific axes to place material accurately.
* X-Axis: Moves left to right.
* Y-Axis: Moves front to back.
* Z-Axis: Moves up and down to advance layers.
As the nozzle traces the path, it prints the outer perimeter first for structure, then fills the inside with an infill pattern.
Alternative Technologies Like SLA and SLS

While FDM uses plastic thread, other technologies use liquids or powders to create parts. These methods offer different benefits regarding detail and material strength.
Curing Liquid Resin With UV Light
Stereolithography (SLA) uses a vat of liquid photopolymer resin instead of solid filament. A UV laser or projector selectively hardens the liquid into solid plastic layer by layer.
This process produces extremely smooth surfaces and fine details perfect for jewelry or dental models. However, the parts can be brittle and require washing and UV curing after printing.
Fusing Powder With Lasers
Selective Laser Sintering (SLS) uses a high-powered laser to fuse fine nylon powder particles together. The unused powder surrounding the part acts as natural support, eliminating the need for separate support structures.
This method creates durable, functional parts ideal for industrial applications like ducts or gears.
Understanding Material Options for Printing
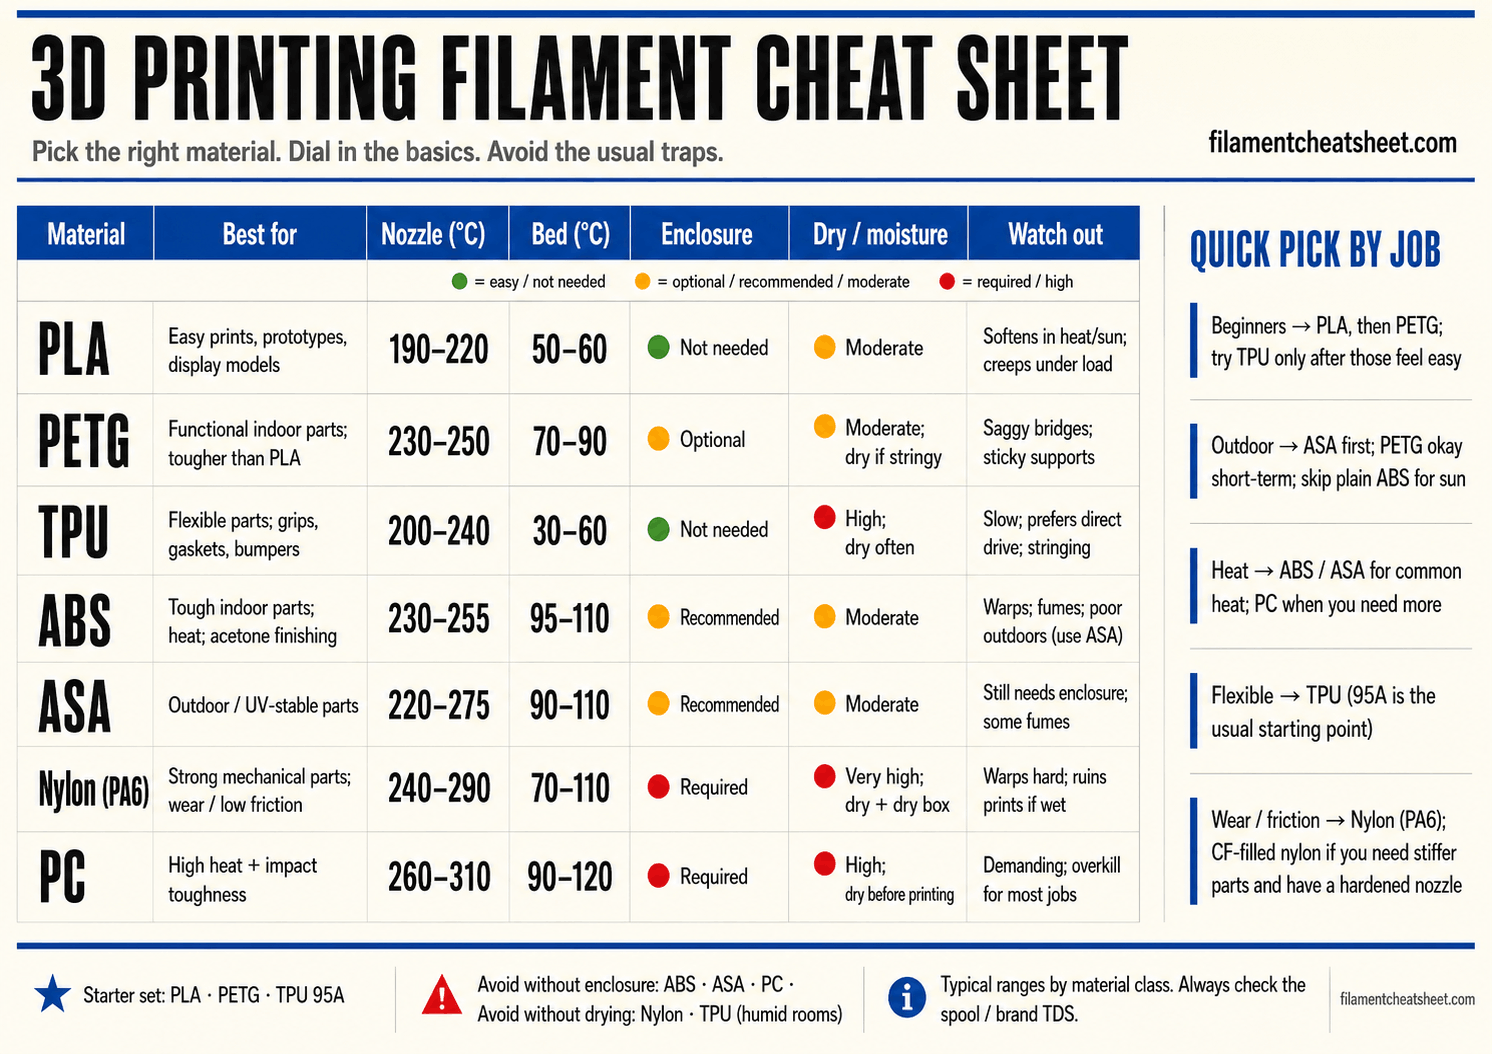
The material you choose dictates the strength, flexibility, and heat resistance of your print. Different technologies require specific material forms like filaments, resins, or powders.
Common Thermoplastic Filaments
FDM printers use spools of thermoplastic that melt when heated. Each type has unique properties suited for different tasks.
- PLA: Easy to print, biodegradable, and great for beginners.
- ABS: Durable and heat-resistant but requires ventilation due to fumes.
- Nylon: Tough and flexible, used for industrial components.
- TPU: Rubber-like and highly flexible for phone cases.
Resins and Metal Powders
SLA printers use liquid resins that range from standard formulas to tough, engineering-grade options. Industrial machines may use metal powders like titanium or stainless steel.
These metal parts are printed via Powder Bed Fusion and often require sintering in a furnace to reach full density and strength.
Multi-Material Printing and Color Switching
Advanced systems allow you to print with multiple colors or materials in a single job. Devices like the Bambu Lab AMS can hold several filament spools at once.
The printer automatically cuts the current filament, retracts it, and loads a new color when needed.
Automating Filament Changes
The machine moves to a purge station to clear old material before switching colors. This process enables gradients, logos, and parts with both rigid and flexible sections.
Be aware that each color change creates some waste material and adds time to the total print duration.
Ensuring Material Compatibility
Not all materials work well together when switching mid-print. You should generally swap between materials with similar melting temperatures to avoid clogs.
Using dry, high-quality filament prevents jams during these automatic changes.
Post-Processing Steps for Finished Parts
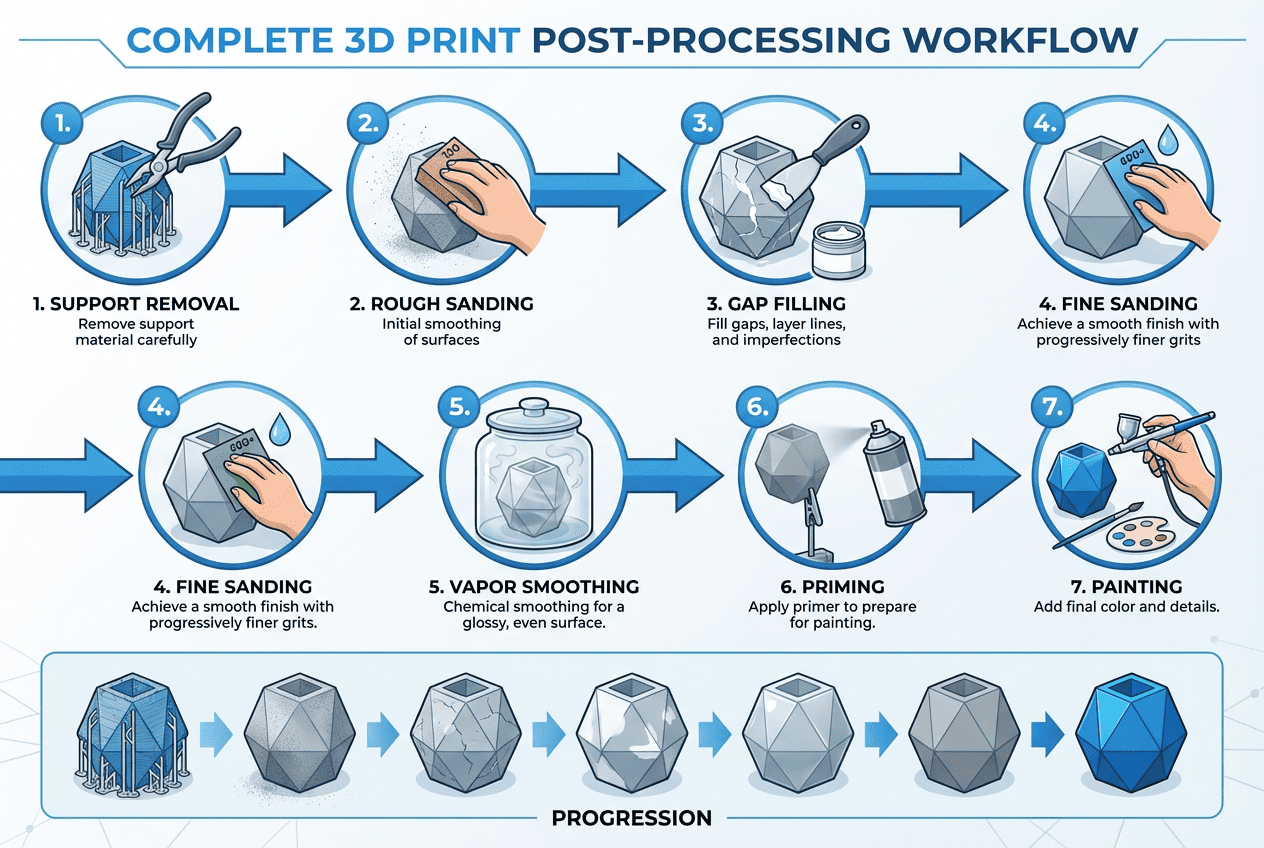
Your print is rarely ready to use the moment it finishes. Post-processing improves appearance, strength, and functionality.
Removing Supports and Smoothing Surfaces
Support structures hold up overhangs but must be removed carefully. You can break them off mechanically or dissolve them in water if using soluble materials.
Sanding with progressively finer grit removes visible layer lines. For ABS prints, chemical vapor smoothing can create a glossy, injection-molded look.
Enhancing Strength and Durability
Resin prints need exposure to UV light to fully cure and reach maximum strength. You can also anneal thermoplastic parts with heat to improve thermal resistance.
Adding metal inserts or threads allows for stronger screw connections in functional assemblies.
Real-World Applications Across Industries
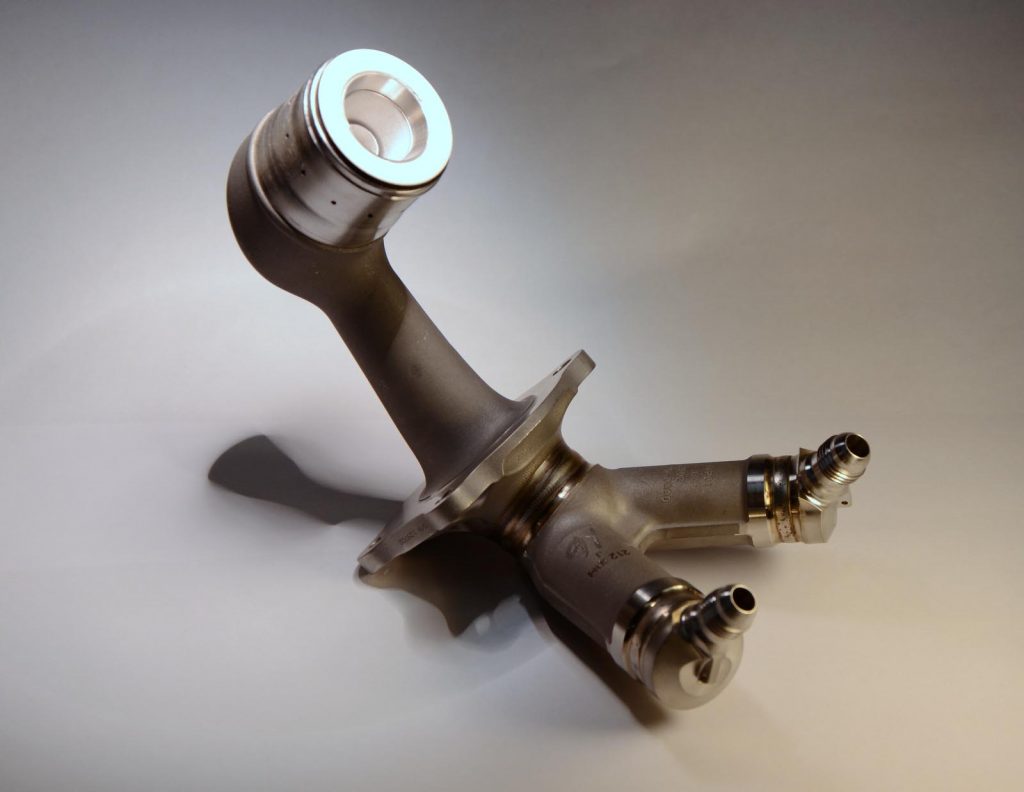
3D printing has moved beyond hobbies into critical roles in medicine, aerospace, and construction. The ability to customize parts quickly drives adoption in these fields.
Medical Prosthetics and Implants
Surgeons use patient-specific guides and implants tailored to individual anatomy. Custom prosthetic limbs can be printed for a fraction of traditional costs, helping children who outgrow them quickly.
Over 20 types of FDA-approved implants now utilize this technology for better bone integration.
Aerospace Components and Automotive Tools
Jet engines use printed fuel nozzles that combine multiple parts into one lightweight unit. Car manufacturers print custom jigs and brackets to speed up assembly lines.
Topology optimization allows engineers to create parts that are strong yet use minimal material.
Limitations Including Anisotropic Strength
Despite its versatility, the technology has physical constraints you must consider. Parts are not always as strong in every direction.
Weakness Along the Z-Axis
Printed objects are anisotropic, meaning they are weaker between layers than within them. Stress applied perpendicular to the layers can cause failure more easily than stress applied parallel.
Optimizing part orientation during slicing helps mitigate this weakness for load-bearing applications.
Geometric and Speed Constraints
Overhangs greater than 45 degrees usually require support material. Large bridges may sag without proper cooling or support structures.
Additionally, printing is slow compared to injection molding, making it less suitable for mass-producing thousands of identical units.
Deciding Between Buying a Printer or Using Services
You must weigh your volume needs and budget before investing in hardware. Buying makes sense if you print frequently, while services suit occasional or industrial needs.
When to Purchase Your Own Machine
Buy a printer if you plan to create 10 to 25 parts per week. Entry-level machines offer great value for hobbyists who want control over their workflow.
- Entry-Level: Affordable and easy to use for beginners.
- Mid-Range: Faster speeds and better reliability for frequent users.
- High-End: Industrial features for professional engineering tasks.
When to Use a Printing Service
Use a service if you need fewer than 10 prints a month or require exotic materials like metal. Online services provide instant quotes and handle all maintenance for you.
This option eliminates upfront costs and gives access to technologies you cannot afford to buy.
Frequently Asked Questions About 3D Printing Mechanics
How long does it take to 3D print an object?
Print times vary from minutes to days depending on size, layer height, and infill density. Small simple items may take an hour, while large complex models can run for over 24 hours.
Can 3D printers print in full color?
Yes, some advanced material jetting and binder jetting printers can produce full-color models. Standard FDM printers usually require filament swapping to achieve multi-color results.
Is 3D printing safe to do at home?
It is generally safe if you follow precautions like ventilating the room and avoiding touching hot parts. Some materials emit fumes, so using an enclosure or air filter is recommended for ABS or resin printing.
What is the strongest material for 3D printing?
Metal powders like titanium and steel offer the highest strength for industrial applications. Among thermoplastics, carbon-fiber reinforced nylon provides exceptional durability and stiffness.
Can I 3D print food or organic materials?
Yes, specialized printers can extrude chocolate, sugar, dough, and even meat alternatives. Research is also ongoing into bioprinting tissues using biological inks for medical use.
Key Takeaways for Understanding How 3D Printers Work
You now know that how does a 3d printer work depends on converting digital models into physical layers through heat, light, or binding agents. The process involves careful slicing, precise motion control, and selecting the right material for your specific needs.
Whether you choose FDM for versatility or SLA for detail, understanding these mechanics helps you design better parts and avoid common failures. Start by experimenting with simple designs to see additive manufacturing in action.


