

You’ve hit Ctrl + P to print an important report, only to watch the job disappear to the wrong printer. Maybe it went to an old office model, a neighbor’s shared device, or a printer you’ve never touched. This common frustration happens when your default printer isn’t set correctly. The good news: fixing it takes under a minute.
The default printer is the device Windows automatically selects whenever you print without choosing one manually. Windows often uses a setting called “Let Windows manage my default printer,” which picks the last printer you used. While convenient, this feature can cause confusion, especially if you move between locations. You can take full control and assign any installed printer as your permanent go-to device.
In this guide, you’ll learn how to disable automatic management, set a specific printer as default, and troubleshoot common issues like missing options or unexpected changes. Whether you’re on Windows 11, Windows 10, or an older system, you’ll get exact steps tailored to your version.
Disable Windows Automatic Printer Management
Before you can manually lock in your default printer, you must turn off Windows’ auto-select feature. If left on, Windows will override your choice and revert to the last-used printer every time.
Turn Off Auto-Select in Windows 11
- Press Windows + Q, type “printers,” then select Printers & scanners
- Scroll down to Printer preferences
- Toggle off “Let Windows manage my default printer” using the slider
Once disabled, the system stops changing your default automatically, giving you full control.
Turn Off Auto-Select in Windows 10
- Press Windows + Q, type “printers,” then open Printers & scanners
- Under Printer preferences, uncheck “Let Windows manage my default printer”
This checkbox is essential. Leaving it checked means your manual selection may not stick.
Set a Default Printer Through Windows Settings
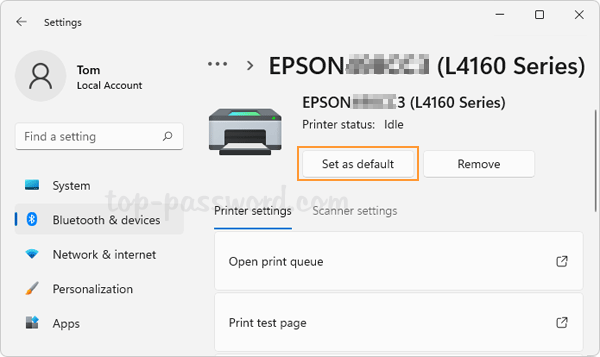
After disabling automatic management, you can assign your preferred printer as the default using the modern Settings app.
Choose and Confirm Your Default Device
- Go to Start > Settings > Devices > Printers & scanners
- Find the printer you want to use from the list
- Click Manage under that printer
- Select Set as default
The Printer status field will change from blank to Default, confirming the update was successful.
Pro Tip: If your printer isn’t listed, install it first. Click “Add a printer or scanner” at the top of the Printers & scanners page to detect nearby devices.
Verify the Change Took Effect
To confirm everything works:
- Open any document or web page
- Press Ctrl + P to open the print dialog
- Check that your selected printer appears by default
If it does, you’ve successfully locked in your choice.
Use Control Panel to Set Default Printer
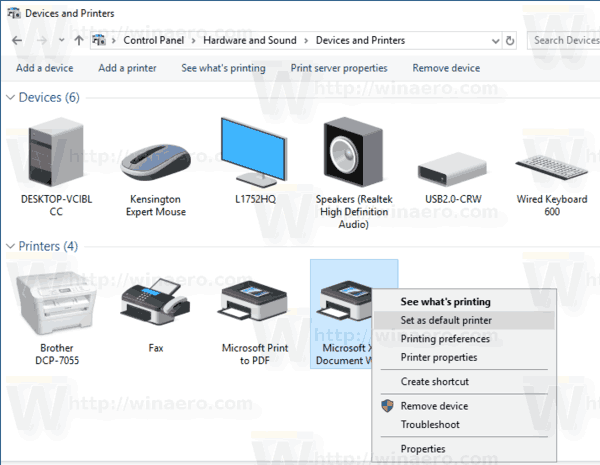
For users who prefer the classic interface, or those on older systems, the Control Panel offers a fast alternative.
Set Default in Windows 10 Control Panel
- Click Start, then open Control Panel
- Select Devices and Printers
- Locate your desired printer in the list
- Right-click its icon
- Choose Set as default printer
This method bypasses the Settings app entirely and works reliably even if the modern interface has glitches.
Set Default in Windows Vista or XP
- Click Start > Control Panel > Hardware and Sound
- Click Printers (labeled “Printer” in some XP editions)
- Right-click the target printer
- Select Set as Default Printer
- Look for a check mark next to the printer name to confirm it’s now the default
Note: Interface elements vary slightly between Vista and XP, but the right-click menu stays consistent across both versions.
Fix a Missing “Set as Default” Button
Sometimes the Set as default button doesn’t appear in the printer management window. This issue has a single common cause.
Why the Button Disappears
- Primary Cause: “Let Windows manage my default printer” is still turned on
- Result: Windows blocks manual changes to prevent conflicts
How to Restore the Button
- Return to Settings > Devices > Printers & scanners
- Ensure “Let Windows manage my default printer” is off
- Go back and click Manage on your printer
- The Set as default button should now be visible
If the button still doesn’t appear, restart your PC and try again. A quick refresh often resolves interface glitches.
Troubleshoot Unexpected Default Printer Changes
Have you set a default printer only to find it changed days later? This issue commonly affects laptop users moving between home, office, and remote locations.
Why the Default Changes Automatically
- Location-based switching: On mobile devices, Windows detects network and printer availability as you move
- Auto-management enabled: With “Let Windows manage my default printer” on, the system updates the default based on recent usage at your current location
Stop Unwanted Default Changes
Option 1: Disable Automatic Management
– Turn off “Let Windows manage my default printer”
– Manually set your preferred printer once
Option 2: Accept Dynamic Behavior
– Leave auto-management on if you frequently switch environments
– Always double-check the printer before sending sensitive jobs
Expert Note: For business travelers or hybrid workers, disabling auto-management ensures consistency and prevents printing errors.
Manage Multiple Installed Printers
Many users have several printers installed, including home inkjets, office lasers, photo printers, or PDF converters. Only one can be the default at a time.
Understand How Printer Priorities Work
- The default printer receives all jobs unless you manually choose another
- Non-default printers require selection during the print dialog
- For example, if your Canon SELPHY photo printer isn’t set as default, print jobs may go to your office laser instead
Prevent Wrong Printer Selection
- Regularly audit your installed printers
- Remove outdated or unused devices:
– In Printers & scanners, select the old printer
– Click Remove device - Reassign the correct default after cleanup
Warning: Shared or network printers may reappear after removal if they’re discovered on the network. This is normal Windows behavior.
Fix a Printer That Doesn’t Appear in Settings
If your printer doesn’t show up in the Printers & scanners list, you can’t set it as default until it’s recognized.
Why a Printer Goes Missing
- Not properly connected via USB or Wi-Fi
- Driver not installed on your system
- Offline or out of range for wireless models
Steps to Resolve the Issue
- Ensure the printer is powered on and connected
- For USB: Plug the cable directly into your PC
- For Wi-Fi: Confirm both printer and PC are on the same network
- In Printers & scanners, click Add a printer or scanner
- Wait for detection, then follow the setup prompts
Once installed, return to the settings and designate it as your default.
Use Microsoft PC Assist for Quick Setup
Don’t want to navigate through menus? Microsoft offers a helper app that automates the process.
Set Default Printer with PC Assist
- Download and install the Microsoft PC Assist app from the Microsoft Store
- Open the app and search for “printer”
- Select Set up default printer
- Follow the guided steps
This tool simplifies the process and works well for less technical users or quick fixes.
Maintain Correct Default Settings Long-Term
Setting the default printer once isn’t always enough. Here’s how to keep it working consistently.
Prevent Accidental Reverts
- Avoid toggling “Let Windows manage my default printer” back on
- Educate other users on shared PCs about default printer behavior
- Periodically verify the correct printer is still set as default
Best Practices for Multi-Printer Setups
| Scenario | Recommended Action |
|---|---|
| Single home printer | Disable auto-management, set manually |
| Office with shared printers | Disable auto, set most-used device |
| Frequent traveler | Consider leaving auto on for convenience |
| Photo printing (e.g., Canon SELPHY) | Always set manually to avoid misprints |
Quick Reference: Steps by Windows Version
| Action | Windows 11 | Windows 10 | Vista/XP |
|---|---|---|---|
| Open printer settings | Win+Q → Printers & scanners | Win+Q → Printers & scanners | Control Panel → Hardware and Sound → Printer |
| Disable auto-default | Toggle off slider | Uncheck box | N/A |
| Set default | Select printer → Manage → Set as default | Same as Win 11 | Right-click → Set as Default Printer |
| Confirm success | “Default” label appears | “Default” label appears | Check mark appears |
| Fastest method | Settings app | Control Panel or Settings | Control Panel |
Frequently Asked Questions About Changing Default Printer
Why does Windows keep changing my default printer?
This happens when “Let Windows manage my default printer” is enabled. Windows automatically selects the last printer you used, and on mobile devices, it may switch based on your physical location. Disable the feature and set your default manually to lock it in.
Where is the “Set as default” button in Windows 11?
Go to Settings > Devices > Printers & scanners, click Manage under your chosen printer, then select Set as default. If the button is missing, turn off “Let Windows manage my default printer” first.
Can I set a default printer in Windows 10 without using Settings?
Yes. Open Control Panel > Devices and Printers, right-click your desired printer, and choose Set as default printer. This method works even if the Settings app has issues.
How do I change the default printer in Windows Vista?
Navigate to Start > Control Panel > Hardware and Sound > Printers, right-click your target printer, and select Set as Default Printer. A check mark next to the printer confirms the change.
What happens if my printer isn’t listed in the settings?
Your printer may not be installed or connected properly. Check that it’s powered on, connected via USB or Wi-Fi, and on the same network. Then use Add a printer or scanner to detect and install it.
Should I leave “Let Windows manage my default printer” on or off?
Turn it off if you want a consistent default printer. Leave it on if you frequently switch between locations or printers and prefer Windows to handle selection automatically.
Key Takeaways for Changing Your Default Printer
Changing your default printer is a simple but powerful way to avoid printing mistakes and save time. The most important step across all Windows versions is disabling “Let Windows manage my default printer” before making your manual selection. Once disabled, your chosen printer will stay default until you change it again.
For laptop and mobile users, consider whether automatic management helps or hinders your workflow. If you’re still on Windows 10, remember that support ended on October 14, 2025. Upgrading to Windows 11 ensures continued security updates and improved printer management features.
Take two minutes right now to set your default printer correctly, and you’ll never waste paper printing to the wrong device again.


