

You’ve held a miniature with impossibly fine details, examined a dental model that fits like a glove, or admired a prototype so smooth it looks injection-molded. These objects didn’t come from melted plastic filament. They came from a resin printer, a machine that uses light to transform liquid into solid with stunning precision. But how does a resin printer work in practice?
The process is called photopolymerization, and it powers three main technologies: SLA, DLP, and LCD. Each one uses ultraviolet light to cure liquid resin layer by layer, but the delivery method differs. By the end of this guide, you’ll understand the science, the differences between each technology, and the steps that turn a digital model into a finished print.
The Core Principle Behind Resin Printing
At its foundation, every resin printer relies on a simple chemical reaction. When photosensitive liquid resin is exposed to ultraviolet (UV) light, its molecules link together and harden. Printers use this reaction to cure only the areas that should become part of your object, leaving the surrounding resin untouched.
In most desktop printers, the build happens upside down. The build platform sits above a resin tank, and each cured layer forms on the underside of the platform, sticking to the previous one. As the build progresses, the platform rises, pulling the object out of the vat one thin layer at a time.
Why Resin Printing Delivers Superior Detail
Resin printing produces noticeably smoother surfaces and finer features than FDM printing. Where FDM leaves visible layer lines from extruded plastic, resin cures in layers as thin as 10–50 microns. This makes resin the go-to choice for jewelry, dental work, miniatures, and any application where precision matters.
SLA Printing: Laser-Based Precision
Stereolithography, or SLA, was the first 3D printing technology ever developed. Invented by Charles Hull in the 1980s, it remains a trusted standard in industrial and professional settings.
How a UV Laser Traces Each Layer
An SLA printer uses a focused UV laser beam guided by small mirrors called galvanometers. These mirrors sweep the laser across the surface of the liquid resin, tracing the exact shape of each layer. The laser hardens only the points it touches, leaving the rest of the vat liquid.
Once a layer finishes, the build platform lifts slightly. This peeling motion releases the cured layer from the bottom of the tank, then fresh resin flows underneath for the next pass. The result is high accuracy, especially on curved or complex shapes.
SLA prints slower than other methods on complex models, because the laser must physically draw every point. Industrial SLA machines often include heated vats and sealed chambers to keep resin viscosity stable and reduce print failures.
Where SLA Excels
- Dental and medical models with tight tolerances
- Engineering prototypes requiring precision
- High-gloss visual models and presentation pieces
- Low-volume production of detailed parts
DLP Printing: Full-Layer Flash Speed
Digital Light Processing, or DLP, skips the point-by-point scanning approach. Instead, it cures an entire layer in a single flash.
Projectors Cure Whole Layers at Once
Inside a DLP printer, a digital projector contains thousands of microscopic mirrors. Together, these mirrors project a complete 2D image of the layer onto the resin tank. Every pixel in that image receives UV light at the same time, so the full cross-section hardens in one exposure.
Because DLP flashes entire layers, print speed depends mostly on layer height, not model complexity. This makes DLP significantly faster than SLA for most jobs, particularly prints with large footprints.
One trade-off: DLP projectors can introduce slight edge distortion due to lens optics. Resolution is also fixed by the projector’s native pixel count, meaning upgrades require new hardware.
Common Uses for DLP Printers
- Jewelry masters and casting patterns
- Dental crowns and orthodontic models
- Quick prototypes in small studios
- Educational labs and research environments
DLP strikes a balance between speed and accuracy, making it popular in professional shops where turnaround time matters.
LCD Printing: Affordable High Resolution
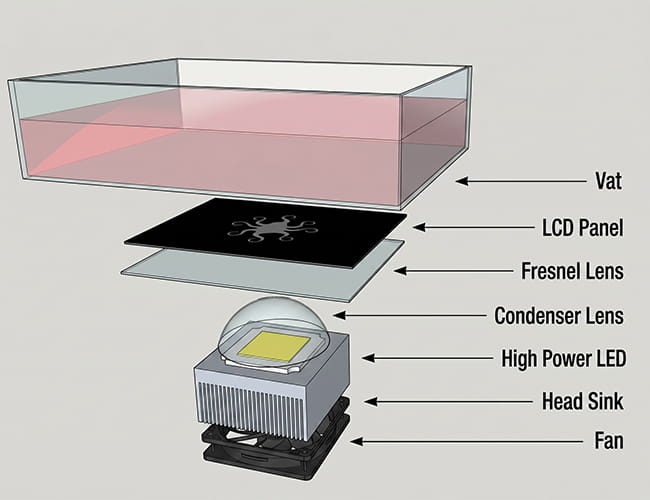
LCD printing, sometimes called mSLA, is now the most common technology in consumer-grade resin printers. It borrows DLP’s full-layer approach but swaps the projector for an LED and screen setup.
How UV LEDs and an LCD Mask Work Together
In an LCD printer, a panel of UV LEDs sits beneath the resin tank. Above the LEDs, an LCD screen acts as a gatekeeper. The screen’s individual pixels switch on or off to control where light passes through. Open pixels let UV light reach the resin and cure the pattern. Closed pixels block the light entirely.
This design delivers high XY resolution, with some printers achieving accuracies under 35 microns. It also costs far less than a precision projector, which is why LCD has become the dominant choice for home users.
The LCD screen itself is a wear item. Prolonged UV exposure degrades it over time, typically lasting 1,000–2,000 hours. Many modern printers now use monochrome LCDs, which cure faster and last longer than older color screens.
Why Hobbyists Prefer LCD
- Lower upfront cost than SLA or DLP
- High resolution for detailed miniatures
- Fast layer exposure times
- Wide compatibility with third-party resins
From tabletop gamers to product designers, LCD printers offer professional-quality results at consumer prices.
The Resin Printing Process: Step by Step
Now that you understand the technology, here’s how a typical print unfolds from start to finish.
Step 1: Prepare the Model in Slicing Software
Your 3D model needs to be oriented and supported before printing. Resin prints require support structures to hold them steady during layer separation. Open your model in a slicer like Chitubox or Lychee to position it for minimal supports, generate scaffolds at weak points, and slice it into thin layers.
Step 2: Load Resin and Start the Print
Pour resin into a clean tank, then lower the build platform until it rests just above the FEP film at the bottom. Start the print from an SD card or USB drive. The first layers receive extra exposure to lock the print firmly to the build plate, then each new layer peels and cures in sequence.
Step 3: Remove the Finished Print
Once the print completes, raise the build platform and detach the object. Let any excess resin drip back into the vat before moving to post-processing.
Cleaning and Post-Curing: Finishing the Job
A freshly printed object is still soft and chemically incomplete. Two finishing steps bring it to full strength and stability.
Wash in Isopropyl Alcohol
Submerge the print in isopropyl alcohol (IPA) at 90% concentration or higher. This dissolves any uncured resin clinging to the surface. A manual wash with a soft brush works well for small models, while ultrasonic cleaners or agitation stations speed up the process.
Cure Under UV Light
After cleaning, place the print under UV light for final curing. Dedicated curing stations with rotating turntables provide even exposure, while sunlight works as a slower alternative. Proper curing makes the print hard, stable, and safe to handle.
Handling Resin Safely

Liquid resin is potentially harmful, so always protect yourself before starting a print job.
Essential Protective Gear
- Nitrile gloves to block skin contact
- Safety goggles to shield your eyes
- A respirator or mask in poorly ventilated spaces
- Long sleeves to cover exposed skin
Work on a silicone mat or disposable surface, and keep your area well ventilated.
Storing and Disposing of Resin
Resin degrades when exposed to UV light, heat, or air. Store bottles in a cool, dark place, tightly sealed to keep out moisture and contaminants.
Never pour liquid resin down the drain. Instead, collect waste resin and IPA in a clear container, then cure it under sunlight or a UV lamp until solid. Once hardened, it can be disposed of as regular solid waste.
Frequently Asked Questions About Resin Printing
What’s the main difference between SLA, DLP, and LCD printers?
SLA uses a UV laser to trace each layer point by point. DLP uses a projector to flash an entire layer at once. LCD uses UV LEDs behind an LCD screen that acts as a mask. All three cure liquid resin with light, but they differ in speed, cost, and resolution.
Is resin printing more detailed than FDM?
Yes. Resin printers typically produce layer heights between 10 and 50 microns, resulting in smoother surfaces and finer details than FDM printers, which extrude melted filament in thicker, visible lines.
How long does it take to print with resin?
Print time depends on the model’s height, layer height, and complexity. A small 5 cm model might take 1 to 2 hours, while larger or more detailed prints can run several hours or overnight.
Do resin prints need post-curing?
Yes. Fresh prints are only partially cured. Washing in isopropyl alcohol removes uncured resin, then a final UV cure hardens the object completely and gives it full strength.
How should I store unused resin?
Keep resin in a sealed, opaque bottle in a cool, dark place away from sunlight. Most resins last 6 to 12 months unopened, but opened bottles have a shorter shelf life due to contamination and air exposure.
Is resin dangerous to handle?
Liquid resin can irritate skin and eyes and release fumes. Wearing nitrile gloves, goggles, and working in a ventilated area minimizes risk. Fully cured prints are safe to touch and handle normally.
Final Thoughts on Resin Printing
Resin printing transforms liquid into solid through controlled light, one microscopic layer at a time. Whether you choose SLA for industrial precision, DLP for professional speed, or LCD for affordable home use, the underlying principle stays the same: light shapes the object. Pair that knowledge with proper post-processing and safe resin handling, and you’ll consistently produce prints that rival professional output. Ready to start? Pick a technology that matches your budget and goals, then run a small test print to experience the process firsthand.


