
You’ve loaded your document, hit print, and instead of a perfectly scaled page, you get tiny text crammed into one corner or half your content cut off. If you’ve ever asked, “How to change print size on printer?” you’re not alone. Whether printing photos, PDFs, web pages, or documents from Word or Excel, incorrect scaling is one of the most common printing issues. The good news: adjusting print size is usually quick and easy once you know where to look.
Most problems stem not from the printer hardware but from software settings in your operating system, application, or print dialog box. This guide walks you through practical steps to control print size across Windows, macOS, Microsoft Office, Adobe PDFs, and common browsers. You’ll learn how to scale correctly, avoid cropping, and ensure your prints come out exactly the size you need without guesswork.
Access the Print Dialog Correctly
Before changing any settings, make sure you’re opening the right print interface. Many users skip this step and assume their document will print as displayed, leading to mismatched sizes.
Open Print Menu with Shortcut
Use Ctrl + P on Windows or Cmd + P on macOS in any app, including your browser, Word, or PDF reader. This opens the native print dialog where scaling and page size options live. Avoid right-clicking and selecting “Print” from context menus unless you’re certain it leads to the full print settings panel.
Choose the Right Printer
In the print dialog, verify the correct printer is selected at the top. If multiple printers are installed, such as PDF generators or network devices, choosing the wrong one may apply unintended defaults. Select your physical printer from the dropdown menu to ensure accurate preview and scaling options.
Adjust Scaling in Print Settings
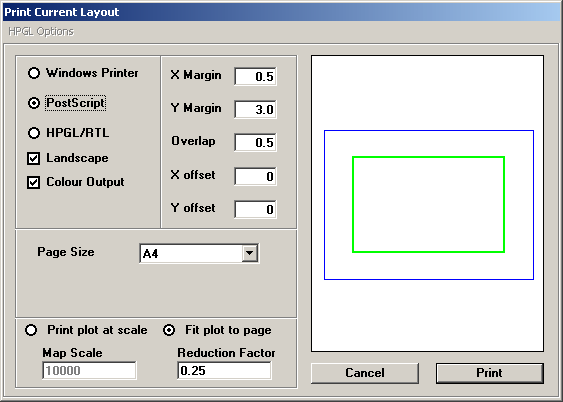
Scaling tells the printer how to fit your content on the page. This is the most direct way to change print size and the most commonly overlooked setting.
Set Custom Scale Percentage
In the print dialog, look for a Scale or Scaling option. By default, it’s often set to “100%” or “Shrink to Fit.” To enlarge or reduce print size:
- Enter a custom percentage (e.g., 120% to enlarge, 80% to shrink)
- Ensure “Custom Scale” is selected, not “Fit to Page” or “Shrink to Fit”
⚠️ Warning: “Fit to Page” automatically resizes content and can distort layout. Use only if you’re okay with automatic adjustments.
Compare Scale Options
Different apps offer slightly different names for scaling:
- 100% Scale: Prints actual size with no resizing
- Fit to Page: Shrinks or enlarges to fill paper
- Shrink to Fit: Reduces oversized content just enough to fit
- Custom Scale: Manual control over size
Choose based on your goal: accuracy versus fit.
Control Page Size and Orientation
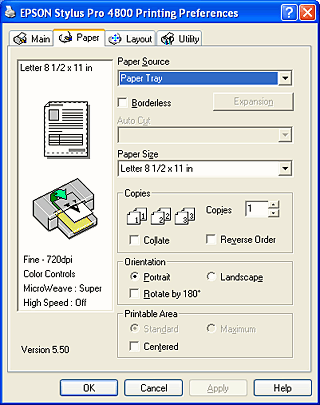
Print size also depends on paper dimensions and layout. Even with correct scaling, wrong page settings cause content to appear too small or get cut off.
Select Correct Paper Size
In the print dialog, find the Paper Size dropdown, usually under Settings or Preferences. Match it to the paper loaded in your printer:
- Letter (8.5 x 11 inches): Standard in the U.S.
- A4 (210 x 297 mm): Standard internationally
- Legal, Tabloid, or custom sizes: For special documents
Mismatched paper sizes force the printer to scale automatically, altering your intended output.
Switch Between Portrait and Landscape
If your content looks squished or cuts off horizontally, try Landscape mode:
- Portrait: Taller than wide, ideal for letters and essays
- Landscape: Wider than tall, better for charts, photos, and wide tables
Changing orientation can eliminate the need for scaling while improving readability.
Fix Print Size in Microsoft Word
Word offers granular control over print size, including scaling entire documents or adjusting individual pages.
Scale Document via Print Setup
In Word’s Print menu, follow these steps:
- Click Page Setup at the bottom of the preview pane
- Go to the Paper tab and confirm size
- In the Margins tab, ensure margins aren’t too large, since excessive margins reduce printable area
- Return to Print dialog and set Scale to desired percentage
Alternatively, go to Layout > Size > More Paper Sizes for advanced options.
Resize Using Zoom Before Print
Before printing, use the Zoom slider in the bottom-right corner of Word. While this affects only the screen view, Word sometimes applies zoom level during print if scaling is misconfigured. Always double-check the print preview under File > Print to confirm layout.
Print to Fit Multiple Pages
Need smaller prints? Use Pages per Sheet:
- Choose 2, 4, or 8 pages per sheet
- Word automatically reduces each page to fit
- Ideal for creating handouts or saving paper
Note: This reduces print size proportionally but may impact readability.
Adjust Print Size in Adobe Acrobat Reader

PDFs often preserve exact dimensions, but incorrect settings can still distort them during printing.
Disable “Fit” Options to Preserve Size
In Adobe Acrobat’s print dialog, take these steps:
- Under Page Sizing & Handling, select Actual Size
- Uncheck “Fit to Page” or “Shrink Oversized Pages”
- Check the preview to ensure no scaling occurs
✅ Pro Tip: If borders are cut off, enable Choose Paper Source by PDF Page Size to let the printer detect original dimensions.
Scale PDFs Intentionally
To enlarge or reduce a PDF, use these options:
- Select Custom Scale and enter a percentage
- Use Poster option to print large images across multiple sheets
- Use Multiple to fit several PDF pages on one sheet, like 2-up or 4-up
Always check Preview to confirm alignment and size before printing.
Modify Print Size in Web Browsers
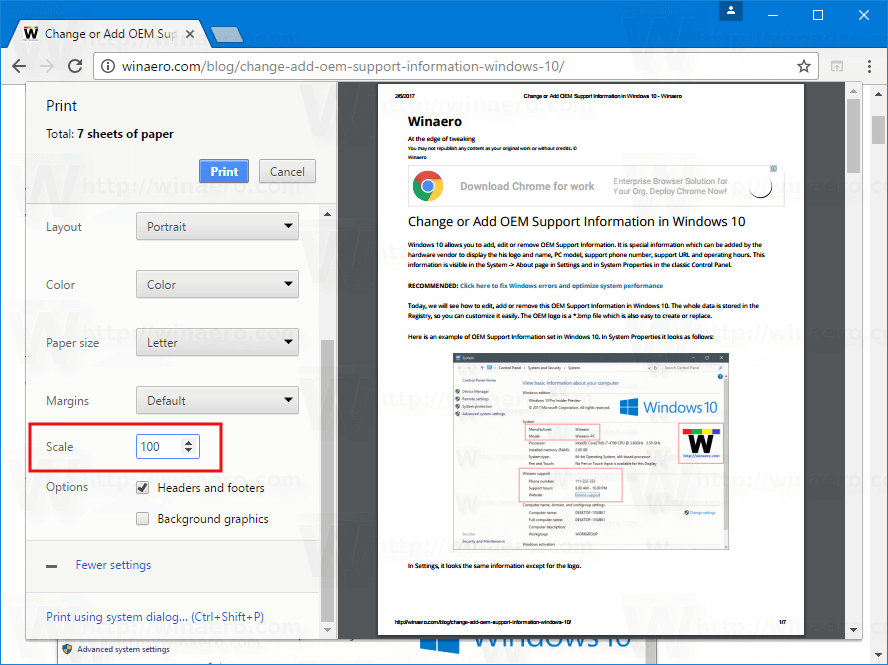
Printing web pages often results in tiny text or broken layouts because browsers apply default scaling.
Use Browser Print Preview
In Chrome, Edge, or Firefox, follow these steps:
- Press Ctrl + P
- Set Layout to Landscape if needed
- Under Scale, choose Default (usually 100%), Custom (enter 125%, 150%, etc.), or avoid “Fit to Page” unless necessary
Remove Headers and Margins for More Space
By default, browsers add URLs and page numbers, reducing usable space.
- In Chrome’s print dialog, set Margins to None or Minimum
- Toggle off Headers and footers
- This increases printable area, making content appear larger without changing scale
Print Selection Only
To avoid irrelevant content shrinking your main text:
- Highlight only the section you want to print
- In print dialog, choose Selection under Pages
- Then adjust scale as needed
This focuses the printer on your chosen content, often improving size and clarity.
Troubleshoot Incorrect Print Sizes
Even after adjusting settings, some prints still come out too small or are cropped. Here’s how to diagnose and fix common causes.
Check Printer Default Settings
Your printer may have factory defaults that override app settings.
Reset Print Preferences
- Open Control Panel > Devices and Printers (Windows)
- Right-click your printer and select Printing Preferences
- Look for Scaling, Page Layout, or Size tabs
- Set default scale to 100% or Actual Size
- Save as default
On macOS: Go to System Settings > Printers & Scanners, select printer, click Options & Supplies > Driver Properties, and adjust defaults.
Update or Reinstall Printer Drivers
Outdated drivers may misinterpret scaling commands.
- Visit the manufacturer’s website (HP, Canon, Epson, etc.)
- Download the latest driver for your model
- Install and restart your computer
- Test print with known settings
Updated drivers often resolve scaling bugs and improve compatibility.
Avoid Mobile App Limitations
Printing directly from smartphones can limit size control.
Use Desktop Mode When Possible
- On Android or iOS, open browser in desktop mode before printing
- Or email the document to yourself and print from a computer
- Mobile print dialogs often hide advanced scaling options
Prevent Future Print Size Issues
Once you’ve fixed the problem, take steps to avoid repeating it.
Save Custom Print Presets
Many printers allow saving custom profiles.
- After setting correct scale, paper size, and layout
- In print dialog, click Save As Preset (location varies by printer)
- Name it (e.g., “Full Page Print” or “No Scale”)
- Select it next time for consistent results
Use Print Preview Every Time
Never skip Print Preview. It shows exactly how your document will look.
- Look for cropped edges, tiny fonts, or white space
- Adjust scale or margins before sending to printer
- Saves paper, ink, and frustration
Standardize Document Setup
Design documents with printing in mind:
- Use standard paper sizes (Letter or A4)
- Avoid oversized elements unless intentional
- Test print one page first before printing full document
Frequently Asked Questions About Changing Print Size
Why is my printer printing so small all of a sudden?
This usually happens when “Fit to Page” or “Shrink to Fit” gets accidentally enabled in your print dialog. Check the scaling settings and set them back to 100% or “Actual Size.” Also verify your printer driver’s default preferences haven’t changed.
How do I print a document larger than the page?
Use the Poster option in your print dialog (available in Adobe Reader and some browsers). This splits the image across multiple pages that you can tape together. Alternatively, use Custom Scale and increase the percentage until the content fits your desired layout.
What’s the difference between “Fit to Page” and “Actual Size”?
“Actual Size” prints your document at 100% with no resizing, preserving exact dimensions. “Fit to Page” automatically scales content up or down to match the selected paper size, which can distort proportions or reduce clarity.
Can I change print size without changing the document?
Yes. Use the Scale or Zoom option in your print dialog. This adjusts output size without modifying the original file. You can also set margins to minimum or none to maximize printable area.
Why does my PDF print at the wrong size?
Most often, “Fit to Page” or “Shrink Oversized Pages” is checked. Open the print dialog, go to Page Sizing & Handling, and select “Actual Size.” Also make sure your printer’s paper size matches the PDF’s intended dimensions.
Key Takeaways for Changing Print Size on Your Printer
Mastering print size comes down to three core areas: the application, the print dialog, and the printer driver. Start by always opening the print dialog with Ctrl + P or Cmd + P, then verify your printer selection and paper size before adjusting scale. Use Custom Scale for precise control and avoid “Fit to Page” unless automatic adjustment is acceptable.
When problems persist, check your printer’s default preferences in Control Panel or System Settings, and keep your drivers updated. For PDFs, disable auto-sizing in Adobe Reader. For browsers, remove headers and adjust margins to maximize printable space. Always preview before printing to catch issues early.
Your next step: Open a document you’ve been struggling to print, apply the Custom Scale method from this guide, and preview the result. Once you see how quickly the fix works, save it as a preset for future use.


