

Choosing the right 3D printer can feel overwhelming when you face dozens of models, technologies, and price points. The key to making a smart decision is matching the machine to your goals, budget, and skill level. Picking the wrong printer leads to frustration, wasted filament, and abandoned projects.
The question of how to choose a 3D printer matters whether you’re a beginner or experienced maker. This guide cuts through the noise and helps you pick based on real needs, not marketing hype. You’ll learn how FDM, SLA, and SLS technologies differ, how to decode build volume and resolution, and how to calculate total cost of ownership.
By the end, you’ll know exactly which type of printer fits your use case and why.
Match Printer to Your Use Case
Define Your Primary Purpose
Before looking at models, ask: What will I actually print? Your answer determines everything from technology type to budget.
- Hobbyists and beginners: FDM printers work well for figurines, custom phone cases, or simple repairs.
- Jewelers and model makers: SLA printers deliver the fine detail needed for rings or miniatures.
- Engineers and professionals: SLS or high-end FDM printers handle functional, durable parts.
- Educators and students: Reliability and safety matter most, making enclosed FDM designs a smart choice.
Don’t buy a $2,000 SLA printer if you only want to print toy cars. Likewise, don’t expect an entry-level FDM to produce dental molds. Align your printer with your most common project type.
Assess Print Frequency and Skill Level
Are you printing weekly or once a month? Frequent users benefit from auto-bed leveling, filament runout sensors, and reliability. Occasional users can prioritize ease of setup over advanced features.
Your technical comfort matters too:
– Beginners should avoid complex assembly or open-frame designs.
– Intermediate users can handle calibration and minor maintenance.
– Advanced users may want open-source firmware and upgrade paths.
Compare 3D Printing Technologies
FDM: Best for Beginners and Prototyping
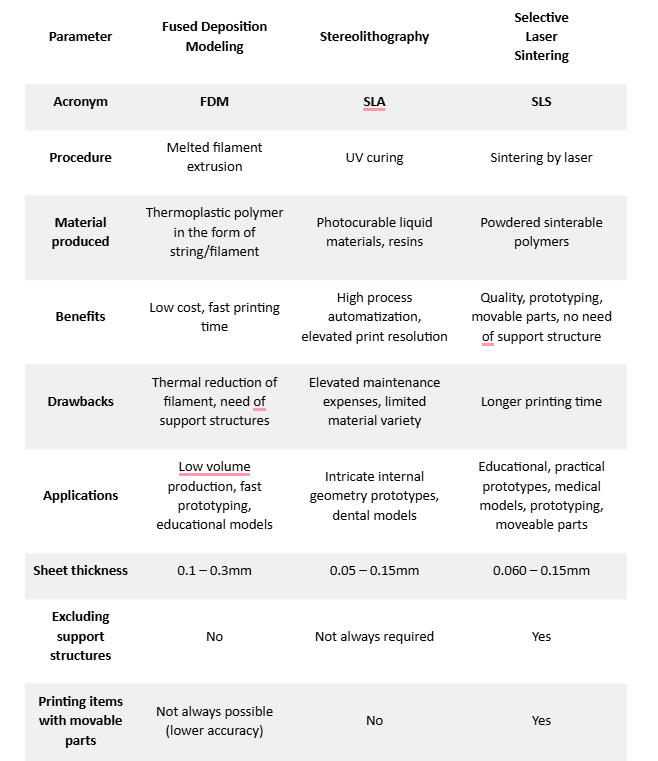
Fused Deposition Modeling (FDM) is the most popular 3D printing method. It melts plastic filament and layers it to build objects.
Choose FDM if:
– You’re new to 3D printing
– You need affordable, durable prints
– You want to print functional parts or prototypes
Pros:
– Low cost ($100–$800 for most models)
– Wide material options: PLA (easy), ABS (strong), PETG (balanced)
– Minimal post-processing
– Large community support
Cons:
– Visible layer lines
– Lower resolution than SLA
– Slower print speeds compared to other methods
– Requires occasional calibration
Top FDM Picks:
– Creality Ender 3 V3 KE: Budget-friendly, auto-leveling, reliable
– Prusa i3 MK3S+: Premium build, excellent support, high precision
– Anycubic Kobra 2: Fast, quiet, great value
SLA: High Detail for Miniatures and Jewelry

Stereolithography (SLA) uses UV light to cure liquid resin into solid layers.
Choose SLA if:
– You need ultra-fine details
– You print jewelry, dental models, or tabletop miniatures
– Surface smoothness is critical
Pros:
– Extremely high resolution (down to 0.01mm layer height)
– Smooth, professional-looking finishes
– Ideal for intricate designs
Cons:
– Resin is toxic and requires gloves, ventilation, and safety gear
– Post-processing needed: washing and UV curing
– Higher ongoing cost (resin is more expensive than filament)
– Smaller build volume compared to FDM
Top SLA Picks:
– Anycubic Photon M3 Max: Large build area, good value
– Elegoo Saturn 4: High speed, excellent detail
– Formlabs Form 3: Professional-grade, reliable, but costly
Pro Tip: If you choose SLA, budget for a resin washing station and curing box because they’re essential for safe, high-quality prints.
SLS: For Industrial-Strength Parts

Selective Laser Sintering (SLS) uses a laser to fuse powdered nylon or TPU into solid parts.
Choose SLS if:
– You need strong, functional parts
– You’re in manufacturing or engineering
– You print complex geometries without supports
Pros:
– No support structures needed
– Durable, flexible, and heat-resistant prints
– Excellent for end-use parts
Cons:
– Very expensive ($3,000–$10,000+)
– Requires professional setup and maintenance
– Not practical for home users
Top SLS Picks:
– Sinterit Lisa: Entry-level SLS, compact
– HP Jet Fusion: Industrial-scale, high throughput
Reality Check: Most hobbyists don’t need SLS. It’s overkill unless you’re producing commercial parts.
Size Matters: Pick the Right Build Volume

Small Printers (150–200 mm)
Typical size: 150 x 150 x 150 mm
Best for: Small models, electronics enclosures, detailed figurines
These printers are great for desktop use and beginners. You can print a chess piece or a small tool, but not a full helmet or large prototype.
Ideal if: You have limited space or print small items regularly.
Medium Printers (200–400 mm)
Typical size: 200 x 200 x 200 mm or larger
Best for: Household items, tools, cosplay props, most hobby projects
This is the sweet spot for most users. A 200mm cube build volume lets you print larger functional parts without taking over your desk.
Ideal if: You want flexibility without industrial size.
Large Printers (300–500 mm+)
Typical size: 300 x 300 x 400 mm or more
Best for: Architectural models, large prototypes, industrial parts
These require more space, power, and often a dedicated room. They’re common in workshops and labs.
Ideal if: You’re printing large-scale projects regularly.
Warning: Bigger isn’t always better. Larger prints take hours, and a failed 10-hour print wastes time and material.
Evaluate Print Quality and Precision
Layer Height: Smoother vs. Faster
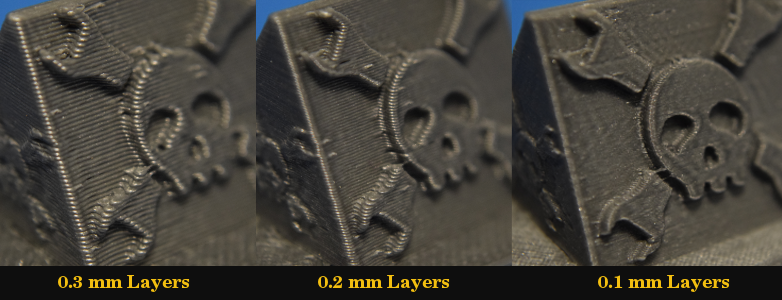
Layer height is measured in millimeters. Lower values mean finer detail.
- 0.1 mm: High detail, smooth surfaces, slow print
- 0.2 mm: Balanced quality and speed (most common)
- 0.3 mm: Fast, visible layers, lower detail
Tip: Use 0.1 mm for display models and 0.2 mm for functional parts.
Nozzle Size: Detail vs. Speed
- 0.4 mm: Standard and good for most prints
- 0.2–0.3 mm: Finer details, slower prints, clogs more easily
Smaller nozzles are great for intricate designs but require clean filament and precise calibration.
Print Speed vs. Quality
Faster prints (150+ mm/s) can reduce quality. Look for printers that maintain accuracy at speed.
- Under 60 mm/s: High quality, very slow
- 60–100 mm/s: Good balance
- 100–150 mm/s: Fast, acceptable for drafts
Check reviews for real-world print samples, not just manufacturer claims.
Prioritize Ease of Use and Maintenance
Auto-Bed Leveling Saves Time
Manual bed leveling is frustrating and error-prone. Auto-bed leveling ensures the nozzle is perfectly aligned, improving first-layer adhesion.
- Essential for beginners
- Reduces failed prints
- Found on mid-range and premium models
Models with auto-leveling: Creality Ender 3 V3 KE, Prusa i3 MK3S+, Anycubic Kobra 2
Enclosure: Stability for Tough Materials
An enclosed print chamber keeps temperature stable, which is critical for printing ABS or PETG without warping.
- Prevents drafts
- Improves print success rate
- Safer for homes with kids or pets
If your printer isn’t enclosed, consider building or buying one.
Filament System: Direct Drive vs Bowden
- Direct Drive: Motor is on the print head. Better for flexible filaments like TPU. Slightly slower.
- Bowden: Motor is on the frame. Lighter head, faster prints. Struggles with flexible materials.
Choose Direct Drive if you plan to print TPU or other soft filaments.
User Interface and Software
Look for:
– Touchscreen interface (easier than buttons)
– Intuitive menu layout
– Wi-Fi or app control (convenient for monitoring)
Avoid printers with clunky or outdated software.
Check Software and Connectivity
Slicing Software Compatibility
Slicing software converts 3D models into printer instructions. Most printers work with:
- UltiMaker Cura (free, user-friendly)
- PrusaSlicer (advanced features)
- Simplify3D (paid, powerful)
Ensure your printer is supported by your preferred slicer.
Firmware: Open Source vs Closed
- Open-source firmware (Marlin, Klipper): Allows customization and community upgrades
- Closed firmware: Limited control, but more stable
Klipper is gaining popularity for speed and precision. Check if your printer supports it.
Connectivity Options
Look for:
– SD card slot (most common)
– USB connection
– Wi-Fi or Ethernet (for remote monitoring)
– OctoPrint compatibility (great for remote control)
Wi-Fi and OctoPrint let you monitor prints from your phone, which is very useful for long jobs.
Budget Smart: Total Cost of Ownership
Initial Price Ranges
| Category | Price | Example Models |
|---|---|---|
| Entry-Level | $100–$300 | Creality Ender 3 |
| Mid-Range | $300–$800 | Prusa i3 MK3S+, Anycubic Kobra 2 |
| High-End | $800–$2,500+ | Formlabs Form 3, Anycubic Photon M3 Max |
| SLS | $3,000–$10,000+ | Sinterit Lisa, HP Jet Fusion |
Don’t Ignore Ongoing Costs
The printer is just the start. Factor in:
- Filament: PLA (~$20/kg), ABS (~$25/kg), PETG (~$22/kg)
- Resin: SLA resin (~$50/liter), which is more expensive and shorter shelf life
- Maintenance: Nozzles ($5–$15), belts, bearings
- Tools: Spatula, cleaning supplies, build surface
- Upgrades: Better hotend, enclosure, power supply
Example: A $200 printer with frequent failed prints and replacements may cost more than a $400 reliable model.
Rule of Thumb: Spend a little more upfront for reliability and support. It pays off long-term.
Research Real-World Performance
Watch YouTube Reviews
Search: “Creality Ender 3 V3 KE review” or “Anycubic Kobra 2 long-term test“
Look for:
– Real print samples
– Noise levels
– Reliability over time
– Ease of assembly
Avoid overly promotional videos. Seek honest, long-term reviews.
Read User Feedback
Check:
– Reddit (r/3Dprinting): Real user experiences
– 3D Printing Stack Exchange: Technical help
– Discord servers: Live community support
– Manufacturer forums: Official updates and troubleshooting
Look for patterns. If multiple users report bed adhesion issues, it’s a red flag.
Test Prints and Calibration
When you get your printer:
1. Print a calibration cube to check dimensions
2. Test retraction to reduce stringing
3. Adjust bed leveling if needed
4. Run a temperature tower to find optimal settings
These steps ensure your printer performs as expected.
Plan for Future Upgrades
Upgrade Potential Matters
A good printer should grow with you. Ask:
– Can you upgrade the hotend for higher temps?
– Is dual extrusion possible?
– Can you install Klipper firmware?
– Are community mods available?
Example: The Ender 3 has thousands of mods, including silent boards, glass beds, and auto-leveling kits.
Open-Source vs Closed Systems
- Open-source (e.g., Prusa, Creality): More mods, firmware upgrades, community support
- Closed (e.g., Formlabs): Limited customization but polished experience
Choose based on how much tinkering you want.
Frequently Asked Questions About 3D Printers
What is the best 3D printer for beginners?
For beginners, a budget-friendly FDM printer with auto-bed leveling is ideal. The Creality Ender 3 V3 KE offers reliability, ease of use, and a price point around $270. It also has a large community for support and troubleshooting.
How much should I spend on a 3D printer?
Entry-level FDM printers start around $100–$300, mid-range models run $300–$800, and high-end or SLA printers cost $800–$2,500+. SLS machines start at $3,000. Budget for ongoing costs like filament, resin, and replacement parts too.
FDM vs SLA: which is better?
FDM is more affordable, easier to use, and works well for prototypes and hobby prints. SLA delivers higher resolution and smoother finishes, making it better for jewelry, miniatures, and dental models. Your choice depends on whether you value cost or detail more.
How important is build volume?
Build volume matters based on what you plan to print. Small printers (150–200mm) suit figurines and small parts. Medium printers (200–400mm) handle most hobby projects. Large printers (300mm+) are best for industrial or architectural models.
Are cheap 3D printers worth it?
Cheap printers can work for beginners, but they often lack features like auto-bed leveling and may require more maintenance. Spending a bit more upfront on a reliable model usually saves money on repairs and failed prints.
What software do I need for a 3D printer?
You’ll need slicing software to prepare models. Popular options include UltiMaker Cura (free), PrusaSlicer (free), and Simplify3D (paid). Most printers support at least one of these, and many offer Wi-Fi or USB connectivity for easy file transfer.
Key Takeaways for Choosing the Right 3D Printer
Start by defining what you’ll print and how often. Match the printer technology to your use case: FDM for general projects, SLA for fine detail, and SLS for industrial strength. Choose a build volume that fits your largest projects without going oversized. Look for features that match your skill level, especially auto-bed leveling if you’re a beginner.
Budget for the total cost of ownership, not just the sticker price. A reliable mid-range printer often outperforms a cheap model with constant repairs. Finally, research real user reviews before committing.
Your next step: Pick two or three printers from the recommendations above that match your needs. Watch a few honest YouTube reviews and join the r/3Dprinting subreddit to ask owners about their experience. Within a week, you’ll know which printer deserves your money.


