

Connecting your Epson printer to Wi-Fi transforms it from a basic device into a powerful hub for printing and scanning from anywhere. If you are wondering how to connect Epson printer to Wi-Fi, you likely want to avoid the frustration of failed setups caused by simple mistakes like leaving a USB cable plugged in.
This guide provides a clear path to success using official Epson methods for mobile apps and desktop computers. You will learn to use the Epson Smart Panel, install desktop drivers correctly, and register for remote printing features while avoiding common pitfalls.
Verify Essential Setup Prerequisites
Skipping initial checks is the leading cause of connection failures for Epson devices. Ensure your hardware and network details are ready before launching any software to save time.
Confirm Power and Physical Readiness
Your printer must be fully powered on with all ink cartridges installed and primed. Check that the control panel displays a “Ready” status with no active error lights indicating paper jams or low ink levels.
Remove Interfering USB Cables
You must not connect the printer to your computer via USB during standard wireless setup. On Windows, a “Found New Hardware” pop-up indicates interference, so click Cancel and unplug the cable immediately.
Gather Network Credentials
Have your specific Wi-Fi network name (SSID) and password ready before starting the process. Ensure your computer or mobile device is already connected to the exact same network you intend the printer to join.
Prepare Software Requirements
Download the latest driver package from the Epson support website if your computer lacks a CD drive. macOS users must ensure the Software Updater component is selected during installation to maintain future connectivity.
Connect Via Epson Smart Panel App
The Epson Smart Panel app offers the fastest way to configure your printer using an iOS or Android device. This method relies on Bluetooth to transfer Wi-Fi credentials securely to your printer.
Launch and Detect Your Printer
Install the Epson Smart Panel app and open it while standing close to your printer. Tap the plus icon if the app does not automatically detect your device, then select Connect to a New Product.
Select Model and Network
Choose your specific printer model from the list and tap Next to confirm your current Wi-Fi network. If you need to join a different network, select Change another Wi-Fi SSID before proceeding.
Enter Credentials and Wait
Type your Wi-Fi password carefully as it is case sensitive, then tap OK to begin configuration. Keep your mobile device within three feet of the printer and do not move it until the app confirms setup is complete.
Confirm Successful Configuration
Trust the completion message within the app even if the printer screen says connected earlier. Canceling the process prematurely can corrupt the network settings and require a full restart.
Install Drivers Using Desktop Software
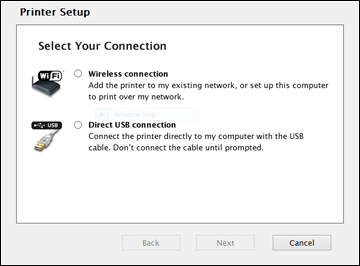
Using the official desktop installer is the most reliable method for Windows and macOS computers. This approach installs necessary drivers, utilities, and the setup wizard in one seamless process.
Start the Installation Wizard
Run the downloaded installer file and accept the End-User License Agreement to proceed. Click Install and wait several minutes for the core components to load without interrupting the process.
Choose Wireless Connection Type
Select Wireless connection when the Printer Setup screen appears, then choose Set up printer for the first time. The software will attempt to locate your printer automatically over the network.
Use Manual Setup If Needed
If the software cannot find your printer, choose to set up using printer buttons or a temporary USB cable. The temporary USB method pushes Wi-Fi settings directly to the printer before you disconnect the cable.
Finalize Driver Installation
Follow the on-screen prompts to confirm your network settings and complete the driver installation. Your computer can now communicate with the printer over the wireless network for all printing tasks.
Register for Epson Connect Services
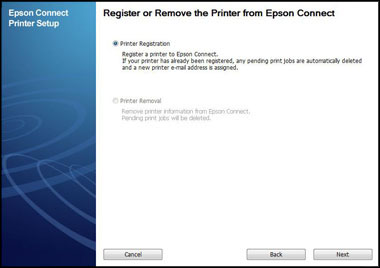
Registering your device with Epson Connect enables powerful features like Remote Print and Scan to Cloud. This step requires your printer to already be connected to Wi-Fi using one of the previous methods.
Download Setup Utility
Visit the Epson Connect website and download the Printer Setup Utility for your computer. Run the installer and accept the license agreement to begin the registration workflow.
Select Printer Registration
Choose your printer model from the list and select Printer Registration as your service option. Click Agree to the terms and confirm your choice when the registration prompt appears.
Create or Log In to Account
New users should fill out the creation form while existing users can log in to add a new device. Click Add or Finish to link your specific printer model to your Epson Connect account.
Activate Remote Features
Enable Remote Print to send documents via email or use the Epson iPrint app from anywhere. Set up Scan to Cloud to save documents directly to services like Google Drive or Dropbox.
Troubleshoot Common Wi-Fi Connection Errors

Connectivity issues often stem from simple oversights like cable interference or signal range problems. Use these targeted solutions to resolve frequent setup failures quickly.
Resolve Product Detection Failures
If the app or software cannot find your printer, move your device closer to eliminate Bluetooth or Wi-Fi interference. Ensure no USB cable is connected and restart both the printer and your router to refresh the connection.
Fix Mid-Process Configuration Drops
Keep your mobile device stationary within three feet of the printer during the entire setup phase. Do not cancel the process even if the printer display indicates a connection, as the app must finalize the handshake.
Address Windows Hardware Pop-ups
Click Cancel immediately if a “Found New Hardware” window appears during wireless setup. Unplug any USB cable connecting the printer to the computer and restart the installation wizard.
Ensure Software Updater Installation
Mac users experiencing connectivity drops should reinstall the software and verify the Software Updater component is checked. This utility is critical for receiving firmware updates that maintain Wi-Fi stability.
Maintain Stable Long-Term Connectivity

Keeping your printer online requires occasional maintenance and awareness of network changes. Follow these best practices to ensure consistent performance over time.
Update Firmware Regularly
Run the Epson Software Updater on Windows or allow the background updater on macOS to install fixes. These updates patch security flaws and improve wireless transmission speeds.
Reconfigure After Network Changes
Change the Wi-Fi settings on your printer if you update your router password or rename your network. Use the Smart Panel app option to Change another Wi-Fi SSID or use the printer control panel.
Avoid Ad-Hoc Mode Confusion
Always select Infrastructure Mode to connect your printer to your main wireless router. Avoid Ad-Hoc or Wi-Fi Direct modes for permanent setups as they limit functionality and range.
Final Thoughts on Connecting Epson Printer to Wi-Fi
Successfully learning how to connect Epson printer to Wi-Fi depends on preparation and following the correct sequence for your device. By removing USB cables, gathering network credentials, and using the Epson Smart Panel or desktop wizard, you ensure a stable wireless connection.
Remember to register with Epson Connect for remote capabilities and keep your firmware updated for optimal performance. Start by checking your printer status and downloading the necessary tools today to enjoy seamless wireless printing.
Frequently Asked Questions About Connecting Epson Printer to Wi-Fi
Why does my printer not appear in the Epson Smart Panel app?
Your mobile device may be too far from the printer or Bluetooth might be disabled. Move within three feet of the printer, ensure Bluetooth is on, and restart the app to refresh the device list.
Can I use a USB cable to help set up Wi-Fi?
Yes, the desktop installer offers a temporary USB connection method to transfer Wi-Fi settings. You must select this option explicitly during the setup wizard and remove the cable once connected.
What should I do if the “Found New Hardware” window pops up?
This error means a USB cable is interfering with wireless setup. Click Cancel on the pop-up, unplug the USB cable immediately, and restart the installation process.
Do I need an Epson Connect account to print wirelessly?
No, basic wireless printing works without an account, but Epson Connect is required for remote printing and cloud scanning features. You can create a free account during the registration process if needed.
How do I update my printer if the Wi-Fi password changes?
You must reconfigure the printer network settings using the Epson Smart Panel app or the printer control panel. Select the option to change the Wi-Fi SSID and enter the new password to restore connectivity.


