

You have unboxed your new machine, but the real challenge begins when you need to translate a digital idea into a physical object. Learning how to program a 3D printer is the essential bridge between a static 3D model and a successful print job. Without correct settings, even expensive hardware will produce warped layers or failed prototypes.
This guide walks you through selecting software, adjusting critical parameters, and generating the G-code your machine needs. You will discover how to configure slicers, calibrate your bed, and troubleshoot common errors with confidence. By following these steps, you gain full control over print quality and speed.
Select the Best Slicing Software for Your Needs
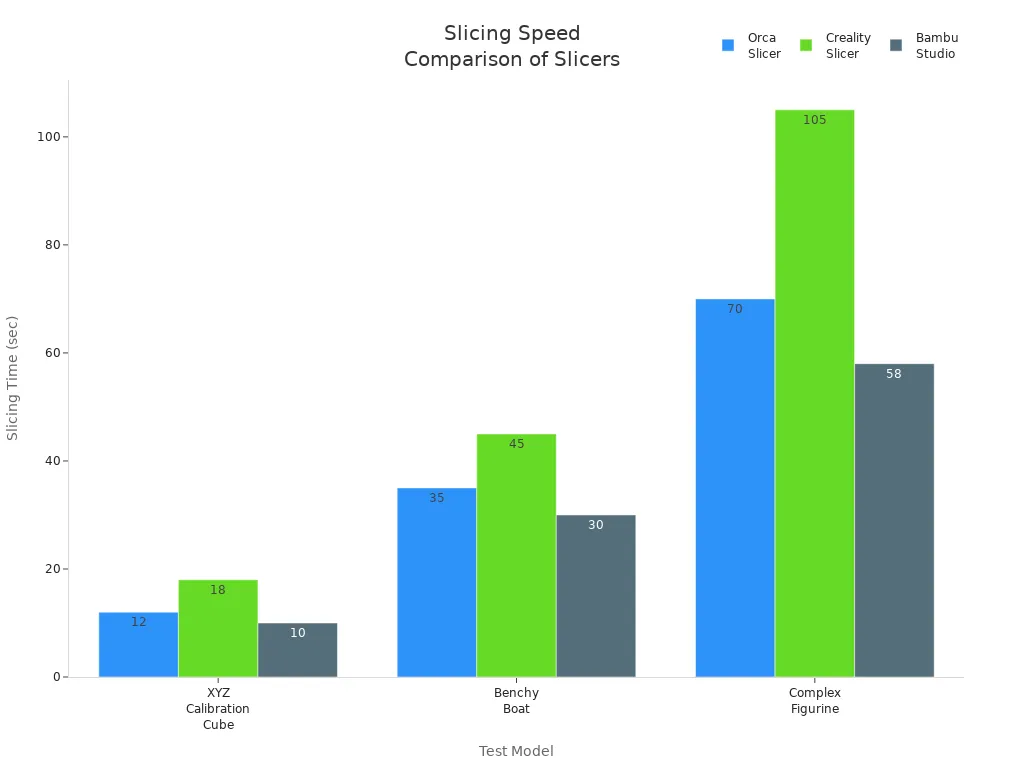
Your first task is choosing a slicer, the software that converts 3D models into machine instructions. This tool translates your design into G-code, which tells the printer exactly where to move. Different programs offer unique features, so picking the right one depends on your specific printer and skill level.
Compare Top Slicer Options
- Cura: A free, open-source choice ideal for beginners and compatible with most printers.
- PrusaSlicer: Excellent for Prusa hardware but supports many other brands with advanced layer editing.
- Simplify3D: A paid option offering powerful customization and multi-process printing capabilities.
- Bambu Studio: Tailored specifically for Bambu Lab printers with AI-powered calibration features.
- OrcaSlicer: A community-driven fork of Bambu Studio with added enhancements for various machines.
Always verify that your chosen software supports your specific printer model. Many manufacturers provide custom versions optimized for their hardware to ensure better performance.
Configure Your Slicer Profile
- Download the latest version directly from the official website.
- Launch the application and select your printer model from the setup wizard.
- Input your nozzle diameter, build volume, and bed type accurately.
- Save your configuration as a custom profile if you make any modifications.
A correctly configured slicer will display an accurate preview of your printer’s build plate before you start.
Prepare and Repair Your 3D Model Files
A poorly prepared file leads to failed prints regardless of how well you program the machine. You must ensure your digital model is clean and oriented correctly before slicing begins.
Import and Orient Your Design
- Click “Add Model” to load your STL, OBJ, or 3MF file into the workspace.
- Center the object on the build plate using the built-in alignment tools.
- Rotate the model to minimize overhangs and reduce the need for support structures.
- Scale the object uniformly unless you are resizing it for a specific fit.
Placing models too close to the edges increases the risk of nozzle collision or poor adhesion.
Fix Mesh Errors Before Slicing
Not all downloaded models are print-ready. Holes, non-manifold edges, or flipped normals often cause slicing errors.
Use these tools to repair geometry:
* Meshmixer: Detects and fixes complex geometry issues for free.
* Netfabb Online Repair: Allows you to upload and auto-repair broken meshes quickly.
* Cura’s STL Check: Enable this under preferences to automatically detect model errors.
Look for red highlights in your software, as these indicate gaps or intersecting faces that need fixing.
Adjust Critical Slicing Parameters

Setting the right parameters defines how your printer behaves during the job. These values determine layer height, print speed, temperature, and overall quality.
Define Layer Height and Quality
- 0.1 mm: Provides high detail but results in a slow print time, best for showpieces.
- 0.2 mm: Offers a balanced approach for quality and speed, serving as a general default.
- 0.3 mm: Delivers fast, low-detail prints suitable for functional prototypes.
Remember that your maximum layer height should never exceed 75% of your nozzle diameter.
Control Speed and Temperature Settings
| Parameter | Typical Range | Notes |
|---|---|---|
| Print Speed | 40–80 mm/s | Faster speeds risk accuracy loss |
| Infill Speed | 60–100 mm/s | Can run faster than outer walls |
| Nozzle Temp | 190–220°C (PLA) | Adjust based on filament type |
| Bed Temp | 50–70°C (PLA) | Higher temperatures needed for ABS |
Exceeding filament temperature limits causes oozing or clogs, so stay within recommended ranges.
Enable Supports and Adhesion Aids
- Supports: Generate automatically under overhangs greater than 45 degrees.
- Brim: Adds a flat border around the base to improve bed adhesion.
- Raft: Creates a thick base layer for tricky materials like ABS.
Toggle these options in the “Support” and “Build Plate Adhesion” menus within your slicer.
Generate and Inspect G-Code Instructions
Once your settings are locked, you must generate the G-code, which is the actual program your printer executes.
Slice the Model File
Click “Slice” or “Prepare” in your software to begin the conversion process. This may take seconds or minutes depending on model complexity.
After slicing, view the layer-by-layer preview to spot potential issues. Check the estimated print time and filament usage carefully. Look for red zones that indicate collisions or thin walls.
Review Key G-Code Commands
While you rarely edit code manually, understanding key commands helps diagnose problems.
Common commands include:
* G28: Homes all axes to their starting position.
* G29: Runs bed leveling if your printer has a probe.
* M104 S200: Sets the extruder temperature to 200°C.
* M190 S60: Waits for the bed to reach 60°C.
Some slicers allow pre-print script editing, letting you add custom startup routines like nozzle cleaning.
Transfer G-Code to Your 3D Printer
With the file ready, you need to send it to your printer using a reliable transfer method.
Use USB Drive or SD Card
- Export the G-code file to an SD card or USB drive.
- Insert the storage device directly into your printer.
- Navigate the menu to Print, select your file, and hit Start.
This method is the most reliable for beginners because it has no wireless dependency.
Connect via Wi-Fi or Ethernet
Modern printers from brands like Bambu Lab and Prusa support network printing.
Connect your printer to the same network as your computer. Use a companion app like Bambu Studio or OctoPrint to upload the file. This allows you to monitor the print remotely with a real-time camera feed.
Utilize OctoPrint for Advanced Control
OctoPrint is a popular open-source interface for managing prints over Wi-Fi.
Install it on a Raspberry Pi connected to your printer via USB. You can then access a dashboard from any browser to drag-and-drop files and control temperatures. This enables true remote programming and monitoring of your jobs.
Calibrate Hardware Before First Print
/https://fbi.cults3d.com/uploads/blog/image/image/1714/3.jpg)
Even perfectly programmed G-code fails without proper mechanical calibration. Think of this as tuning an instrument before a performance.
Level the Print Bed
An uneven bed causes poor first-layer adhesion and print failure.
For manual leveling:
1. Heat the nozzle and bed to operating temperatures.
2. Move the nozzle to each corner of the bed.
3. Slide a piece of paper under the nozzle and adjust screws until you feel slight drag.
If you have auto-leveling, run the G29 command and follow the on-screen prompts to save the mesh.
Set the Z-Offset Correctly
Z-offset determines how close the nozzle rides to the bed at the zero position.
If the offset is too high, the filament will not stick. If it is too low, you risk clogging the nozzle or scraping the bed. Adjust this in your firmware or via your touchscreen interface. Test your settings with a first-layer calibration tower print.
Run a Test Print to Validate Settings
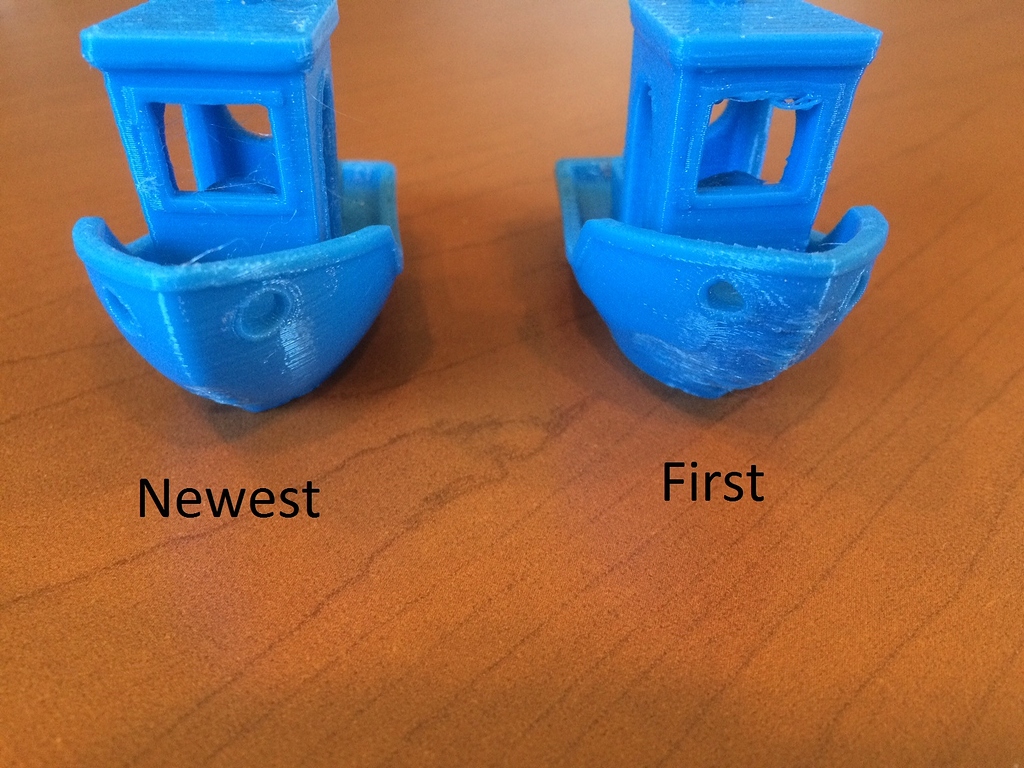
Never skip the test print, as it validates your programming and calibration efforts.
Print a Calibration Object
- Calibration Cube: Checks dimensional accuracy and squareness of the axes.
- 3D Benchy: Tests overhangs, bridging, and overall print quality.
Inspect the corners to ensure they are glued down properly. Check that layers are uniform and free from stringing. If the print fails, return to your slicer to lower speed or increase bed temperature.
Keep a printed log of the settings used for future reference.
Troubleshoot Common Programming Errors
Even experienced users face glitches, but most are rooted in programming settings.
Fix G-Code Execution Issues
If your printer homes but does not extrude, check your file. The file might be corrupted, so try re-slicing and re-transferring it. Ensure your G-code includes heating commands like M109. Older firmware versions may not recognize newer G-code commands, so verify compatibility.
Correct Mismatched Slicer Settings
Symptoms like extruder jams or layer shifts often mean your slicer settings do not match your hardware.
Common causes include:
* Nozzle diameter mismatch between slicer and physical hardware.
* Incorrect filament diameter setting in the software.
* Uncalibrated steps per mm in the firmware.
Run an E-steps calibration to ensure your extruder pushes the correct amount of filament.
Optimize with Advanced Programming Techniques
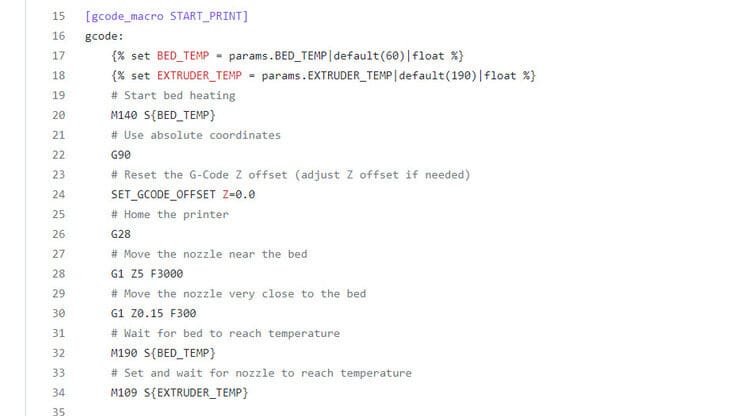
Once you master the basics, you can enhance performance with advanced customizations.
Customize Start and End Scripts
Automate routines by editing your start and end G-code scripts.
Example start commands:
* Home all axes with G28.
* Run bed leveling with G29.
* Heat the nozzle and wait for the bed temperature.
Example end commands:
* Cool down the nozzle and bed.
* Lift the nozzle and park the head.
Tailor these scripts to your specific printer behavior for consistent results.
Use Conditional G-Code
Some firmwares like Klipper support conditional logic via macros. You can create auto-purge scripts that run before every print to clear old filament. This ensures color consistency and prevents clogs.
Maintain Consistent Print Results
Reliable programming means achieving repeatable outcomes across different prints and materials.
Save and Organize Profiles
Create separate profiles for different filament types like PLA, PETG, and TPU. Make distinct profiles for varying nozzle sizes and quality modes. Label them clearly, such as “PLA – 0.2mm Layer – 50mm/s,” to avoid confusion.
Update Firmware Regularly
Manufacturers release firmware updates that improve G-code interpretation and fix bugs. Download the correct file from the official site and copy it to your SD card. Follow your printer’s specific update procedure carefully. Always backup your current firmware before updating to prevent data loss.
Frequently Asked Questions About 3D Printer Programming
What software do I need to program a 3D printer?
You need slicing software like Cura, PrusaSlicer, or Simplify3D. These programs convert your 3D models into G-code that your printer can read and execute.
Is coding knowledge required to program a 3D printer?
No, you do not need to write code from scratch. Slicing software handles the complex programming, though understanding basic G-code helps with troubleshooting.
How do I know if my G-code is correct?
Use the layer preview feature in your slicer to visually inspect the toolpath. You can also run a test print with a simple object like a calibration cube.
Why does my printer ignore my G-code commands?
This often happens if the firmware is outdated or incompatible with specific commands. Check that your slicer matches your printer model and firmware version.
Can I program my 3D printer wirelessly?
Yes, many modern printers support Wi-Fi or Ethernet connections. You can use apps like OctoPrint or manufacturer-specific software to send files remotely.
Key Takeaways for Programming Your 3D Printer
Programming a 3D printer involves selecting the right slicer, preparing clean models, and tuning parameters for your specific hardware. By mastering these steps, you transform raw digital files into precise physical objects with minimal errors.
Start with pre-configured profiles and gradually tweak settings as you gain experience. Regular calibration and firmware updates ensure your machine continues to produce high-quality results. Now that you know how to program a 3D printer, load your first file and start creating.


