

You need to email sales reports or view them digitally, but your system only prints to a physical terminal. A virtual printer solves this problem by mimicking a real printer and sending output directly to your screen as a PDF. This guide shows exactly how to setup a virtual printer in Windows and configure it with business software like MicroSale. You’ll get shareable, paperless reports without buying extra hardware.
Setting up a virtual printer takes less than 10 minutes and prevents spooling errors that disrupt report generation. You’ll assign the printer as default, link it to your application, and start producing clean PDFs instantly. Follow the steps below to build a reliable virtual printing environment on any Windows PC.
Add a Local Virtual Printer in Windows
Begin by using Windows’ built-in tools to install a local printer that sends output to a file instead of paper.
Open the Printers & Scanners Menu
Press Windows + S, type Printers & Scanners, then click the result. In Windows 10 and 11, this opens the modern Settings panel. On older systems, search for Devices and Printers in the Control Panel. Once the window opens, click “The printer that I want isn’t listed” at the top.
This bypasses automatic detection and allows manual setup, which is critical for creating a virtual device not tied to hardware.
Choose the Manual Setup Option
Select “Add a local printer or network printer with manual settings”, then click Next. This option gives you full control over port and driver selection, ensuring compatibility with virtual workflows.
Avoid wireless or network-based options here, as they’re meant for physical devices. Stick with local configuration for reliable virtual printing.
Select a Compatible Port
Under “Use an existing port,” choose XPSPort (Local Port) if available. If not, select LPT3 Port as the alternative.
Why this matters: These ports prevent spooling conflicts. Standard USB or network ports may cause printing errors or failed PDF generation.
If XPSPort is missing, click “Create a new port”, choose Local Port, and manually enter XPSPort: as the port name. Confirm and proceed.
Install a Generic Printer Driver
Click Next, then select any manufacturer (such as Brother, Kodak, or HP) from the list. Pick a basic model like Brother HL-2270DW or HP LaserJet. The driver choice doesn’t matter since no real printing occurs.
Then choose “Use the driver that is currently installed (recommended)” and click Next.
💡 Pro Tip: Use generic PCL or PostScript drivers for better PDF rendering when viewing reports.
Name and Finalize the Printer
Enter a clear name such as “MicroSale PDF Printer” or “Virtual Report Printer” so it’s easy to identify later.
Make sure “Do not share this printer” is selected unless multiple users need access. Finally, check the box to set this printer as default before clicking Finish.
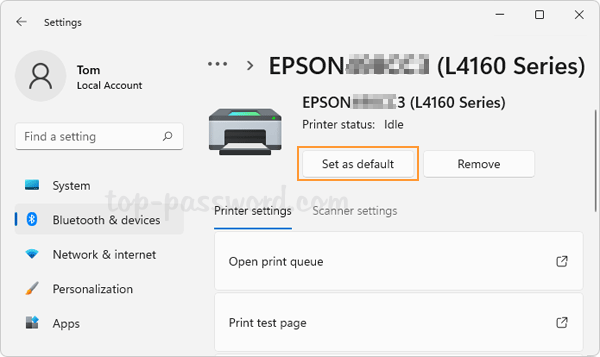
⚠️ Critical: If emailed reports appear blank, the virtual printer likely isn’t set as default. Return to Printers & Scanners, right-click your new printer, and select Set as default printer.
Configure the Virtual Printer in MicroSale
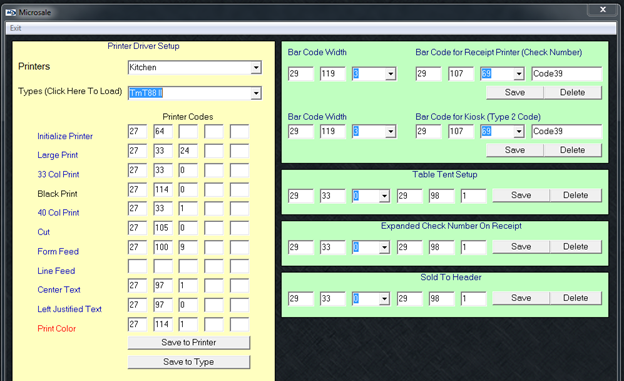
Now that the printer exists in Windows, link it to MicroSale for digital report handling.
Launch MicroSale and Access Printer Setup
Open MicroSale, then navigate to:
Managers Menu > Register Setup > Terminal Configuration > Printer Setup
This section controls where receipts and reports are sent during end-of-day processes.
Assign the Virtual Printer to Reports
In the Printer Setup window, locate the Report field. Click the dropdown and select your newly created virtual printer. Click Save, then exit the configuration menu.
✅ Success Signal: When you run a report, a print dialog appears, but instead of sending to paper, it generates a file you can save or email.
Test the Report Output
Go to Reports Menu > Daily Summary or any standard report. Run the report and confirm the print queue shows the virtual printer as the destination.
The system prompts you to save the file, typically as a PDF. Choose a location, name the file, and open it to verify the content.
Once confirmed, you can:
– Attach the file directly to an email
– Automate saving to a shared folder
– View reports onscreen without printing
🔄 Automation Note: Combine this setup with a cloud sync tool like OneDrive or Dropbox to auto-upload reports for remote access.
Troubleshoot Common Virtual Printer Issues
Even with correct setup, problems can arise, especially with spooling, blank outputs, or app integration.
Fix Blank or Missing Report Content
If emailed reports come through blank, try these steps:
– Confirm the virtual printer is set as default in Windows
– Reinstall the printer using XPSPort
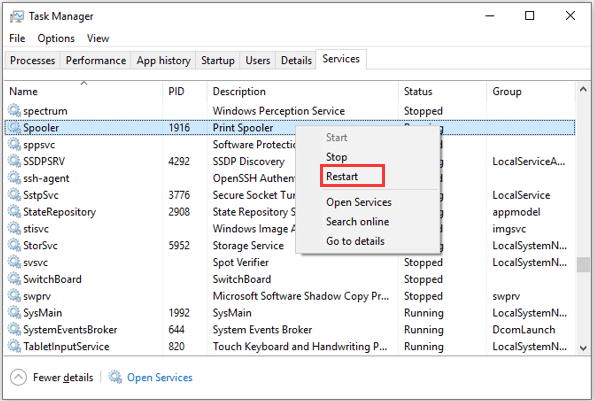
– Restart the Print Spooler service:
1. Press Win + R, type services.msc
2. Find Print Spooler, right-click, and select Restart
3. Try printing again
Resolve Spooling Errors
Spooling issues often stem from incorrect ports. To fix them:
– Never use USB001, LPT1, or standard network ports
– Always use XPSPort or LPT3
– Delete and recreate the printer if errors persist
Handle Driver Conflicts
If MicroSale doesn’t recognize the printer:
– Reinstall using a common driver such as HP LaserJet Pro
– Avoid proprietary or GDI-only drivers
– Ensure the driver supports both x86 and x64 platforms if using mixed systems
Optimize Virtual Printing for Business Use
Maximize efficiency by integrating your virtual printer into daily operations.
Rename the Printer for Clarity
Use descriptive names like:
– “Email Reports – Do Not Print”
– “Digital Daily Summary Printer”
Avoid generic names like “Printer 2” to prevent confusion across teams.
Prevent Accidental Physical Printing
Disable other printers temporarily when testing:
– Right-click unwanted printers and select Remove device
– Or set them offline to force routing through the virtual printer
Combine With Email Workflows
After generating a report:
1. Save it as a PDF
2. Open your email client
3. Attach and send it to managers or accountants
💼 Pro Workflow: Use Outlook rules or Power Automate to auto-send saved reports at scheduled times.
Security and Maintenance Tips
Keep your virtual printing system secure and reliable over time.
Update Printer Permissions
Restrict access if sharing the machine:
– Right-click the printer and select Printer Properties
– Open the Security tab
– Remove Guest or Everyone permissions
– Assign only necessary user roles
Monitor the Print Queue
Check the print queue occasionally:
– Open Printers & Scanners and click your virtual printer
– Clear any stuck jobs to avoid delays
Back Up Your Configuration
Document your setup:
– Note the port used (XPSPort or LPT3)
– Save the driver name and printer name
– Store the steps in a team knowledge base
This speeds up reinstallation after OS updates or hardware changes.
Frequently Asked Questions About Setting Up a Virtual Printer
What is a virtual printer used for?
A virtual printer replicates a physical printer’s interface but sends output to a file instead of paper. It’s commonly used to email reports, view digital copies onscreen, or save PDFs without needing a physical 80-column report printer.
Do I need special software to create a virtual printer?
No. Windows has built-in tools to add a local printer manually. By selecting a compatible port and a generic driver, you can turn any Windows PC into a virtual printing station without third-party software.
Which port should I use for a virtual printer?
Always use XPSPort (Local Port) if available. If it’s not an option, use LPT3 Port. These are the only ports that reliably prevent spooling errors in virtual printing setups.
Why are my emailed reports blank?
Blank reports usually mean the virtual printer isn’t set as the default printer in Windows. Return to Printers & Scanners, right-click your virtual printer, and select Set as default printer. Then test the report again.
Can I use a virtual printer alongside a physical receipt printer?
Yes. A virtual printer works alongside an attached receipt printer. Use the receipt printer for customer transactions and the virtual printer for digital reports that need to be emailed or saved.
How do I view reports onscreen after setting up a virtual printer?
After assigning the virtual printer in MicroSale’s Printer Setup, run any report from the Reports Menu. Instead of printing to paper, Windows prompts you to save a PDF. Save the file and open it to view the report onscreen.
Final Thoughts on Setting Up a Virtual Printer
Setting up a virtual printer streamlines digital reporting, especially in retail and POS environments running MicroSale. By following the correct how to setup a virtual printer process, you eliminate paper waste, reduce hardware dependency, and enable seamless email delivery of critical reports.
The most important steps are choosing the right port (XPSPort or LPT3), setting the printer as default, and assigning it within your software. With proper configuration, you’ll generate clean, shareable PDFs every time. Keep the printer updated, monitor for spooling issues, and integrate with automation tools to get the most out of your digital workflow. Start by opening Printers & Scanners on your terminal today, and you’ll have a fully functional virtual printer within minutes.


