If your 3D printer produces inconsistent layers or skips steps, the culprit is often poor 3D printer maintenance rather than a software glitch. Regular care prevents mechanical binding, under-extrusion, and permanent component damage that ruins print quality.
This guide details a complete schedule for cleaning, lubricating, and inspecting your machine. You will learn specific steps to fix tension issues, clear clogs, and update firmware so your printer runs smoothly for years.
Monthly Mechanical Tune-Up for Smooth Motion
Mechanical systems loosen over time due to vibration and thermal cycling. A monthly check ensures your axes move freely without wobble or binding that causes print defects.
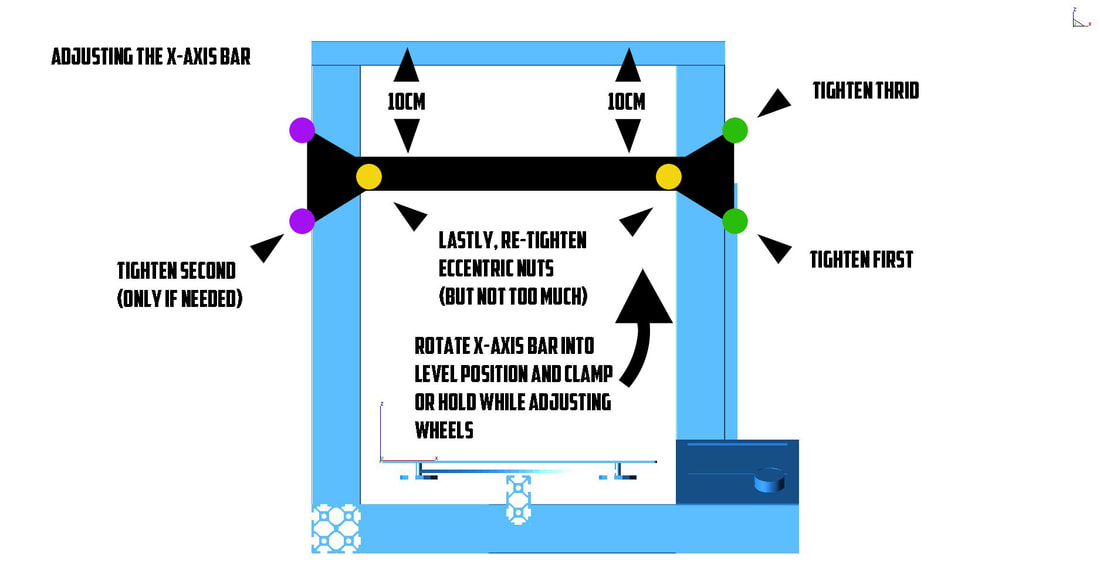
Adjust Eccentric Nuts on V-Wheel Printers
V-wheel printers like the Ender 3 use eccentric nuts to control wheel-to-rail clearance. Vibration often loosens these, causing the carriage to wobble or bind during movement.
Symptoms of misalignment include:
* Jerky movement on the X or Y axis
* Squeaking or grinding noises during travel
* Visible play when wiggling the extruder carriage
Follow these adjustment steps:
1. Locate the eccentric nuts on your extruder carriage and bed frame.
2. Use a spanner to rotate the nut slightly clockwise to tighten or counter-clockwise to loosen.
3. Move the carriage by hand until you feel zero wobble but still have smooth motion.
4. Repeat this process on all wheels, including those under the bed.
Pro Tip: Adjust in tiny increments. Over-tightening increases friction and strains your stepper motors significantly.
Perform the Plink Test for Belt Tension
Loose belts cause layer shifts while over-tightening risks motor damage. You must find the perfect balance for dimensional accuracy.
Use the plink test to verify tension:
1. Flick the belt lightly with your finger.
2. Listen for a high-pitched plink similar to a guitar string.
3. A dull thud means the belt is too loose.
4. A tight squeak indicates over-tensioning.
Tensioning methods vary by model:
* Ender 3 S1: Turn the front knob until you achieve the plink sound.
* Most others: Loosen the hex bolt, pull the belt taut, and re-tighten.
* Core XY printers: Check monthly as heat causes thermal expansion.
Replace the belt if it snaps, shows fraying, or if print dimensions drift despite correct steps per millimeter settings.
Clean and Lubricate Linear Rods Correctly
Dirt and dried grease on linear rods cause jerky movement and Z-band artifacts on your prints. Proper cleaning restores smooth travel.
Cleaning steps:
1. Move the print head to the minimum X and Y positions.
2. Dip a lint-free cloth in 90% isopropyl alcohol.
3. Wipe the rods thoroughly from end to end.
4. Move to the maximum position and repeat to cover full travel.
Lubrication rules depend on your bearing type:
* Self-lubricating bearings: Do not add oil or grease as it blocks pores.
* Grease-packed bearings: Apply a tiny amount of high-temp grease.
* Linear rails: Follow manufacturer specs strictly.
Coat rods lightly while moving the carriage and wipe off excess to prevent dust buildup. Never lubricate V-wheels since plastic-on-aluminum relies on dry friction.
Z-Axis and Lead Screw Care Procedures
The Z-axis lead screw controls vertical movement. A dirty or dry screw causes horizontal banding and inconsistent layer heights across your models.
Clean and Grease the Z Lead Screw

You should clean the lead screw monthly or after printing high-temperature filaments like ABS. Listen for grinding noises that indicate dry operation.
Step-by-step cleaning process:
1. Raise the bed to the top position.
2. Inspect the screw top for black, gritty residue.
3. Wipe the entire length with an alcohol-soaked cloth.
4. Apply a thin layer of white lithium grease.
5. Lower and raise the bed five to ten times to distribute lubricant.
Warning: Do not grease plastic lead screw nuts as some greases degrade Delrin material. Use dry lubricants instead. Avoid over-greasing because excess attracts dust and forms gunk.
Hotend and Extrusion System Maintenance
The extrusion system pushes filament through the hotend. Wear here leads to under-extrusion, jams, and failed prints.
Inspect and Replace Worn Nozzles

Brass nozzles wear fast, especially when using abrasive filaments. Regular inspection prevents flow issues.
Signs of nozzle wear include:
* Inconsistent extrusion rates
* Excessive stringing or oozing
* Visible flaring under magnification
Lifespan estimates by filament:
* PLA and PETG: 6 to 12 months of regular use
* Carbon fiber or metal-filled: Less than one spool
Hot cleaning procedure:
1. Heat the hotend to printing temperature.
2. Remove the silicone sock if present.
3. Scrub the nozzle tip with a brass wire brush.
4. Wipe with an alcohol cloth to remove residue.
Never unscrew a cold nozzle because thermal contraction can fuse it to the heat block. Replace the nozzle if cleaning does not restore flow or if the orifice looks enlarged.
Trim or Replace Worn Bowden Tubes

PTFE tubes degrade from repeated retraction pressure. This wear causes filament slipping and frequent jams.
Symptoms of tube wear:
* Filament slips during printing
* Frequent clogs at the hotend
* Visible thinning near the collet
Fix minor wear with trimming:
1. Cut 2 to 5 mm off the tube end using a flush cutter.
2. Ensure a straight, square edge.
3. Reinsert and re-clamp firmly.
Replace the entire tube if repeated trimming makes it too short or if the internal bore shows scoring. Use high-temp PTFE for better durability.
Clear Clogged Hobbed Gears
Grinding filament creates dust that packs into gear teeth. This reduces grip and causes under-extrusion.
Cleaning steps:
1. Open the extruder cover if possible.
2. Inspect gear teeth for filament shavings.
3. Use tweezers or a hobby knife to remove debris.
4. Blow out remaining dust with canned air.
Prevent clogs by avoiding excessive retraction settings and using high-quality filament. Upgrade to hardened steel gears if printing abrasive materials regularly.
Bed Leveling and Adhesion Maintenance
A level bed ensures the first layer sticks properly. Poor adhesion leads to warped corners or total print failure.
Re-Level the Bed Weekly
Even printers with auto-bed leveling need mechanical stability. Spring-based beds loosen quickly due to vibration.
For spring-based beds:
1. Heat the bed and nozzle.
2. Home the printer.
3. Move the nozzle to each corner.
4. Adjust wingnuts until paper drags slightly.
Check frequency should be weekly or if the first layer looks inconsistent. For sensor-based systems, ensure the probe is clean and the arm moves freely. Tighten any loose mounting screws to maintain accuracy.
Clean the Build Plate After Every Print
Residue kills adhesion. You must clean the build plate after every single print job.
Safe cleaning methods:
* PEI and Glass: Wash with warm soapy water and a sponge.
* Textured plates: Use alcohol sparingly to avoid degrading coatings.
Cleaning steps:
1. Remove the plate from the bed if possible.
2. Scrub gently with a non-abrasive cloth.
3. Rinse and dry thoroughly.
4. Reattach and re-level if needed.
Reapply adhesion aids like glue stick or hairspray only when necessary for difficult materials. Avoid touching the surface with oily hands.
Structural Integrity Checks for Safety
Vibration loosens fasteners over time. Regular checks prevent catastrophic failures during long prints.
Tighten Loose Fasteners Monthly
Vibration loosens screws on pulleys and motor mounts. This causes layer misalignment and motion errors.
Critical points to check:
* X and Y motor pulleys
* Z-axis lead screw couplers
* Belt tensioner bolts
* Motor mounting screws
Procedure:
1. Power off the printer.
2. Use the appropriate Allen key or wrench.
3. Check each fastener and retighten if loose.
4. Do not overtighten as stripped threads are worse than loose ones.
Even a half-turn of looseness can cause significant layer shifting issues.
Inspect for Plastic Creep Every 3 Months
3D printed parts under stress slowly deform, a phenomenon called creep. This affects bed brackets and spool holders.
Signs of creep include:
* Sagging or bending parts
* Cracks near screw holes
* Misaligned components
Replace deformed parts with upgraded metal or reinforced printed versions immediately. Creep leads to binding and print failure if ignored.
Thermal and Electrical System Maintenance
Dust accumulation reduces cooling efficiency. This leads to heat creep and potential electronic failures.
Remove Dust from Fans and Heatsinks
Dust blocks airflow and causes overheating. Clean your fans monthly to ensure proper thermal management.
Monthly cleaning routine:
1. Power off and unplug the printer.
2. Use canned air to blow out hotend heatsink fins.
3. Clear the part cooling fan and control board vents.
4. Vacuum the frame with a brush attachment.
Never use compressed air from a compressor as moisture can damage electronics. Dust on the hotend can ignite at high temperatures.
Update Firmware for Stability
Outdated firmware causes avoidable bugs and motion issues. Updates often fix hardware-like problems via software.
Benefits of updates:
* Bug fixes for bed leveling and homing
* Improved safety features
* Better performance with new filaments
Update steps:
1. Visit the manufacturer website.
2. Download the latest stable release.
3. Copy the file to an SD card.
4. Boot the printer with the card inserted.
Check for updates every two to three months to ensure optimal performance.
Daily and Weekly Workflow Habits
Small daily habits prevent major repairs. Consistent cleaning keeps your 3D printer maintenance schedule manageable.
Clean Debris Immediately After Printing
Leftover filament scraps cause jams and motion issues. Remove skirt lines and failed prints immediately.
Do this after every print:
* Remove purge lines and failed prints
* Pick up loose filament bits near belts
* Wipe the build surface if sticky
Keep a trash can nearby to make cleanup part of your routine. Debris can wrap around lead screws and contaminate lubricants.
Follow the 5 to 10 Print Deep Clean Rule
Every 5 to 10 prints, perform a quick system health check. This prevents small issues from becoming big problems.
Checklist:
* Inspect belts for proper tension
* Wipe down frame and rails
* Clean extruder gears
* Verify bed adhesion
* Check for loose screws
Think of this as a quick health checkup for your printer.
Maintenance by Printer Type

Different architectures require specific care. Know your machine type to apply the right techniques.
V-Wheel Printers: Do Not Lubricate Wheels
Models like the Ender 3 rely on dry nylon-on-aluminum contact. Lubricating these wheels ruins their grip.
Maintenance focus:
* Eccentric nut adjustment
* Z-screw lubrication
* Wheel cleanliness
Never oil or grease V-wheels as they are designed to run dry.
Core XY and Enclosed Printers: Watch Belt Tension
Heat from enclosed chambers causes belts to expand and contract. This changes tension frequently.
Best practices:
* Check belt tension monthly
* Use high-temp belts if available
* Clean the internal chamber often
Enclosures trap heat and debris, requiring more frequent cleaning.
Rod-Based Printers: Keep Rails Spotless
Printers with linear rods need clean rods to function. Dust causes grinding and accelerates bearing wear.
Key rule: Wipe rods with alcohol weekly. Dirty rods cause jerky movement and poor print quality.
Troubleshoot by Maintenance Signs
Use print defects to diagnose mechanical issues. Your prints tell you what needs fixing.
Fix Z-Banding with Screw Maintenance
Horizontal lines on prints often mean a dry or dirty Z-screw. Clean and re-grease the lead screw to solve this. Also check Z-coupler tightness.
Stop Layer Shifting with Belt and Pulley Check
Sudden X or Y shifts mid-print indicate loose belts or pulleys. Use the plink test and tighten motor pulley screws. Loose pulleys are a top cause of shifting.
Solve Under-Extrusion with Nozzle and Gear Check
Thin layers or gaps suggest flow issues. Inspect the nozzle for wear, check hobbed gears for dust, and examine the Bowden tube. Clean or replace worn components.
Silence Noisy Printers with Lubrication
Squeaking or grinding means dry components. Lubricate rods if applicable, adjust eccentric nuts, and replace noisy wheels.
Prevent Dimensional Errors with Belt Maintenance
Prints that are too big or small indicate belt stretch. Measure belt tension and confirm steps per millimeter in firmware. Replace stretched belts for accuracy.
Frequently Asked Questions About 3D Printer Maintenance
How often should I lubricate my 3D printer?
You should lubricate linear rods and Z-screws monthly. However, never lubricate V-wheels or self-lubricating bearings. Always check your specific bearing type before applying any grease or oil.
Why does my 3D printer keep skipping layers?
Skipped layers usually result from loose belts, misaligned eccentric nuts, or binding rods. Perform the plink test on belts and ensure all wheels move smoothly without wobble.
When should I replace my 3D printer nozzle?
Replace brass nozzles every 6 to 12 months for standard filaments. If you print abrasive materials like carbon fiber, replace the nozzle after less than one spool to maintain accuracy.
Can I use WD-40 on my 3D printer?
No, do not use WD-40 on linear rods or bearings. It is a solvent that washes away lubricant and attracts dust. Use high-temp grease or oil designed for 3D printers instead.
How do I know if my belts are too tight?
Belts that are too tight make a high-pitched squeak rather than a plink sound. Over-tightening strains motor bearings and can cause premature failure of the belt itself.
Key Takeaways for Effective 3D Printer Maintenance
Consistent 3D printer maintenance prevents most common print failures. Focus on tension, cleanliness, and proper lubrication to keep your machine running smoothly. Replace wear items like nozzles and belts before they cause major issues.
Start today by cleaning your rods, checking belt tension, and updating your firmware. These simple steps ensure flawless prints and extend the life of your printer significantly.