Is your printer producing faded text, streaky images, or missing colors entirely? These frustrating issues usually signal clogged nozzles or dirty internal components that need immediate attention. Knowing how to clean a printer properly can restore crisp output, extend the device lifespan, and save you from costly repairs or replacements.
This guide delivers targeted, model-specific methods ranging from basic software resets to advanced manual fixes based on real diagnostic protocols. Whether you use a home inkjet or a professional large-format device, you will learn exactly when and how to intervene safely. By the end, you will be able to diagnose print issues, execute effective cleaning cycles, and maintain peak performance with confidence.
Run a Nozzle Check Before Cleaning

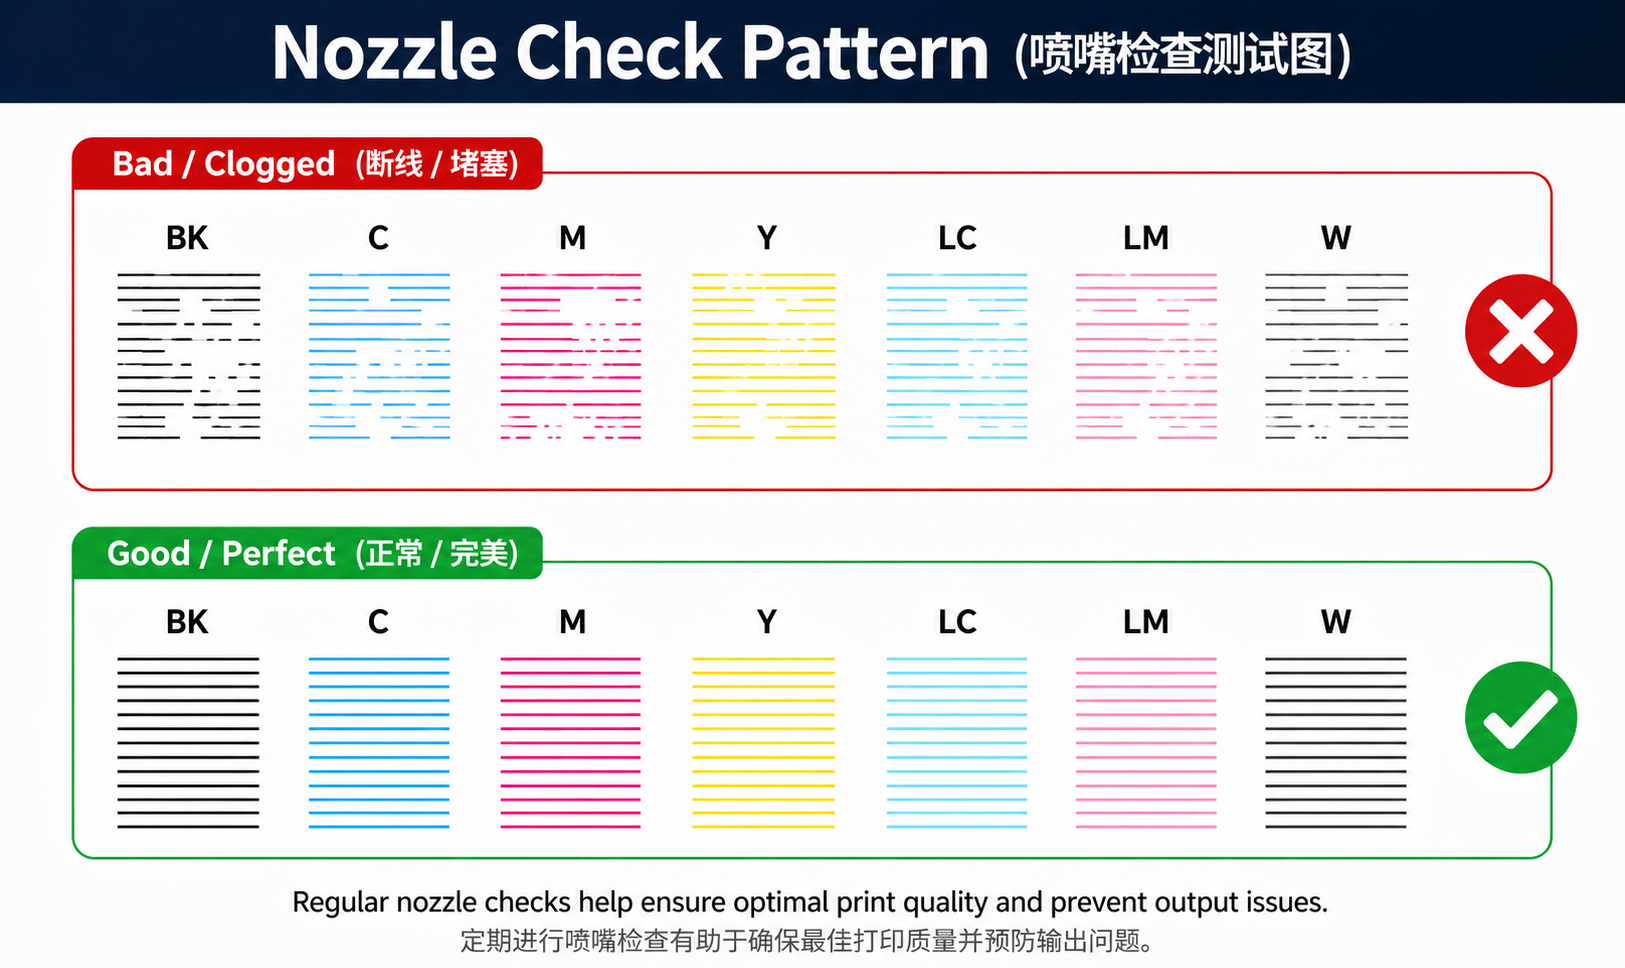
Never attempt to clean your printer without first confirming the issue with a nozzle check. This diagnostic print reveals whether nozzles are actually clogged or if the problem lies elsewhere in the system. Printers use this specific pattern to assess print head health accurately.
You should look for clear, solid lines which indicate healthy nozzles. Gaps, dots, or broken lines signal clogged channels that require intervention. Newer models may run automatic checks and trigger cleaning if flaws are detected automatically.
However, third-party inks like Piezography can confuse internal sensors on modern devices. In those cases, rely on visual inspection rather than the printer’s automated judgment. If the pattern looks good, cancel further cycles immediately to avoid wasting expensive ink.
Warning: Do not clean blindly. Running unnecessary cycles wastes ink and stresses the system. Always verify with a nozzle check first.
Why Your Printer Might Reject Good Patterns
Automatic nozzle checks on newer models measure patterns internally to decide if cleaning is needed. If you use specialized inks, the printer might reject a visually perfect pattern. You must trust your eyes over the machine in these specific scenarios.
Use Software Cleaning Utilities First
When nozzle checks show gaps, start with the built-in Head Cleaning function via your computer. This method is safe, controlled, and represents the best first step for most users. It uses standard pressure to clear minor blockages without physical risk.
Windows Cleaning Steps
- Power on the printer and ensure the Ink Out light is off.
- Open Control Panel and select Devices and Printers.
- Right-click your printer and choose Printer Properties.
- Go to the Utility tab and click Head Cleaning.
- Follow the prompts while flashing lights indicate the cycle is active.
- Click Print Nozzle Check Pattern after completion to verify results.
Mac Cleaning Steps
- Open any document and choose File then Print.
- Click Options or Show Details, then select the Utility button.
- Choose Head Cleaning and follow the on-screen instructions.
- Print a nozzle check pattern immediately afterward.
Pro Tip: Always print a nozzle check after cleaning to reset the cycle counter. Otherwise, the printer may block future cleaning attempts unnecessarily.
Clean Using Control Panel Buttons
You do not need a computer to trigger a cleaning cycle on most devices. Most printers let you initiate cleaning directly from the hardware buttons for quick maintenance. This is ideal if your computer cannot connect to the device.
Manual Button Method
- Confirm the power light is solid and the Ink Out light is off.
- Press and hold the Ink button (droplet icon) for three seconds.
- Wait for flashing lights to stop, which signals the cycle is done.
- Print a nozzle check from the control panel or software.
If the Ink Out light flashes when you hold the button, it starts cartridge replacement. Press the button again immediately to cancel this mode. This method works on Epson, Canon, and many HP models effectively.
Always refer to your specific model manual for exact button sequences. Different manufacturers use slightly different combinations for maintenance modes.
Try Advanced Automated Cleaning Cycles
Standard cleaning sometimes fails to clear stubborn dried ink. You must escalate to deeper automated cycles if initial attempts show no improvement. These methods use higher pressure or specific channel targeting.
Run Multiple Cleaning Cycles
Perform up to five sequential cycles while printing a nozzle check every one or two cycles. Look for steady improvement in the pattern quality. If gaps close gradually, continue with the process.
Stop immediately if you see no change or if the pattern worsens. The issue is likely mechanical or involves the capping station rather than simple nozzle clogs.
Power Cleaning: On some models, every fifth cycle activates a stronger suction flush. This helps dislodge stubborn blockages that standard cycles miss.
Use KK Cycles for Large Format Printers
Large-format Epson models like the 7900 or 9900 offer KK cleaning levels. KK1 provides a standard clean while KK2 delivers a high-power clean using more ink. If standard cycles fail, try one or two KK2 cycles.
Channel Pair Cleaning for Pro Models
High-end printers allow targeted cleaning by channel pairs to save ink. You can select specific pairs like Light Cyan and Light Magenta or Cyan and Magenta. Use this feature to clean only affected colors.
Try the Overnight Rest Method
Sometimes time is the most effective cleaner for dried ink inside nozzles. If four or five cleaning cycles yield no improvement, stop the automated process immediately.
Turn the printer off and leave it undisturbed overnight completely. The next day, power it on and run a single nozzle check. Dried ink may soften with prolonged rest, allowing a single cleaning cycle to succeed where repeated attempts failed.
Best for: Printers unused for weeks. Combine this method with monthly test prints to prevent drying in the future.
Clean the Capping Station Manually

Automated cleaning can make print quality worse if the capping station is clogged. This rubber gasket and sponge seals the print head when parked. If blocked with dried ink or paper fibers, it leaks ink back onto the nozzles.
Safety First Steps
Wear nitrile gloves to protect your skin from ink and solvents. Unplug the printer before inserting any tools or hands inside the housing. Avoid getting liquid near electronics, especially under the capping area.
Access the Capping Station
Move the print head left to expose the cap underneath. Desktop models require pressing “Ink Change,” waiting, unplugging, and sliding the head left. Pro models like the P800 need you to power on, unplug during startup when the head moves right, open the lid, and slide left.
Wide format models like the 7900 or 9900 require Serviceman Mode. Hold Right, Down, and OK on power, select “Wiper Replacement,” then power off.
Clean the Sponge Thoroughly
- Use a straw or syringe to add two or three drops of PiezoFlush, warm distilled water, or Windex.
- Let the fluid sit for ten seconds, then allow it to drain.
- Repeat this process three to five times for best results.
Warning: Do not flood the area. Excess liquid can damage circuitry permanently.
Dry and Wipe Components
Use a Bounty paper towel folded to four inches by four inches. Gently dab the sponge by pushing down and slightly right to protect springs. Use a damp Q-tip to clean the gasket edge and remove all lint.
Return the print head to the far right, plug in, and power on. Run one or two cleaning cycles and print a nozzle check. Clean every one to two months or with heavy use.
Clean the Flushing Box on Pro Models
Professional printers like the 3800 or P800 feature a flushing box that collects waste ink. This component sits to the left of the capping station. If blocked, suction fails and renders cleaning cycles useless.
Cleaning Steps for Flushing Box
Use the same method as the capping station for this component. Access via service mode and apply cleaning fluid to the sponge. Drain the fluid and dry with a paper towel, then wipe the surrounding area.
Replacement Tip: Replace this part every one to three years. Pair replacement with dampers and the capping station for best results.
Scrub the Print Head for Stubborn Clogs
Manual scrubbing removes fiber and ink buildup on old or neglected printers. This technique carries high risk and can scratch nozzles if done incorrectly. It is not recommended for frequent use.
Procedure for Scrubbing
- Move head to service position and unplug the printer.
- Cut a Bounty towel into a one-inch by eight-inch strip.
- Lightly dampen with distilled water or PiezoFlush, avoiding Windex on the head.
- Flatten and insert under the head path carefully.
- Slide head over towel, then gently move towel back and forth under the head.
- Use two or three clean strips until minimal residue appears.
- Wipe the channel with a dry towel and Q-tips.
- Plug in, run one or two cleaning cycles, and check the nozzle pattern.
Best for: Printers unused for months. This prevents clogs from turning permanent.
Flush with a Syringe for Deep Clogs
Syringe flushing forces fluid through specific channels to dislodge deep clogs. This method is for small format printers only. Exposed electronics on large format models mean one drop can destroy the head.
Tools Needed
- Syringe (1–3ml)
- Dummy cartridge or flush kit
- PiezoFlush or distilled water
- Absorbent paper towel
Steps for Syringe Flushing
- Move head to service position, unplug, and remove cartridges.
- Place a moist paper towel under the head path to catch runoff.
- Insert a dummy cartridge into the target channel.
- Draw 1ml fluid into the syringe and attach to the dummy.
- Gently push fluid, stopping if you feel resistance.
- Pull back to extract debris from the channel.
- Repeat until the plunger moves freely.
- Wipe the head bottom with a damp towel.
- Reinstall cartridges and prime dampers if used.
- Run two or three cleaning cycles, then nozzle check.
Target only problem channels. Never flush working ones unnecessarily.
Use the Right Cleaning Materials

Using improper tools can cause more harm than good to your device. Select materials that are safe for print heads and internal components.
| Item | Purpose | Notes |
|---|---|---|
| PiezoFlush | Professional-grade cleaner | Safe for heads, caps, and flushing boxes |
| Warm distilled water | Low-cost alternative | Avoid tap water as minerals clog |
| Windex (blue) | Capping station cleaning | Never use on print head nozzles |
| Bounty paper towels | Wiping and drying | Low lint and high durability |
| Cotton swabs | Gasket and edge cleaning | Use sparingly to avoid fiber shedding |
| Syringe & straw | Precision fluid delivery | Reusable and easy to clean |
Safety Gear Requirements
Wear nitrile gloves to protect skin from ink and solvents. Use eye protection when working near fluid injection points. These precautions prevent injury and contamination.
Avoid Critical Mistakes During Cleaning
Even experienced users make errors that damage printers. Running cleaning with low ink can trigger unintended cartridge replacement modes. Powering off mid-cycle causes head misalignment or motor damage.
Flooding the capping station allows liquid to seep into electronics. This is especially dangerous for 2100 and 2200 models. Using abrasive towels scratches the print head surface permanently.
Forcing the print head damages the carriage belt or encoder strip. If something resists, stop and investigate first. Never apply excessive force to moving parts.
Follow a Maintenance Schedule
Prevention beats repair when it comes to printer health. Print a test page or nozzle check monthly to ensure ink flow. This detects early clogs before they become severe problems.
Clean the capping station and wiper blade every one to two months. This prevents ink buildup and cross-contamination between colors. High-volume studios should perform this task more frequently.
Replace consumable parts every one to three years depending on usage. These parts include the capping station, flushing box, dampers, and wiper blade. High-volume studios should replace these annually.
Troubleshoot Based on Symptoms
Use this quick-reference table to diagnose and act on your specific issue.
| Symptom | Likely Cause | Fix |
|---|---|---|
| Faint or missing dots | Minor clog | Nozzle check then 1–2 cleaning cycles |
| No improvement after cleaning | Stubborn clog | 5-cycle sequence then overnight rest |
| Quality worsens after cleaning | Dirty capping station | Clean cap and gasket immediately |
| One color missing | Deep channel clog | Syringe flush or head scrub |
| Colors mixing | Contaminated cap | Clean capping station sponge and gasket |
Final Thoughts on How to Clean a Printer
Mastering how to clean a printer saves time, money, and frustration in the long run. Always start with a nozzle check to confirm the issue before running any cycles. Use automated cleaning first, then escalate to manual methods only when necessary.
Regular maintenance prevents most clogging issues from becoming permanent disasters. Clean your capping station monthly and replace consumable parts every few years. If you have tried all steps including syringe flushing and still see no output, your print head may be permanently damaged.
Take action today by printing a nozzle check on your device. This simple step starts the journey to crisp, clear prints and a healthier printer.
Frequently Asked Questions About Printer Cleaning
How often should I clean my printer nozzles?
You should run a nozzle check monthly and clean only if gaps appear. Frequent unnecessary cleaning wastes ink and stresses the system. Print a few pages every month to keep ink flowing and prevent drying.
Can I use tap water to clean my printer?
No, never use tap water because minerals can clog nozzles further. Use only distilled water, PiezoFlush, or specific printer cleaning solutions. Tap water causes long-term damage to internal components.
Why does my print quality get worse after cleaning?
This usually indicates a dirty capping station leaking ink back onto the head. Clean the capping station sponge and gasket manually to resolve this issue. Automated cycles cannot fix a contaminated cap.
Is it safe to clean the print head with Windex?
Windex is safe for the capping station sponge but never use it on the print head nozzles. Ammonia in Windex can damage the delicate print head components. Use PiezoFlush or distilled water for the head itself.
What should I do if five cleaning cycles do not work?
Stop the automated cycles and try the overnight rest method to soften dried ink. If that fails, manually clean the capping station or perform a head scrub. Persistent issues may require syringe flushing or part replacement.
Can I syringe flush a large format printer?
No, do not attempt syringe flushing on large format printers due to exposed electronics. One drop of fluid can destroy the print head on these models. This method is only for small format printers without dampers.