You hit print, the nozzle heats up, the bed warms, and within minutes the corners lift, the edges curl, or the whole model peels off the build plate. Few things are more frustrating than watching a print fail before it even starts, especially when you’ve already burned through hours of time and several meters of filament. Poor bed adhesion is the single most common issue in 3D printing, and it affects every material, every printer, and every skill level.
The good news? Most adhesion failures come from a handful of small, fixable problems: a contaminated plate, a misaligned Z-offset, or a filament profile that doesn’t match your loaded spool. This guide walks you through a systematic diagnostic process, twelve proven fixes, and a prevention checklist so your prints stick the first time, every time.
Clean the Build Plate Thoroughly
A dirty build surface is the number one reason filament fails to stick, even when the plate looks perfectly clean. Fingerprint oils, dust, glue residue, and leftover filament bits create an invisible barrier that blocks bonding. Cleaning is the fastest, most effective first step in any troubleshooting process.
Wash With Warm Water and Dish Soap
Use warm water with a drop of dish soap (Dawn in the US, Fair Liquid in the EU/UK). Scrub gently with a soft sponge or microfiber cloth, rinse thoroughly to remove all soap residue, and dry with a lint-free towel. Handle the plate only by the edges afterward to avoid transferring skin oils back onto the surface.
Use Isopropyl Alcohol for Daily Maintenance
IPA is perfect for quick cleaning between prints. Apply it with a clean cloth when the bed is cool. Avoid cleaning a hot bed because heat can bake residues into the surface or leave streaks.
Avoid Window Cleaners and Harsh Solvents
Window cleaners like Windex leave behind chemical films that interfere with adhesion. Acetone is a flammable solvent that can damage PEI sheets over time, causing pitting or even holes. Use it only as a last resort, never as a routine cleaner, and always in a ventilated space with gloves.
Fix Z-Offset and First Layer Height
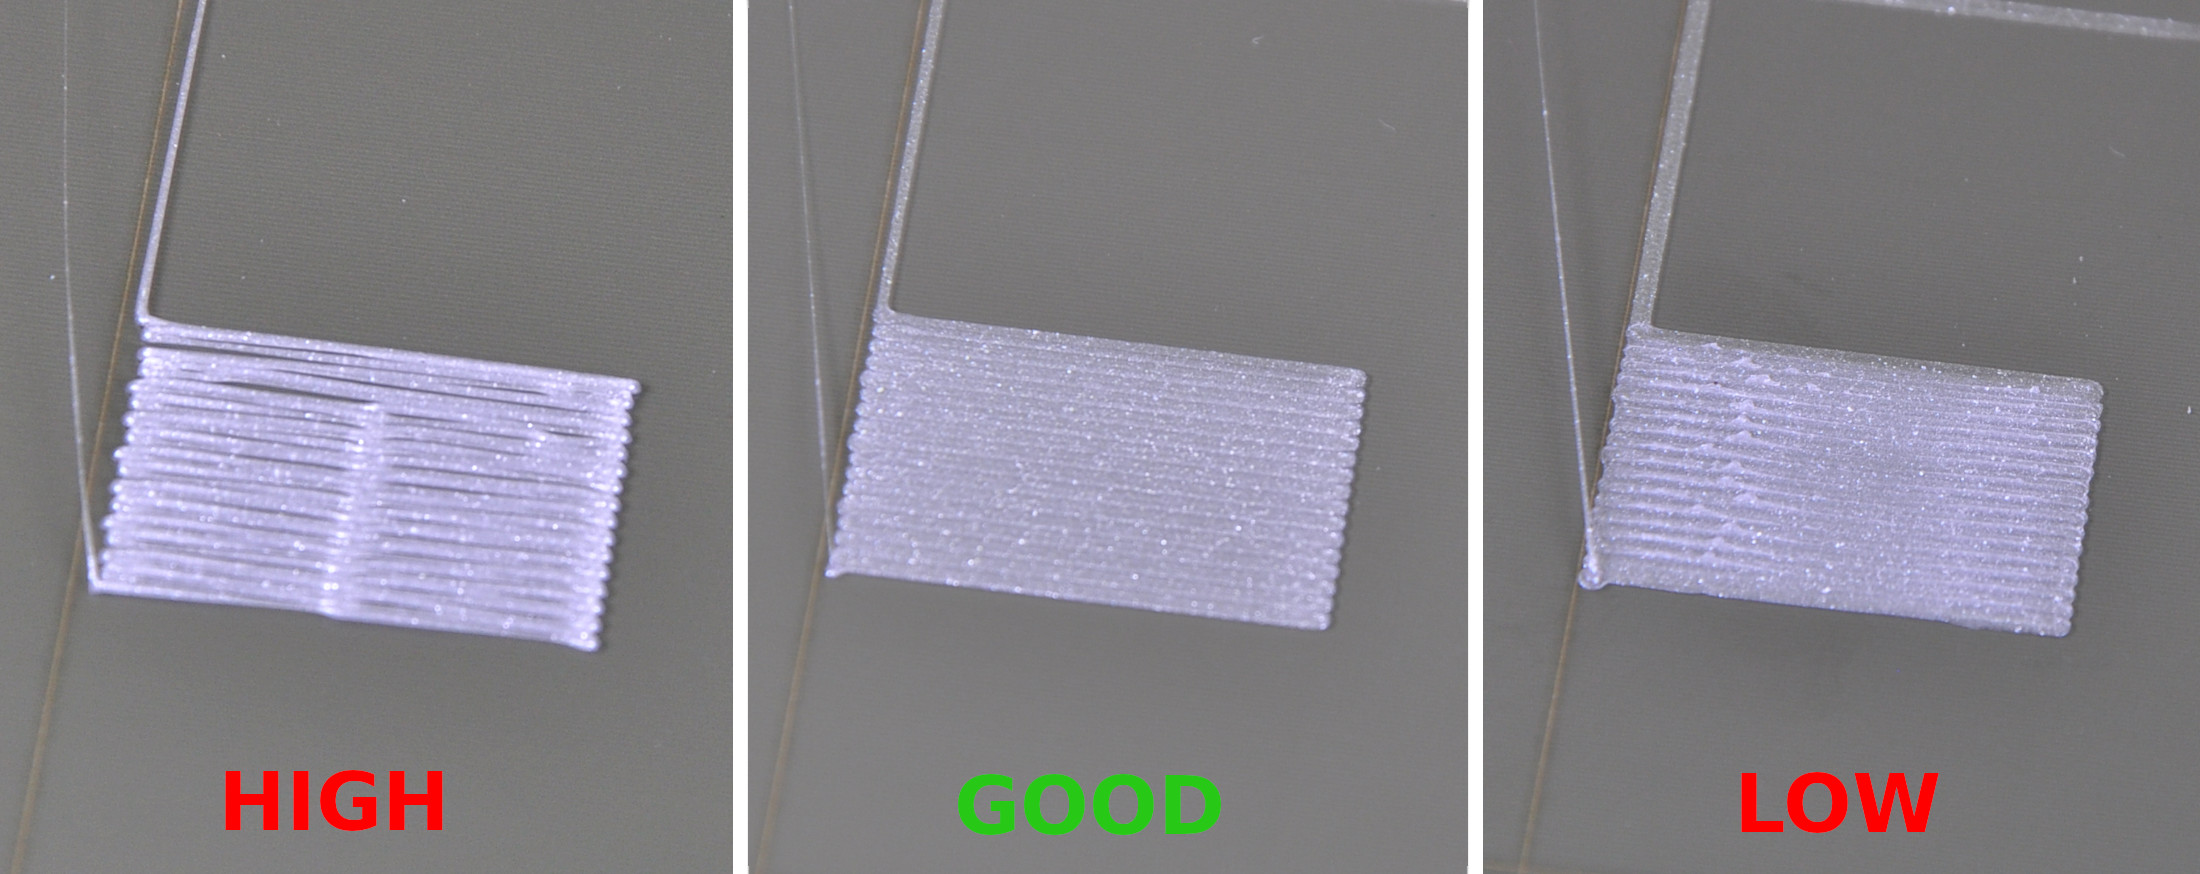
If the nozzle sits too far from the bed, the filament won’t bond. If it sits too close, it scrapes the surface and blocks material flow. The ideal first layer looks slightly flattened, smooth, even, and firmly pressed into the plate.
Perform the Paper Test
With the bed heated and nozzle at home position, slide a standard piece of paper between the nozzle and the plate. It should move with light resistance, similar to pulling a credit card from a wallet. Too loose? Lower the Z-offset. Too tight? Raise it slightly.
Adjust Z-Offset in Your Slicer or Firmware
Most printers let you adjust Z-offset in settings. On Prusa models, use the Live-Z Adjust feature during a test print. Start at -0.200 mm and reduce in 0.05 mm increments until the filament bonds evenly. Save the setting once it’s dialed in.
Never Set First Layer Below 0.2 mm
On printers like the Prusa i3 MK2, setting a first layer height below 0.2 mm creates a 50-micron gap due to Pinda probe calibration limits. This gap prevents reliable contact. Always use at least 0.2 mm for the first layer.
Re-Level the Build Plate
Even with auto-leveling, an unlevel bed causes inconsistent adhesion. One corner sticks perfectly while another lifts. This often happens after changing nozzles, moving the printer, or installing a new build plate.
Run Auto-Leveling After Every Cleaning or Maintenance
Auto-leveling assumes a clean, flat surface. Residue or debris can throw off the calibration, so always re-run the routine after cleaning or swapping parts.
Verify Each Corner Manually
After auto-leveling, check the gap at every corner and the center using the paper test. If one area feels off, repeat the leveling or make manual adjustments.
Confirm the Correct Nozzle in Software
On Bambu Lab P1S printers, make sure the selected nozzle size in Bambu Studio (under Device Settings) matches the physical nozzle. Mismatched settings lead to incorrect layer height calculations and poor adhesion.
Optimize Bed and Nozzle Temperatures
Temperature plays a critical role in adhesion. Too cold, and the filament won’t bond. Too hot, and you’ll see warping or elephant’s foot. Displayed temperatures don’t always match reality, so verify with an infrared thermometer.
Increase Bed Temperature Slightly
For PLA, start at 55°C. If adhesion is still weak, bump it up by 2–5°C (up to 60°C). Confirm with a thermometer that the bed actually reaches the set temperature.
Boost First Layer Nozzle Temperature
Raise the first-layer nozzle temperature by 5–10°C above normal. For PLA, go from 215°C to 220–225°C. This improves flow and bonding without causing excessive oozing.
Avoid Overheating
Too much heat causes the first layers to sag or spread unevenly. Make small, incremental changes and test after each adjustment.
Slow Down the First Layer
Printing the first layer too fast prevents proper adhesion. The filament needs time to bond with the bed surface, so speed should be the lowest priority on layer one.
Set First Layer Speed to 20–40 mm/s
Many users fail because they print the first layer at 50+ mm/s. Drop it to 20–40 mm/s. The goal is stability, not speed.
Keep Outer Walls Slow Too
Even if inner walls print faster, keep outer perimeters under 50 mm/s to ensure clean, strong edges that anchor the print.
Think of It Like Mortar
A slow first layer gives the plastic time to cool slightly and form a solid foundation. Think of it as laying bricks with mortar: rushing ruins the bond.
Delay Part Cooling Fan Activation
Cooling the first layers too soon causes thermal contraction and warping. It’s most critical for PETG and ABS, but even PLA benefits from a delayed fan.
Turn Off the Fan for the First 2–4 Layers
Disable the part cooling fan entirely for the first few layers, or delay activation until layer 3–5. This keeps the plastic warm and malleable long enough to bond fully.
Follow Material-Specific Fan Rules
Different materials need different approaches:
- PLA: Tolerates early cooling, but adhesion improves with a delay
- PETG: Highly prone to warping; keep the fan off for at least 5 layers
- ABS: No fan initially; best results in an enclosed chamber
Add a Brim for Problematic Prints
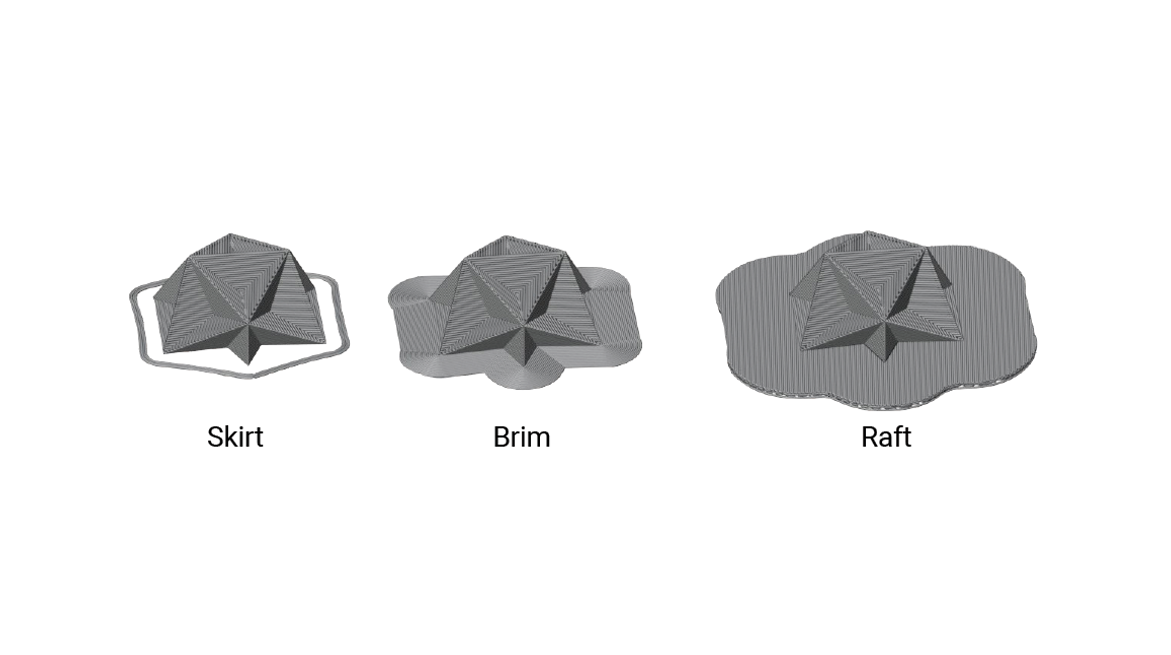
Some models have tiny contact points such as thin legs, sharp corners, or narrow bases that are prone to lifting. A brim adds extra surface area and grip without changing the model itself.
Enable Brim in Your Slicer
In Cura, PrusaSlicer, or Bambu Studio, turn on the Brim setting under print settings. Set 10–20 extra lines depending on the model size.
Use Brim for Small or Tall Models
Brim is essential for:
- Prints with minimal bed contact
- Tall, narrow shapes prone to tipping
- Models with small feet or pointed bases
- Supports starting from narrow areas
Remove the Brim Easily After Printing
Once the print cools, the brim peels away cleanly. It’s a low-cost fix that prevents major failures.
Verify Filament Type and Settings
One of the most overlooked causes of adhesion failure is using the wrong filament with the wrong settings. A Bambu Lab P1S user once spent days troubleshooting, only to discover they’d loaded PETG with PLA settings.
Double-Check the Filament Before Printing
Always confirm the spool matches the slicer profile. Don’t rely on RFID tags or color alone, because some tags are mislabeled and printers don’t always warn about mismatches.
Match Settings to Material
Each filament has its own ideal range:
- PLA: 55–60°C bed, 215–225°C nozzle, fan delayed
- PETG: 70–80°C bed, 230–245°C nozzle, fan off for 5+ layers
- ABS: 90–110°C bed, 240–250°C nozzle, enclosed chamber
Watch for Mid-Print Swaps
Some printers don’t warn when you swap spools mid-print. If the first layer sticks but later layers fail, check whether the filament changed during the job.
Test with a Different Filament
If adhesion issues persist, rule out filament-specific problems by trying a known-good spool of the correct material.
Eliminate Contamination or Degradation
Old or damp filament causes poor flow and weak bonding. Use a fresh, dry spool for testing.
Compare Slicer Performance
Some users report adhesion issues with Cura but perfect results with Slic3r or PrusaSlicer. Try slicing the same model in a different program to isolate software-related problems.
Restore or Replace Degraded Build Plates
PEI sheets lose grip over time. After months of heavy printing, even a clean plate may stop holding parts reliably.
Try Acetone Wipe (With Caution)
Some users restore adhesion by wiping a worn PEI sheet with acetone. It’s a solvent that can damage the surface if overused, so apply sparingly, wear gloves, and work in a ventilated area.
Buff Lightly With Steel Wool or Sandpaper
Fine steel wool (0000 grade) or 600-grit sandpaper can revive adhesion on non-coated surfaces. Buff gently and evenly.
Replace When Necessary
If cleaning and restoration fail, replace the build plate. Most PEI sheets last 6–12 months with heavy use.
Follow a Print Preparation Checklist
Prevention beats troubleshooting every time. Run through this checklist before each print:
- Verify filament type matches the slicer profile
- Clean the build plate with soap and water or IPA
- Check Z-offset with the paper test
- Re-level the bed if needed
- Set first layer speed to 20–40 mm/s
- Confirm bed and nozzle temperatures
- Enable a brim for small or tall models
- Delay part cooling fan activation
Make One Change at a Time
When troubleshooting, resist the urge to adjust everything at once. Change one setting, run a test print, and observe the result.
Why Isolation Matters
If you clean the bed, adjust Z-offset, increase temperature, and add a brim all at once, and the print succeeds, you won’t know which fix actually solved the problem. Future issues become harder to diagnose.
Use Calibration Test Prints
Print a simple calibration cube or first-layer test pattern after each adjustment. Focus on edge adhesion, corner sticking, and surface smoothness to identify what works.
Frequently Asked Questions About 3D Printer Filament Not Sticking to Bed
Why does my first layer stick but later layers lift?
This usually points to filament mismatch or warping. PETG printed with PLA settings will stick briefly but fail as the material contracts differently. Delayed cooling or an enclosure often fixes this.
How often should I clean my 3D printer bed?
Quick IPA wipes between prints work well for daily maintenance. A deeper clean with soap and water every week or two removes buildup that IPA can’t handle.
Is a brim the same as a raft?
No. A brim adds extra lines around the base of your model on the same layer. A raft creates a separate thick platform underneath the print. Brims use less filament and are easier to remove.
Can I use glue stick on a PEI sheet?
Glue stick can help PETG release from PEI, but it’s not necessary for PLA. If you use glue, apply a thin, even layer and clean it off completely between prints.
What is the best first layer speed?
Between 20 and 40 mm/s works for most setups. Slower is fine if your printer handles it without cooling issues. The goal is control, not speed.
How do I know if my Z-offset is wrong?
If the first layer looks stringy or lifts easily, the nozzle is too high. If the nozzle scrapes the bed and filament doesn’t flow, it’s too low. The paper test gives a quick answer.
Key Takeaways for Solving Bed Adhesion Problems
A strong print starts on the bed. If the first layer doesn’t stick, nothing else matters. Clean the plate first, because even invisible oils block adhesion. Verify the filament type, since mismatched material is a silent killer. Fix the Z-offset, because proper first-layer height is non-negotiable. Slow down, because the first layer should be boringly steady. Delay cooling, because warm plastic bonds stronger than cool plastic. Add a brim for extra grip on tricky models. And always test one change at a time to isolate the real fix.
Start with a simple calibration cube, apply the first fix from this guide, and observe the result. Within an hour, you’ll likely have a perfect first layer and a print that sticks exactly where it should.