If your Dymo label printer is not printing, you’re not alone. This common issue can halt shipping, inventory updates, and daily operations, especially when labels are needed urgently. The good news: most causes are simple to diagnose and resolve. Whether your Dymo printer shows no response, prints blank labels, or fails to connect, this guide walks you through step-by-step solutions. You’ll learn how to troubleshoot connectivity, software conflicts, label jams, and more, so you can get your Dymo label printer printing again in minutes.
Check Physical Connections
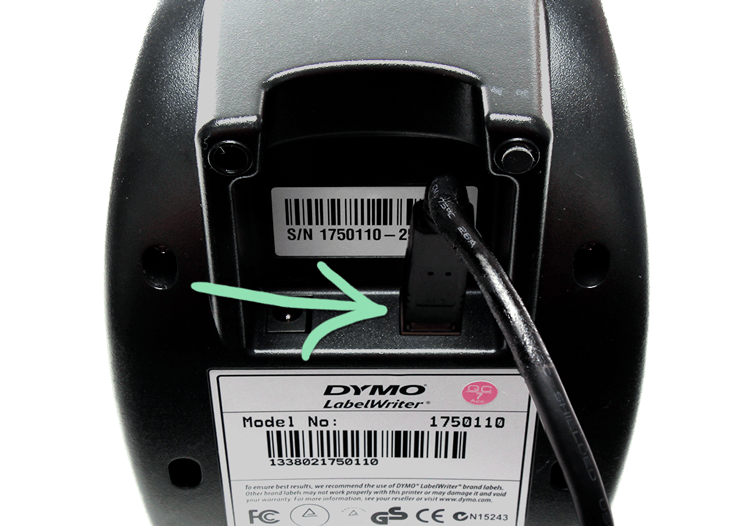
Before diving into software fixes, confirm your Dymo label printer is physically ready to work. A loose cable or power issue is often the root cause of a Dymo label printer not printing.
Secure the USB Connection
• Unplug and reconnect the USB cable from both the printer and computer
• Try a different USB port, preferably a USB 2.0 or 3.0 port directly on your computer, not a hub
• Use the original USB cable that came with your Dymo printer, since third-party cables may not support data transfer
Verify Power and Status Lights
• Ensure the printer’s power light is on. If not, check the power adapter and outlet
• For models like the Dymo LabelWriter 4XL, a blinking light may indicate an error. Refer to the user manual for blink codes
• If the printer has a reset button, press and hold it for 5 seconds, then try printing again
Confirm the Printer Is Selected Correctly
Even if connected, your computer might not be sending print jobs to the right device.
Select the Right Printer in Software
- Open the Dymo Label software.
- Go to File > Print and check the printer name in the dropdown.
- Make sure your Dymo model is selected, not a PDF or other printer.
Set as Default Printer (Optional)
Setting the Dymo as your default printer prevents accidental jobs from going to the wrong device.
• Windows: Go to Settings > Devices > Printers & scanners, select your Dymo printer, and click Set as default
• Mac: Open System Settings > Printers & Scanners, right-click the list, and choose Set as Default Printer
Install or Reinstall Dymo Software
Outdated or corrupted software is a leading cause of a Dymo label printer not printing.
Download the Latest Dymo Software
- Visit dymo.com/support/software.
- Download the Dymo Label Software for your operating system (Windows or Mac).
- Run the installer as an administrator (right-click > Run as Admin on Windows).
Reinstall if Already Installed
- Uninstall current software:
• Windows: Go to Apps & Features, find “Dymo Label Software,” and uninstall
• Mac: Drag the Dymo app to Trash and delete related files in/Library/Printers/ - Restart your computer.
- Reinstall the latest version from the Dymo website.
After reinstalling, reconnect the printer and test a label.
Clear Print Queue and Reset the Printer
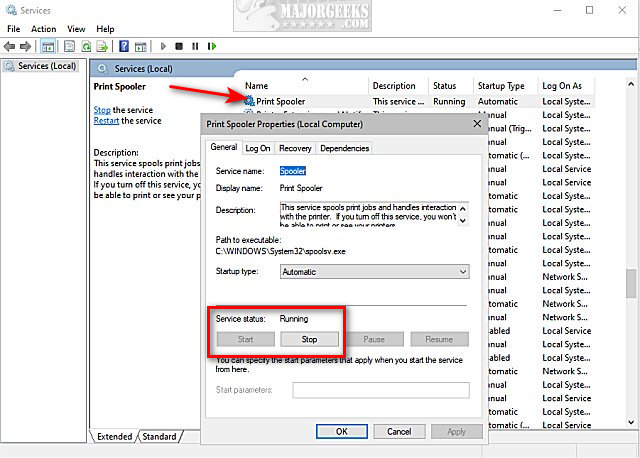
A backed-up print queue can block new jobs, even if the printer appears idle.
Stop and Restart Print Spooler (Windows)
- Press Windows + R, type
services.msc, and press Enter. - Find Print Spooler, right-click, and select Stop.
- Go to
C:\Windows\System32\spool\PRINTERSand delete all files. - Return to Services and Start the Print Spooler again.
Now try printing a test label.
Restart Printer and Computer
• Turn off the Dymo printer and unplug it for 30 seconds
• Restart your computer
• Reconnect the printer and power it back on
• Open Dymo software and attempt a print job
This simple reset resolves many temporary glitches that cause a Dymo label printer not printing.
Test for Label and Ribbon Issues
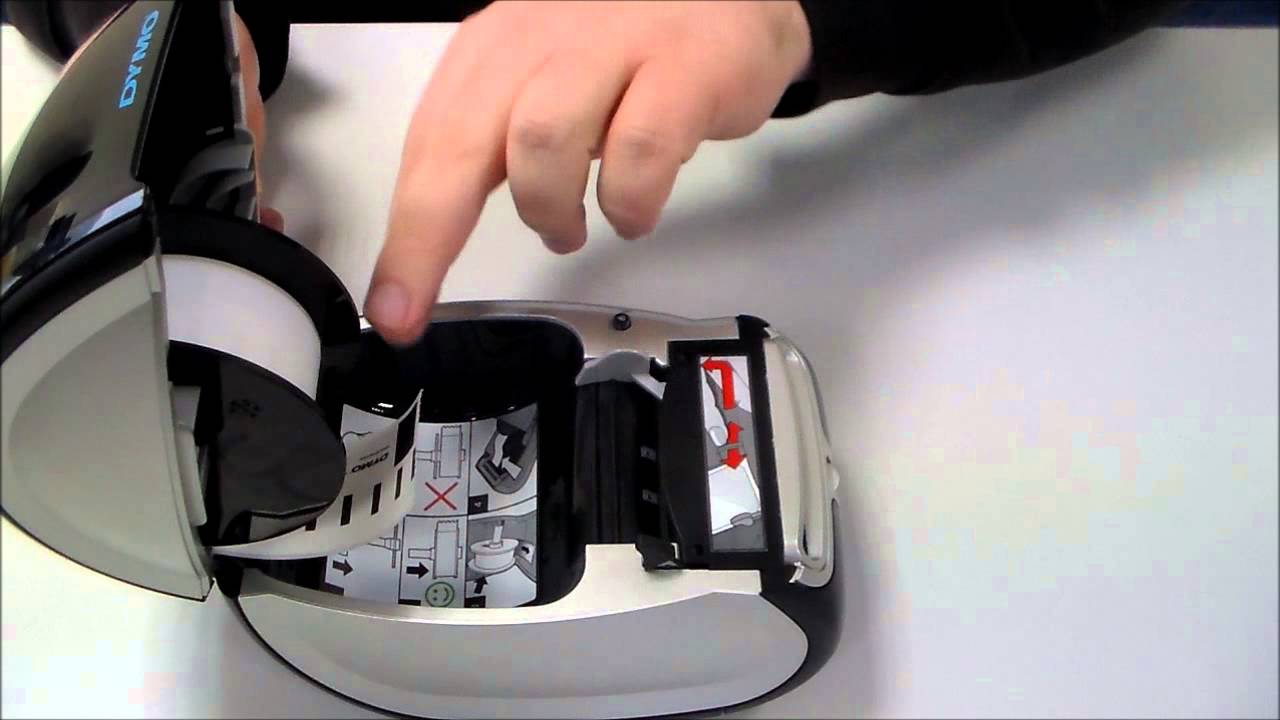
If the printer runs but produces blank or smudged labels, the problem may be media-related.
Check Label Roll Installation
• Open the printer lid and ensure the label roll is loaded with the label side facing up
• The leading edge should feed smoothly into the printer without resistance
• Replace the roll if labels are creased, wrinkled, or stuck together
Inspect Thermal Ribbon (If Applicable)
• Some Dymo models (e.g., Dymo 330T) use thermal transfer ribbons
• Open the ribbon compartment and check if the ribbon is broken, tangled, or depleted
• Replace with a genuine Dymo ribbon cartridge if worn
Clean Print Head and Rollers
Dirty components can prevent proper printing.
- Power off the printer.
- Use a dry, lint-free cloth to wipe the print head (metal roller inside).
- Gently clean the feed rollers with the same cloth.
- Avoid alcohol or cleaners unless specified in your manual.
Wait 10 minutes for any residue to dry before powering back on.
Fix Driver and System Conflicts
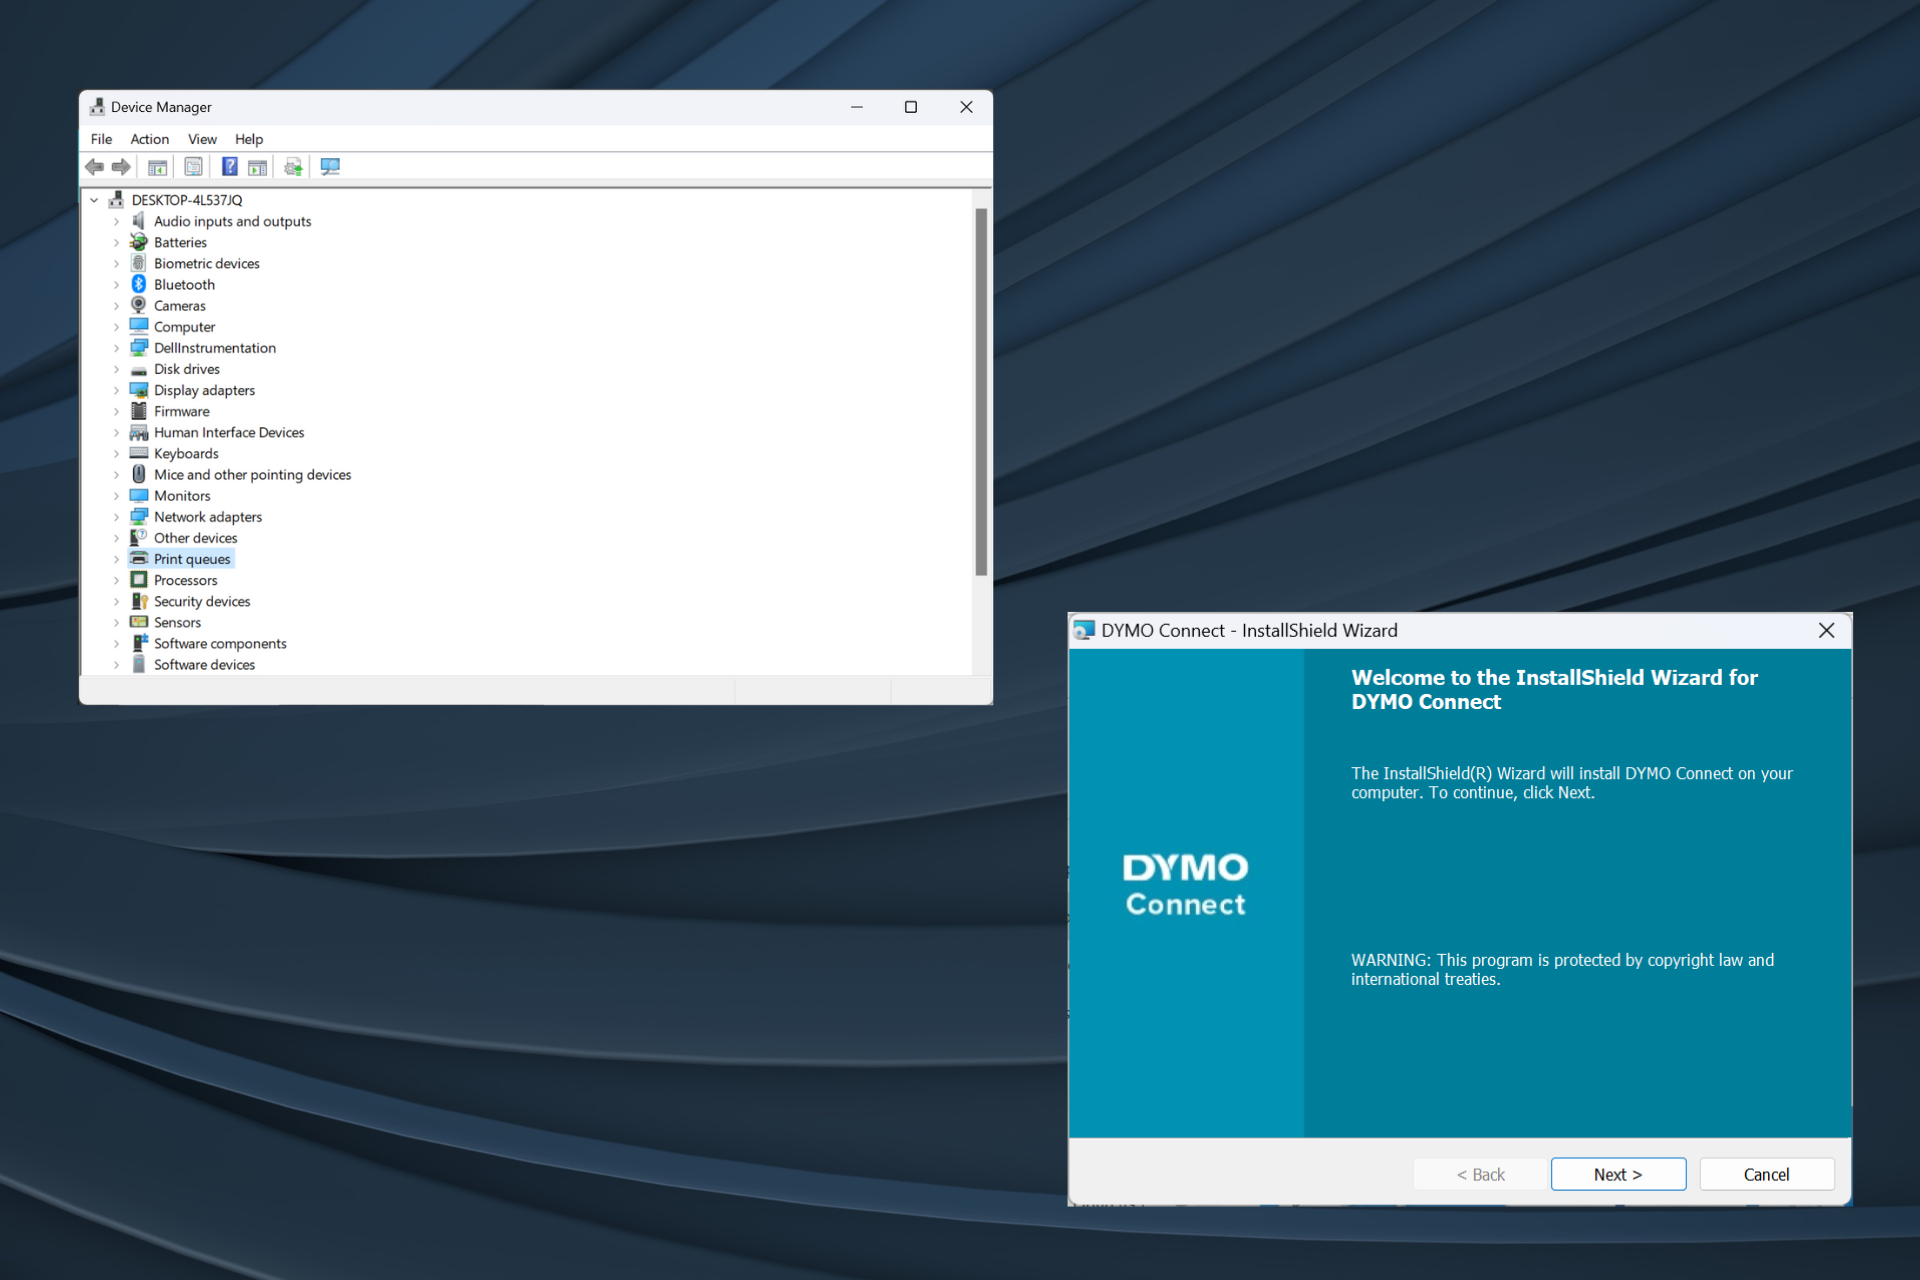
Sometimes, the operating system fails to recognize the printer, even if it’s connected.
Update or Reinstall Printer Driver
Windows:
1. Open Device Manager (right-click Start button).
2. Expand Printers, right-click your Dymo model, and select Update driver.
3. Choose Browse my computer > Let me pick, then reinstall from downloaded software.
Mac:
1. Go to System Settings > Printers & Scanners.
2. Remove the Dymo printer, then click + to re-add it using the correct driver.
Check for OS Compatibility
• Older Dymo printers may not support the latest macOS or Windows updates
• Visit dymo.com/support and verify your model’s compatibility
• If unsupported, consider upgrading to a newer Dymo LabelWriter model
Run a Test Print
After applying fixes, confirm the printer works.
Print a Test Label
- Open Dymo Label Software.
- Create a new label and type “Test.”
- Click Print and watch for output.
If it prints, save the label as a template for future checks. If not, proceed to advanced troubleshooting.
Troubleshoot Network and Shared Printers
If using a shared or network-connected Dymo printer, extra steps apply.
Enable Printer Sharing
On the host computer where the printer is plugged in, ensure sharing is enabled.
• Windows: Go to Settings > Printers & scanners > Your Dymo printer > Printer properties > Sharing > Share this printer
• Mac: System Settings > Printers & Scanners > Right-click printer > Share
Connect from Another Computer
On the client machine, add the shared printer:
• Windows: Add a printer > “Connect to a network printer” > select the shared Dymo
• Mac: Click + in the Printers list > choose the shared printer from the network
Shared printers may require user permissions or firewall adjustments.
Prevent Future Dymo Label Printer Not Printing Issues

Keep your Dymo printer reliable with simple maintenance habits.
Update Firmware Regularly
- Open Dymo Label Software.
- Go to Help > Check for Updates.
- Install any available firmware updates. They often fix bugs and improve stability.
Use Genuine Dymo Labels
• Third-party labels may not trigger the printer’s sensor correctly, causing “no print” errors
• Dymo printers use optical sensors to detect label gaps. Off-brand rolls may have inconsistent spacing
• Stick with Dymo-approved labels for best results, since only Dymo-approved labels are recommended for optimal performance
Clean Monthly
• Power down and wipe the print head and rollers once a month
• Store labels in a cool, dry place to prevent sticking or curling
Frequently Asked Questions About Dymo Label Printer Not Printing
Why is my Dymo label printer not printing anything?
The most common causes are a loose USB connection, outdated Dymo software, or a stuck print queue. Start by checking the cable, restarting the printer and computer, and reinstalling the latest Dymo Label Software.
How do I fix a Dymo printer that prints blank labels?
Blank labels usually mean a dirty print head, an empty ribbon, or a misaligned label roll. Clean the print head with a dry, lint-free cloth and verify the roll is loaded with the label side facing up.
What should I do if my computer doesn’t detect the Dymo printer?
Try a different USB port, use the original cable, and restart both devices. If detection still fails, reinstall the Dymo software and update the printer driver through Device Manager.
Can I use non-Dymo labels in my Dymo printer?
Off-brand labels may not trigger the optical sensor correctly due to inconsistent spacing. Only Dymo-approved labels are recommended for optimal performance and to avoid feeding errors.
How do I update firmware on a Dymo label printer?
Open the Dymo Label software and navigate to Help > Check for Updates. Install any available firmware updates, which often fix bugs that prevent printing.
Where can I get help if my Dymo printer still won’t print?
Contact Dymo Customer Support at 1-800-346-9466 (U.S. & Canada), email support@dymo.com, or use live chat on the Dymo website during business hours.
Key Takeaways for Fixing a Dymo Label Printer Not Printing
A Dymo label printer not printing is usually fixable in under 20 minutes. Start with the simplest checks: secure cables, confirm power, and restart both the printer and computer. If that fails, reinstall the Dymo Label Software, clear the print queue, and clean the print head. Using genuine Dymo labels and keeping firmware updated will prevent most future issues.
If problems persist after these steps, reach out to Dymo Support at 1-800-346-9466 or visit dymo.com/support for live assistance. Getting your printer back online quickly means less downtime and smoother operations for your business.