Zebra printer troubleshooting often starts with a blinking light or a faded label that stops your workflow. Whether you manage a warehouse or a retail floor, these interruptions demand immediate attention to keep operations moving.
This guide provides direct steps to diagnose status lights, restore print clarity, and fix connection errors. You will learn specific reset procedures and maintenance tips to resolve most problems in minutes.
Decode Zebra Status Light Patterns

The status light on your device acts as the primary diagnostic tool for identifying current operational states. Interpreting these colors correctly allows you to isolate issues before attempting complex repairs.
What Does a Solid Green Light Mean?
A solid green indicator confirms the printer is powered, initialized, and ready to receive data. If jobs do not print despite this signal, check your computer driver settings or the print queue for errors.
Why Is My Light Blinking Yellow?
This signal indicates a recoverable error requiring your attention. Common triggers include media jams, ribbon supply issues, or incorrect loading.
* Open the print head cover
* Remove any stuck labels or ribbon
* Reload media correctly and close the lid
* Press the feed button to resume
How to Fix a Solid Red Light Error
A solid red light signals a critical failure where the unit cannot operate. This often points to hardware faults or corrupted firmware files.
1. Power off the device completely.
2. Wait 30 seconds before restarting.
3. If the light remains red, perform a factory reset.
What Does a Blinking Red Light Indicate?
This pattern suggests communication failures between the printer and your host system. Verify that all USB, Ethernet, or serial cables connect securely at both ends. Ensure your computer recognizes the device in the system settings.
When Is a Blinking Green Light Normal?
Brief blinking occurs during initialization or self-tests. If the light blinks continuously for over a minute, the printer may be stuck in a boot loop. Perform a hard reset by unplugging the power for 30 seconds.
Resolve Power Failure Symptoms Quickly
When your Zebra printer shows no signs of life, the issue often lies in the power delivery chain rather than internal failure. Follow these steps to rule out external factors first.
Verify Your Electrical Outlet Function
Plug a different device like a lamp into the same outlet to confirm it works. If the second device fails to power on, the issue is with your building’s electricity, not the printer.
Inspect Cables and Adapters for Damage
Examine the power cord and adapter closely for fraying, kinks, or bent pins. Ensure the connection fits tightly at both the wall outlet and the printer input port.
Perform a 30-Second Hard Reset
This step clears minor electronic glitches that may prevent startup.
1. Unplug the printer from the power source.
2. Wait exactly 30 seconds to allow capacitors to discharge.
3. Plug the unit back in and attempt to power on.
Identify Internal Component Failures
If the printer remains unresponsive after checking the outlet and resetting, internal components may be faulty. Suspect the power supply unit or circuit board if no lights appear.
Eliminate Faint Smudged or Streaky Prints
Poor print quality disrupts scanning and compliance. Specific visual defects point directly to distinct causes you can fix with targeted adjustments.
Correcting Faint or Faded Labels
Faded text usually results from low ribbon supply or insufficient print density settings. Replace the ribbon cartridge if it is near empty and increase the darkness setting in your driver.
* Use high-quality compatible media
* Adjust darkness incrementally
* Avoid setting density to maximum to save printhead life
Fixing Smudged or Blurry Text
Smudging occurs when excessive heat melts the label surface during printing. Lower the print density setting and reduce the print speed to decrease heat application. Ensure you are not using Direct Thermal labels in Thermal Transfer mode.
Solving Incomplete or Truncated Prints
Missing text or graphics often stem from incorrect media length settings in your software. Verify that the digital label dimensions match the physical stock loaded in the printer. Run a manual media calibration to realign the feed.
Removing Ghosting and Vertical Streaks
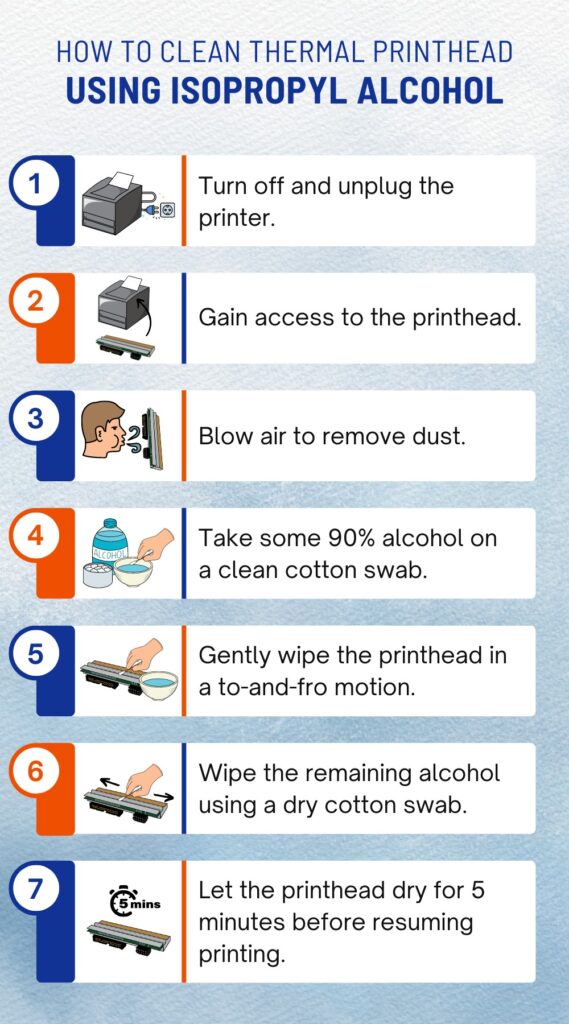
Streaks or repeated faint images indicate a dirty or damaged printhead. Clean the printhead gently with a lint-free swab and isopropyl alcohol.
* Power off the device
* Wipe the heating element width-wise
* Dry with a clean swab before closing
Calibrate Media and Align Labels Accurately
Misaligned printing causes labels to cut off or feed incorrectly. Calibration teaches the printer exactly where each label starts and stops.
Execute Manual Media Calibration
This process forces the printer to detect label gaps automatically.
1. Load fresh media and close the print head.
2. Press and hold the Feed button for 3 seconds.
3. Wait for the printer to feed several labels and beep.
4. Confirm the status light turns solid green.
Enable Auto-Sense Detection
Some models allow automatic gap detection through the menu system. Navigate to Maintenance then select Media Calibration to enable auto-sense features. The printer will feed media and detect spacing without manual button presses.
Clean the Media Sensor Lens
Dust or adhesive buildup on the sensor causes skipped labels or false jam errors. Use compressed air or a dry lint-free swab to clean the sensor area gently. Avoid touching the lens with your fingers to prevent oil transfer.
Match Software Settings to Physical Stock
Digital settings must align with physical media to prevent alignment failures. Verify the label width, length, and sensor type in your driver match the loaded roll. Mismatched settings cause the printer to misread label boundaries.
Restore Connectivity and Communication Links
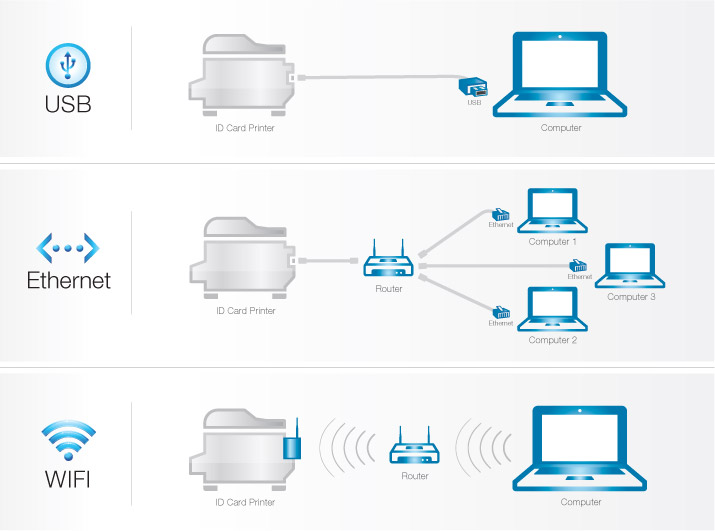
A disconnected printer halts operations even if the hardware functions perfectly. Start with physical connections before moving to network configurations.
Check Physical Cable Connections
Loose or damaged cables are the most common cause of communication errors.
* Try a different USB or Ethernet cable
* Plug directly into the computer rather than a hub
* Ensure Ethernet cables click securely into place
Troubleshoot Wireless Network Issues
Wi-Fi dropouts often occur in environments with high interference. Print a network configuration page to check your signal strength and IP address. Reconnect to the correct SSID if the printer has switched networks.
Restart Network Infrastructure
Sudden outages often resolve by rebooting network devices. Power cycle your router and switch, wait 60 seconds, and then restart the printer. This refreshes DHCP leases and clears routing errors.
Update Drivers and Firmware Files
Outdated software causes silent failures and compatibility issues. Uninstall your current driver and download the latest version from the official support site. Send firmware updates via USB or FTP to fix known bugs.
Utilize Feed Button Diagnostic Functions
The feed button serves as a powerful diagnostic tool beyond simply advancing labels. Knowing these combinations saves time during troubleshooting.
Advance One Label with Short Press
Press the button for about one second to feed a single label forward. This helps align media after loading or clear partial jams manually.
Trigger Self-Test with Long Press
Hold the feed button for three seconds to print a configuration page. This report displays firmware versions, sensor readings, and current settings for review.
Switch Print Modes with Double Press
On dual-mode printers, pressing the button twice toggles between Direct Thermal and Thermal Transfer modes. The LED indicator confirms the active mode change.
Power Off Safily with Five Second Hold
Holding the feed button for five seconds shuts down the printer safely on models without a power switch. This prevents data corruption during configuration changes.
Run Built-In Diagnostic Test Procedures
Zebra printers include internal tools to isolate hardware faults without external software. Use these tests to verify component health.
Print Configuration Sheet Details
Hold the feed button while powering on to print a detailed configuration sheet. Compare the printed serial number and memory status against your expected values.
Perform Printhead Element Test
Run the print head test via the menu to identify dead heating elements. The resulting pattern reveals missing lines or uneven bars that indicate wear.
Test Media and Ribbon Sensors
Activate sensor test mode to verify automatic detection works correctly. Insert and remove labels or ribbon to watch for immediate sensor response lights or tones.
Execute Factory Default Reset Protocols
Resetting clears configuration errors and restores stability when settings become corrupted. Use the correct reset type for your specific situation.
Perform Full Factory Default Reset
Use this when the printer ignores commands or you inherit a used device.
1. Power off the printer completely.
2. Press and hold the Feed button.
3. Power on while holding the button.
4. Release when the status light turns solid green.
When to Use Hard Reset Instead
A hard reset clears temporary memory without erasing settings. Use this for frozen lights or minor communication glitches. Unplug the power, wait 30 seconds, and plug it back in.
Identify Signs Needing Professional Repair
Not every issue resolves with home troubleshooting. Recognizing hardware failure prevents further damage and wasted time.
Recognize Critical Hardware Failures
Seek professional help if the printer fails to power on after all checks. Visible scratches on the printhead, cracked rollers, or burning smells indicate internal damage.
Understand Warranty and Repair Facts
Third-party repair does not automatically void your warranty under federal law. Ensure repairs do not tamper with serial numbers or proprietary firmware to maintain coverage.
Extend Printer Lifespan with Care
Regular maintenance extends device life significantly. Clean the printhead weekly, update firmware quarterly, and use only compatible media to ensure years of reliable service.
Frequently Asked Questions About Zebra Printer Troubleshooting
How do I fix a Zebra printer that is blinking red?
A blinking red light indicates a communication error. Check all cable connections, ensure the printer appears in your device manager, and update the firmware if the connection remains unstable.
Why are my Zebra labels printing faintly?
Faint prints usually result from low ribbon supply or low darkness settings. Replace the ribbon if needed and increase the print density in your driver settings.
How do I calibrate my Zebra printer manually?
Press and hold the feed button for three seconds until the printer feeds several labels and beeps. This forces the device to detect label gaps and align the media correctly.
What does a solid green light mean on a Zebra printer?
A solid green light means the printer is fully operational and ready to receive print jobs. If nothing prints, check your computer’s print queue or driver settings.
How do I reset my Zebra printer to factory defaults?
Power off the unit, hold the feed button, and turn the power back on. Keep holding the button until the light turns solid green to complete the reset.
Why is my Zebra printer not connecting to Wi-Fi?
Verify the SSID and signal strength by printing a network configuration page. Restart your router and ensure the printer firmware is up to date to resolve connectivity issues.
Key Takeaways for Effective Zebra Printer Troubleshooting
Most Zebra printer issues resolve through simple steps like interpreting status lights, cleaning sensors, or recalibrating media. Regular maintenance and correct driver settings prevent the majority of printing errors before they disrupt your workflow.
Start with basic power cycles and cable checks before attempting complex resets. If hardware components like the printhead show physical damage, contact professional support to avoid voiding your warranty or causing further failure.