You’ve checked the ink levels and your printer shows full cartridges, yet pages come out blank, streaky, or missing colors entirely. This confusing issue affects many HP printer owners and can happen even with brand new ink installed. The cause is rarely empty cartridges and usually points to clogged nozzles, misaligned printheads, or communication errors between the cartridge and printer.
The good news is that most fixes take less than 30 minutes and require no technical training. This guide walks you through every proven solution for when your printer has ink but not printing. You’ll learn how to clean printheads, align cartridges, reset ink detection, clear print queues, and identify hardware faults that block ink flow.
By the end, you’ll understand exactly why your printer ignores full cartridges and how to restore sharp, complete prints without visiting a repair shop.
Reinstall Ink Cartridges Correctly
Even with ink present, cartridges that sit loosely or retain protective tape will not print. Proper seating ensures electrical contacts align and ink can flow.
Remove and Reseat Each Cartridge
- Turn on the printer and open the cartridge access door.
- Wait for the carriage to stop moving completely.
- Gently press down on each cartridge to release it, then pull it out.
- Check the bottom for orange or clear plastic tape and remove it if present.
- Slide each cartridge back into its matching color slot until it clicks.
- Close the door and wait 30 seconds for the printer to recognize the cartridges.
Pro Tip: Hold cartridges with both hands during insertion to prevent tilting, which can damage the contacts.
Confirm Cartridge Compatibility
Wrong cartridge models trigger recognition errors that block printing.
- Match the exact number printed on your old cartridge (such as HP 305 or HP 963).
- Avoid mixing original HP ink with third-party alternatives in the same printer.
- Check the expiration date on the box and replace any cartridges past that date.
Run the Printhead Cleaning Cycle

Clogged nozzles are the leading reason ink stays in the cartridge while pages come out blank. Dried ink blocks the tiny holes that spray ink onto paper.
Clean Printheads Through HP Smart App
- Open the HP Smart app on your phone or computer.
- Select your printer from the device list.
- Tap Printer Maintenance or Advanced Settings.
- Choose Clean Printheads and start the first-level cleaning.
- Print a diagnostic test page to check the results.
Clean Printheads From the Control Panel
- Press the Setup button (wrench icon) on your printer.
- Navigate to Tools or Printer Maintenance.
- Select Clean Printhead or Clean Cartridges.
- Choose Black only, Color only, or Both depending on your issue.
- Wait for the printer to complete the cycle and print a test page.
Warning: Do not run more than three cleaning cycles back to back. Excessive cleaning wastes ink and can worsen clogs by pushing dried ink deeper into nozzles.
Interpret the Test Page Results
Look at the pattern printed after cleaning:
- Solid black or color bars mean the printhead is working.
- Gaps or thin streaks indicate partial clogs that need another cleaning.
- Completely blank sections signal severe blockages requiring deep cleaning or manual intervention.
Align and Calibrate the Printhead
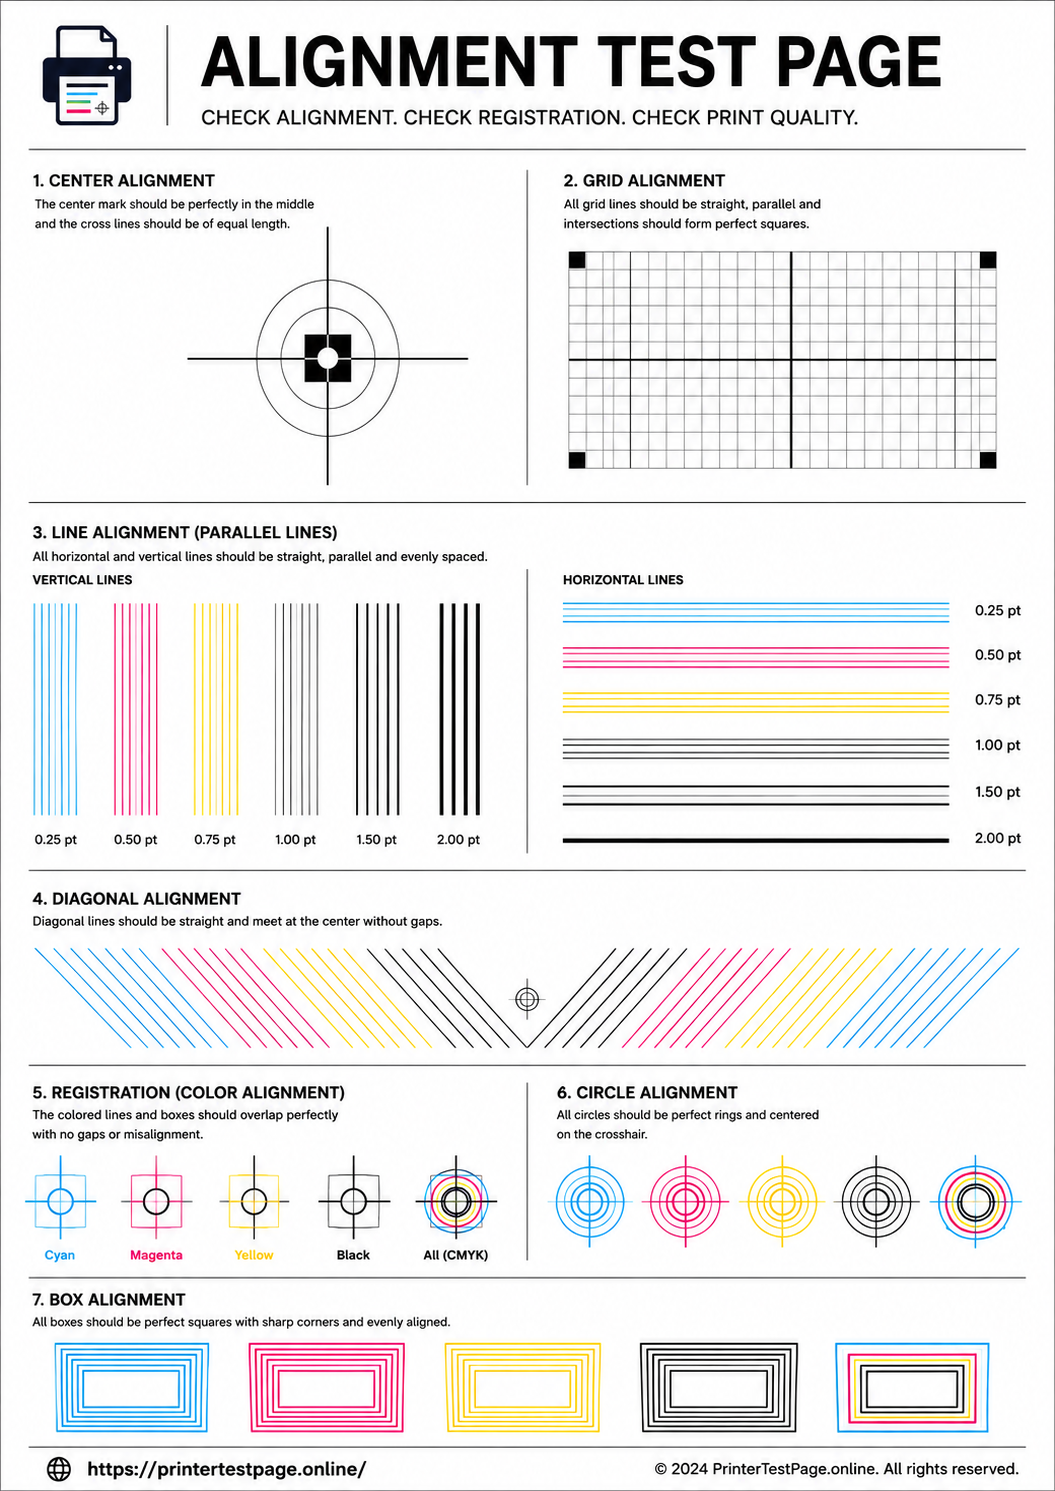
Misaligned printheads spray ink beside the paper or in the wrong positions, creating the illusion of missing ink. Calibration forces the printer to recalibrate nozzle positions.
Run Automatic Alignment
- Load plain A4 or letter paper into the main tray.
- Press Setup on the control panel.
- Navigate to Tools and select Align Cartridges or Align Printhead.
- Press OK to start the alignment process.
- The printer prints a test sheet, then scans it automatically.
- Wait for the confirmation message on the display.
Perform Manual Alignment Through Software
- Open HP Smart and select your printer.
- Go to Printer Settings and find Print Quality Tools.
- Choose Align Printhead and print the alignment page.
- Identify the straightest pattern in each row and note its number.
- Enter the numbers in the software to save the alignment.
Verify Print Settings and Update Drivers
Software settings can override hardware and stop ink from printing even when everything else works correctly.
Check Active Print Preferences
- Open any document and press Ctrl+P (Windows) or Cmd+P (Mac).
- Click Printer Properties or Preferences.
- Go to the Paper or Quality tab.
- Make sure Print in Grayscale is unchecked for color prints.
- Confirm the paper type matches what you loaded.
- Set print quality to Normal or Best instead of Draft.
Update the Printer Driver
- Open HP Smart and tap your printer.
- Look for Check for Updates or Advanced Settings.
- Install any firmware or driver updates available.
- Restart the printer after the update completes.
Reinstall the Driver on Windows
- Press Windows key + R and type appwiz.cpl.
- Find your HP printer in the list and select Uninstall.
- Restart your computer.
- Visit the official HP support website and search for your model.
- Download the latest full driver package and install it.
Clear the Print Queue and Power Cycle the Printer
Stuck print jobs fill the printer’s memory and block new commands, making it appear that ink is not reaching the page.
Cancel All Pending Print Jobs
On Windows:
1. Press Ctrl + Shift + Esc to open Task Manager.
2. Click the Services tab and find Print Spooler.
3. Right-click and select Stop.
4. Open File Explorer and go to C:\Windows\System32\spool\PRINTERS.
5. Delete every file inside that folder.
6. Return to Task Manager and start Print Spooler again.
On Mac:
1. Open System Settings and select Printers and Scanners.
2. Click your printer and choose Open Print Queue.
3. Click Cancel All to remove stuck jobs.
Power Cycle the Printer
- Turn off the printer using the power button.
- Unplug the power cord from the wall outlet.
- Disconnect any USB cables connected to your computer.
- Wait at least 60 seconds to drain residual power.
- Plug the cord back in and turn the printer on.
- Wait for the initialization sounds to finish before printing.
Manually Inspect for Clogged Nozzles
When automatic cleaning fails, a hands-on check reveals whether the cartridge or the printhead is the problem.
Test the Cartridge Nozzles Directly
- Turn off the printer and open the cartridge access door.
- Remove the cartridge showing issues.
- Place a folded lint-free cloth on a flat surface.
- Press the nozzle end of the cartridge firmly onto the cloth for two seconds.
- Lift the cartridge and check the cloth for wet ink marks.
A wet mark means the cartridge is functional and the problem lies in the printer’s internal printhead. A dry cloth confirms the cartridge nozzles are clogged.
Soak Severely Clogged Nozzles
- Pour warm distilled water into a shallow dish (never tap water, which contains minerals).
- Place the cartridge with the nozzle end down into the water.
- Submerge only the nozzle area, about half an inch deep.
- Let it soak for 5 to 10 minutes.
- Remove the cartridge and blot the nozzles with a lint-free cloth.
- Reinstall the cartridge and run one cleaning cycle.
Warning: Never submerge the entire cartridge. The electronic contacts and circuit board will short out if they get wet.
Replace Faulty Cartridges and Reset Ink Detection
Sometimes full cartridges fail electronically even when they contain ink. Testing with a known-good cartridge confirms whether replacement is needed.
Test With a Spare Cartridge
- Install a cartridge from a working printer or a new unopened box.
- Print a test page.
- If the new cartridge prints normally, the original cartridge is defective.
- If the issue persists, the problem lies in the printer hardware itself.
Reset Ink Cartridge Protection
Some HP printers lock out cartridges they cannot authenticate.
- Turn on the printer with cartridges installed.
- Press and hold the Cancel and Resume buttons together for 10 seconds.
- Release the buttons when the display blinks or resets.
- Wait for the printer to restart and recognize the cartridges.
- Try printing a test page.
On newer HP models, you may need to access the Service menu through Setup and select Restore Defaults to clear cartridge locks.
Prevent Future Ink Printing Issues
Regular maintenance keeps ink flowing smoothly and prevents the recurrence of “printer has ink but not printing” problems.
Print at Least Once Per Week
Ink dries inside nozzles during long periods of inactivity. Printing a single page every week keeps the ink moving and prevents clogs from forming.
Store Unused Cartridges Properly
- Keep cartridges sealed in their original packaging until needed.
- Store them upright in a cool, dry location away from direct sunlight.
- Use opened cartridges within six months for best results.
Use Genuine HP Ink
Third-party cartridges often lack the anti-clog coatings and firmware chips found in original HP products. Genuine cartridges are engineered to work seamlessly with your printer’s cleaning cycles and ink monitoring system.
Frequently Asked Questions About Printer Ink Issues
Why does my printer show full ink but print blank pages?
The most common cause is clogged printheads, which block ink from reaching the paper even when cartridges are full. Running a printhead cleaning cycle usually restores ink flow within minutes.
Can I fix a printer that has ink but is not printing without buying new cartridges?
Yes, in most cases. Cleaning cycles, printhead alignment, driver updates, and print queue resets solve the majority of these issues without requiring replacement cartridges.
How many times should I run the printhead cleaning cycle?
Run the cleaning cycle once and test the results. If the test page still shows gaps, run a second cycle. Avoid more than three consecutive cleanings, as this wastes ink and can worsen clogs.
Does using non-HP ink cause printing problems?
Non-HP cartridges can trigger recognition errors, clog more easily, and fail to communicate properly with the printer. Genuine HP cartridges include anti-clog technology and proper firmware that prevent most ink flow issues.
How long does it take to unclog a printer printhead?
A standard cleaning cycle takes 1 to 2 minutes, while deep cleaning can take up to 5 minutes. Stubborn clogs may require 2 to 3 cycles spaced 15 minutes apart to allow the cleaning fluid to dissolve dried ink.
Key Takeaways for Restoring Ink Flow on Your HP Printer
A printer with ink but not printing is almost always fixable at home using the steps above. Start with the simplest solutions first: reseat the cartridges, run a cleaning cycle, and check your print settings. Most users see results within the first three steps.
If those steps fail, move to print queue resets, driver updates, and manual nozzle inspection. Reserve cartridge replacement for cases where testing confirms the cartridge itself is defective. Regular weekly printing and genuine HP ink prevent the majority of future ink flow problems.
When all else fails, contact HP Support with your printer model number ready. They can run advanced diagnostics and identify hardware faults that software troubleshooting cannot detect.